


Nebby
-
Posts
2,428 -
Joined
-
Last visited
-
Days Won
4
Content Type
Profiles
Forums
Events
Posts posted by Nebby
-
-
I haven't played with a lathe yet, just another tool I must learn to use
 That wood sure looks nice!
I checked out a local woodworker's shop and oogled the awesome Japanese hand planes and hand saws. I'll have to take pictures next time but all of them were hand made and were simply awesome.
-
-
I've never seen nor worked with teak before, time to google it.
-
Ah hell real men snort Cocobolo dust.
Hell yeah! Followed by huffing some paint fumes for added effect

-
Ah, can't believe I missed that item! That's the exact store I bought my glue and softener from.
Here's the test piece coated with two coats of semi-flat deft clear lacquer (unsanded)
-
Try out some satin or semi-flat finish lacquer, they are much accomodating with grain edges
-
I also love the great feedback you get when working with steel wool, whenever there's bump in the surface or a rough patch on the surface you instantly know. The mess it makes is quite annoying though, especially if you have any large speaker magnets nearby (fuzzy speakers, anyone?)
-
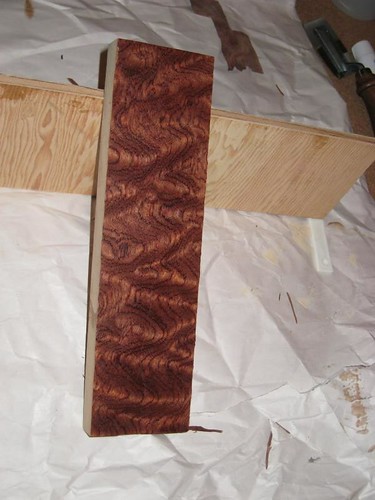
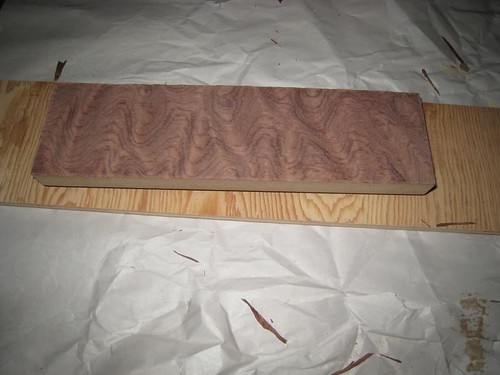
Didn't go into the woodshop, felt too under the weather to trust myself with the project. So instead I did went ahead and tried out a bit of veneering. The veneer I did the test with was a scrap piece of 1/40" figured bubinga.
Main objectives of this test were to find out:
1) How difficult the process is
-not very
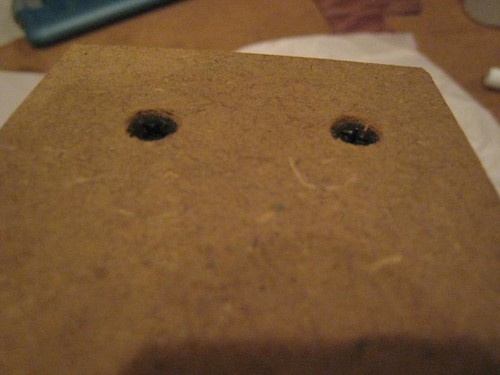
2) If screws or puttied countersinks showed thru the veneer
-1/40" thick veneer I expected they wouldn't, and they don't
3) How hard it is to work with the veneer
-it's a bit tough, sharp tools help; went with a simple score and snap method for removing excess veneer with this test piece, will probably cut it properly with a router on the real thing or 2nd test
4) Overall melt/solidify time for the heat-lock glue
-I used my snowboard wax iron, set to 160C, the glue initially melts/hardens within seconds although the instructions recommend letting it harden for 24hours.
On to the pictures:
Extra countersunk screws
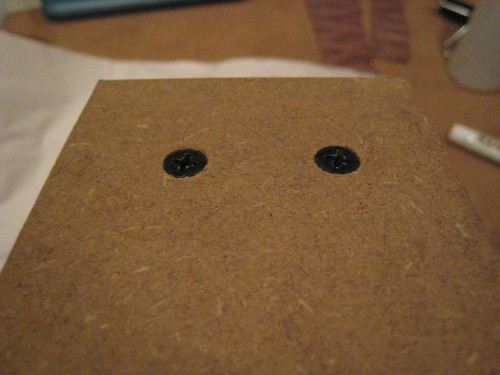
Flush countersunk screws (left one is slightly low)
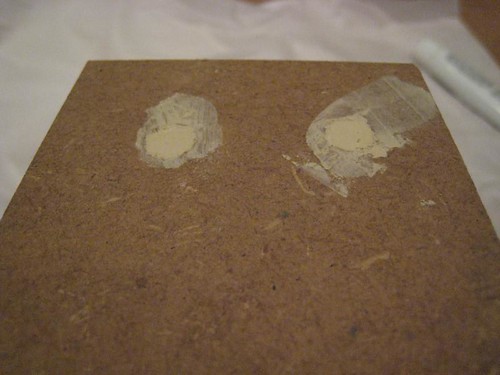
Extra countersunk screws haphazardly puttied
Glue rolled on to both surfaces. You'll notice that the veneer bent quite a bit from the glue. I read in a book that you can prevent this by spraying the opposite side with water to equal the expansion. The book didn't say what would happen if you didn't, so I decided to find out.
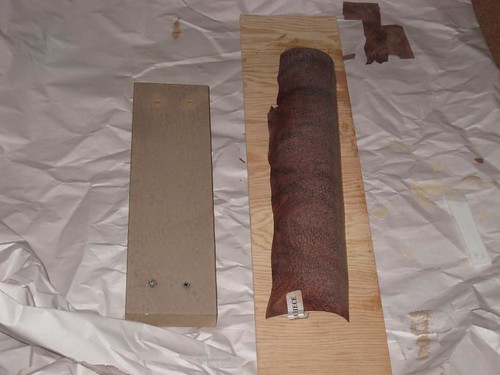
Turns out there's nothing wrong with just letting it dry. I think with a thinner veneer or with veneer that's more unstable you would need to spritz with water, but the bubinga turned out just fine. This is after letting it sit for 30minutes:
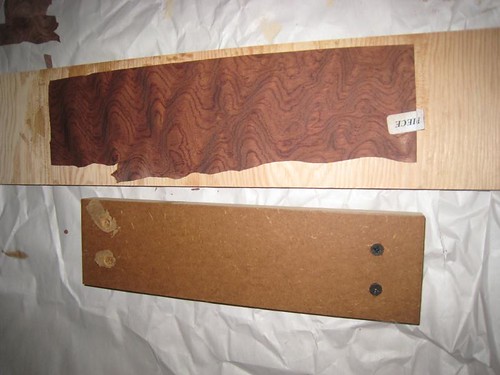
After scoring and snapping off the edges (yes, it was rough but it's just a test) and then doing a quick sanding job with 320grit:
Planning on doing a coat or two of spray lacquer to see how it looks/reacts to a finish tomorrow.
-
I agree that texture is part of the beauty; it definitely is a part of a wood's character. But I think that sometimes smoothing out the surface is needed to match a theme or other components.
-
I'm interested in what others have used also. About the only stuff I've used for that purpose has been sanding sealer, and I'm only quasi-sure that's what it's called because the label is all in japanese
-
Just curious, did you pick up those 12" wide heatsinks through a group buy?
-
I see. It was tough telling how tall they were without a frame of reference
-
There is a group buy going on diyAudio Forums - Aavid Thermalloy Possible Group Buy - Page 1 for some R-theta heatsinks that are somewhat similar, but aside from that you'll need to do as luvdunhill said and buy a ton of extrusion
-
Thanks for taking the time to write all that out luvdunhill. In your testing, what was the distance before inductance wasn't affected by neighboring inductors? The only testing I've seen done has been this link: Placement of coils in crossover networks: Does that mostly match up with your findings?
I have read about capacitor microphonics, but didn't realize it was that noticeable. I think I'll have to do some more reading on that. Perhaps for my next project I'll be using an external crossover!
I'm definitely having fun thinking out the logistics and learning about everything involved with a speaker. Worst case if it doesn't work well I can always make a new enclosure. Afterall, it's not the destination but the journey isn't it?
-
That's basically what I'm hoping to achieve with my bookshelf project, gain some confidence with woodworking.
-
This thread makes me want to build a F5 too. Looks awesome so far!
-
diyAudio Forums - ESS Sabre Buffalo DAC - Page 61
Counterpoint does "sound" subjectively excellent to me. But measurement shows that the noise floor is about 8db higher and the THD similarly higher.
Now I actually feel pretty good about this is it is better than I had hoped.
 And if you blindfolded me and asked me which I were listening to, I doubt I could tell you. So at least its not really "worse".
Counterpoint is also just pretty big.
 Pretty much the same size as the entire new Buffalo32S PCB. Not that this is a key consideration. Just throwing it out there.
I am not very good at subjective lingo.
Hopefully some of you will try Counterpoint out soon and give me your opinion.
Cheers!
Russ
-
Hey thanks for pointing out my mistake there! I did some more reading and found out what I thought was an issue with external xo's was mostly false. I was worried about emi/rfi but that would only really take effect in long runs which wouldn't be the case.
I'm treating this project as a learning experience. Admittedly my own knowledge of the subject is minimal and really only limited to what I've read (including the speaker cookbook...that's one great book)
What are some of the good reasons to do external crossovers? The benefits I can think of moving the XO out of the speaker enclosure:
1) move the XO away from the magnets of the speaker, taking any negative interactions out of the picture
2) If you're playing loud for long periods of time having them external would allow more cooling
3) remove the odd shaped xo from inside the enclosure, though the effect of that can be reduced by putting the xo into a sub-compartment within the enclosure
4) Easier access to the XO for tweaking purposes
5) possible conversion to active crossover (but for a project in this price range I don't think it's worth the hassle)
Possible cons?
1) Separate enclosure required for crossovers
2) Length of the cable from XO might provide more opportunities for emi/rfi, but I would guess that this is a non-issue unless we're talking about very long cables
I would like to keep the speakers one piece though, since I move somewhat often and having extra parts to worry about every move would be a hassle.
-
Russ posted that the counterpoint measured worse than the IVY. I'll try to find out where he said that, but I'll link it when I find it.
-
Who said anything about my DAC box being veneered? I'm crazy, but not THAT crazy
 Speakers = veneered, future DAC box = dovetailed and dado's.
 -
Sinking the screws about 1/32-1/16" below the surface and filling with Durham's Rock Hard Water Putty will work great, although Bondo is perfectly acceptable as well.
Then I'd use a bearing guided straight bit to flush up the top and bottom plates.
I had thought of doing that since I did that for my subwoofer when prepping for paint, but I didn't realize that the screws would show through with veneer! Thanks for the warning AlanY, I'll make sure to put a few screws on my test piece to see how much of an effect it has. The veneer I have also isn't paper backed, so hopefully that helps. I don't have access to that Durham's putty, but I have something that seems to be the Japanese equivalent of Bondo.
Btw, thanks swt for the tip with the dovetails, that makes perfectly good sense!
aerius: I have given external crossovers some thought, but personally I think it's best to keep the cable length between the crossover and the speakers as short as possible so I'm planning on keeping the crossovers internal. Thinking back now I was simply over-thinking the crossover placement, it really won't be much of an issue if at all.
-
I was hoping that was the case, good to hear if I use the plastic piece it won't be detrimental.
04/03/09
More tinkering with the dovetail jig today, got some results I think are acceptable. Other than that I did more measuring and marking on the SR-71, and measured/marked/drilled/etc some more on the ZBM.
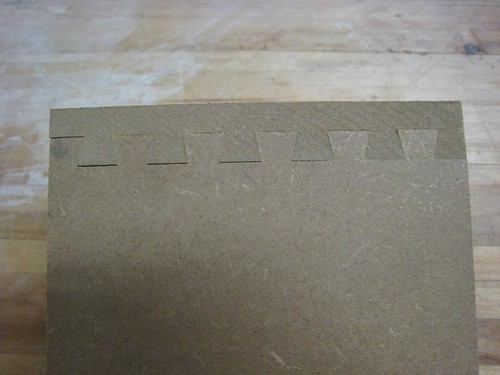
Didn't quite line up the bottom piece correctly, found out the clap tends to raise up the piece by ever so much if you're not careful.
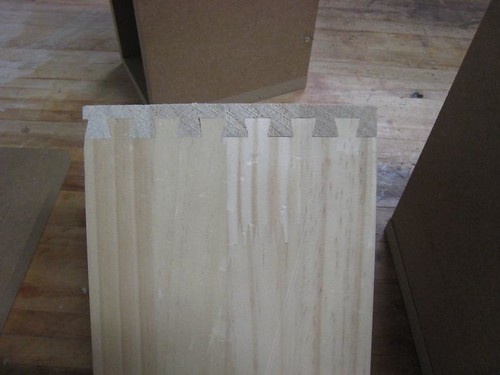
Somewhat happy with this one, any comments?
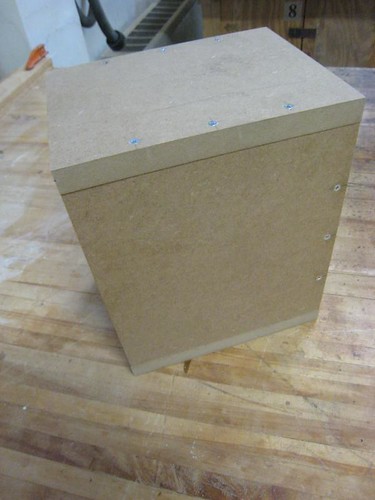
ZBM top and bottom and sides of the rear drilled/countersunk/screwed. It's starting to be a pretty solid enclosure!
I'll be testing out veneering on a scrap piece of MDF this weekend to get a feel for how the glue and softener work.
In other news, I'll be building up a pair of TPA counterpoint boards for my buffalo DAC this weekend. I plan on building a case for the DAC out of wood, with dovetail joints. I'm thinking of making the case two parts, rear panel and bottom one piece and the top/sides/front another piece. Put a dado in the side and front and slide the bottom piece right in, with four screws in the rear securing it in.
-
^just realized half of what I typed made no sense. I apologize for the terrible grammar and wording!
-
I've decided to simplify the bracing and will be going with a single brace made out of 1/2" plywood behind the woofer, and a T brace below the port. Given that it's a .5 cu ft enclosure it won't have too much of an effect. I've checked winisd with the woofer and box size, the effect on the freq response will be minimal.
I see your point on the plastic speaker terminals, but the enclosure is made with 3/4" MDF and as it is right now even unglued, without the front and rear panels mounted it's already quite rigid. I'll concede that I have thought has come across my mind more than once of simply putting binding posts directly in the MDF or using the very slick looking Dayton Al plates.
Thanks for the comments and feedback, gives me food for thought!
 That wood sure looks nice!
 Speakers = veneered, future DAC box = dovetailed and dado's.
Topaz DAC/AMP
in Headphone Amplification
Posted
This definitely bugs me in advertising. "Our product is worth the extra hundred dollars because we spent an extra 25 cents on this part!"