PolloLoco
Members
-
Joined
-
Last visited
-
Unfortunately - this site limited me to a picture of 17kB for the above. I did take a couple side view pictures showing how the yokes rotate past the Stax stop on the cups. But now my limit is 4.23 kB? I apologize for the potentially stupid question - but can someone explain how I can exceed that limit? Can I only add new pictures by deleting the previous ones I've submitted? I don't know if this is against the rules to even mention, but I'm also going to post the larger pictures on Head Fi's Stax thread.
-
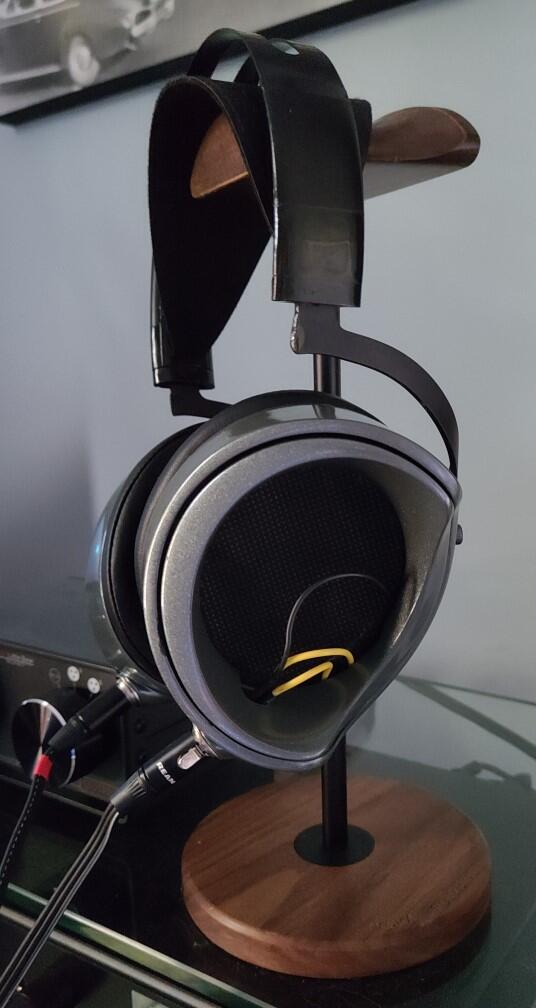
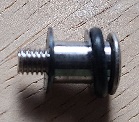
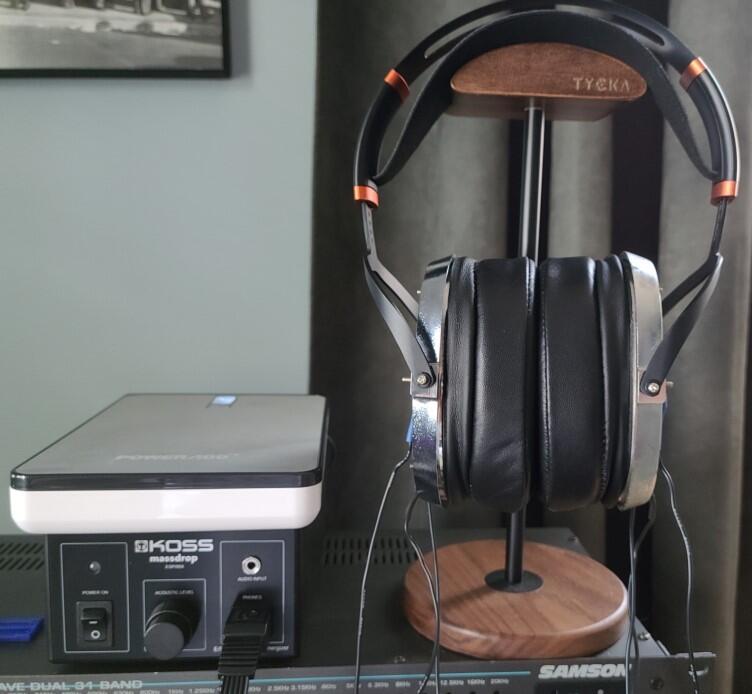
I finally created yokes for my Stax L700 Mk1's that I'm happy with for sound and comfort. I get a great seal and I can move my head freely without the plastic creaking. It took me several attempts to reduce the clamp - and at first I thought I'd gone too far, but for the last month they've been awesome. They're almost as comfortable as my Koss Esp95X - though they sound better. I'd be happy to share the STL I used to get them printed, but I take no responsibility for you damaging your headphones. I think the only risk is that the existing stax bolts are torqued on very tight, using an o-ring for retention. If you're not careful, the screwdriver can slip and cause damage. For that reason I went with countersunk bolts and replaced the o-ring with a nylon washer. The end result spaces the pads out 2CM if hung from a headphone stand. I'm actually now using the wooden Stax stand I have, without fear of wearing out the pads due to the clamp. I had my yokes printed out of vapor polished nylon from Jawstec in the US.
-
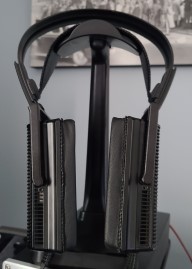
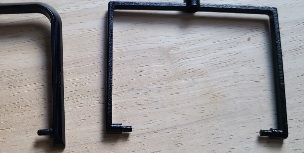
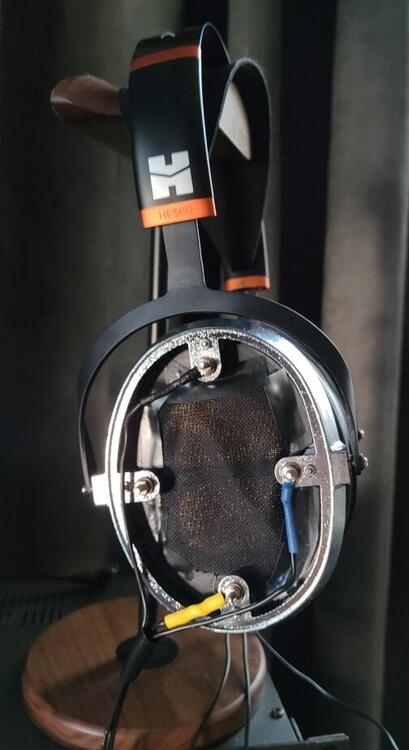
I received my yokes last weekend and they were a successful first test, but I have to revise them. I made them too flimsy. I ordered new ones that are nearly twice as thick and twice as wide, with generous fillets where they won't interfere with the cups. They were printed out of nylon, then vapor polished. That said, the result was extremely comfortable and I get a great seal with the occasional stax fart. Since the stops don't prevent rotation, I could bob my head to the music without the cups squeaking or groaning. That still would happen if the cable pulls on the cups. I'm sharing a picture of what they look like now in comparison to the originals. I'm also showing all the hardware Stax uses to connect the current yokes. It's obvious they were over designed - the yokes and cups free swing around the metal sleeves no matter how much you torque the screws. My only explanation for the stops is that Stax felt having the cups free swing, would look flimsy from a quality standpoint.
-
Thanks for the quick reply. To bypass the stop on the headband and free front to back rotation, I made the top of my yokes round. I'll report back how it works and provide pics if it does.
-
Do the SOCAS yokes include the roughly 5 degree inward angle of the originals to increase clamp? It's unclear from the ad. The headband angles inward, and the original yokes angle in even further. I recently designed my own version to hopefully get rid of the squeaking every time I move my head. But I'm waiting for them to get printed in nylon and shipped before I can suggest if they work. On mine, I removed the inward angle for now so I'll get less clamp. I'm not sure how much effect that will have. I may put the angle back in a second revision. The SOCAS yokes still limit rotation front to back. They seem to keep the "stop" at the top of each cup? On mine, I'm allowing free rotation front to back as well as top to bottom. I'll report back how mine work, but I don't expect to get them until next week.
-
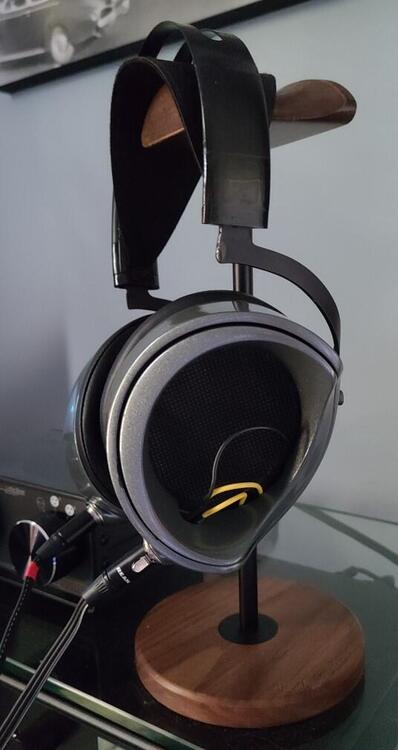
Here's a picture of my finished project. It's been super rewarding. I love the way they look. I had convinced myself that the ESP 6 conversion sounded better than my Koss ESP95X, but after a head to head review - that's definitely not true. Whether closed or open, or with the many different pads I've tried - I've been unable to get meaningful bass out of these. On a different note - I have the nagging feeling that when I went from my jury rigged cables to the removable Kaldas cables, I may have reversed positive and negative wires to each earcup. If so - if the positive wire is going to the back stator and the negative is going to the front stator - would I be able to hear a significant difference?

-
Thank you sir! As usual you're a scholar and a gentleman. I figured that by removing the PCB I divorced the two stators. I just verified it with my voltmeter, they're not connected. Is it possible that one of the stators is grounded, and that that might damage my amp? If so, can I just test by touching each stator with my voltmeter, and checking continuity with the cable? Edit: I just answered my own question. I remembered I had an extra driver, from the first broken pair of Koss ESP6 I had played with. So I busted out my voltmeter to verify that the top and bottom bolts are connected to different stators. The stators are not connected to each other once the PCB is gone. So my amp should be safe. The headphones might eventually die due to the high bias, but thats a risk I'm comfortable with.
-
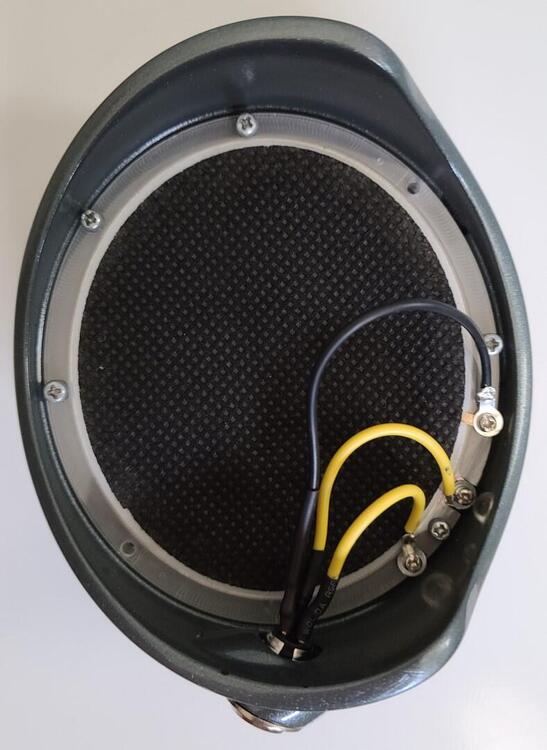
I apologize beforehand if I should have started a new thread, but I figured folks with a Koss ESP950 or Koss ESP95X like me might be curious about the earlier Koss models. If you try this, besides the risk of electrocution, Spritzer has stated before that these weren't designed for pro bias - so I may be slowly killing these Koss ESP6. When I first bought my Koss ESP95X, my desk and work area were better set up for closed headphones, though I loved the clarity and speed of stats. So I became curious if not obsessed with the earlier closed Koss stats. I bid on, but ultimately decided not to buy several versions of the ESP9. During the lockdown I decided I needed a new and more ambitious nerd project. So I bought a Koss ESP6 and decided to wire them to the male end of my Koss ESP extension cable. I ripped out most of the internals first, but left them closed with minimal damping. Sadly, being closed, they lost most of the stat character. Like they sounded originally through the standard headphone jack out of my amp - they still sounded congested and echoey. I had read on another forum about someone that wired their Koss ESP9 for the Koss E90 amp, but they left the PCB. I decided to go one step further, and leave the drivers nearly completely exposed. The first attempt at making them open was disappointing. The two layers of felt over the drivers, and the plastic grills on the pad side were the culprit - when I removed them I was shocked at how good they sounded. Now that I know they sound good I'm going to make or buy a better cable as opposed to my jerry-rigged mess, and create a nice grill. Overall the mids and treble sound clearer than my Koss ESP95X though the sound stage is more intimate. I have not tried them directly back to back, but I will eventually. I suspect a lot of people may be put off by the agressive treble. Sadly, they're still bass light even with my Stax SRM717 but I've been listening to them with a 3 decibel boost under 100Hz, and they sound fantastic to me. I believe the Koss ESP6 were originally wired single ended. The black and yellow cables are connected to each stator. But is it possible I've inadvertently connected one side to ground and am damaging my amp? I'd appreciate any feedback on that.
-
Thank you, the ballast resistor was what I was thinking of. I'm terrible at soldering and this would be a fun distraction in lockdown, not an amp I'd really start using. If I added the resistor to the adapter, it would just go on the bias wire, right?
-
One more Koss question for you if you don't mind. I read a while back that you modded a Koss E90 to run Stax headphones. Even though I don't think its very good, my E90 is sitting around and I was thinking of making a stax to Koss cable adapter for it. Did you have to add resistors or something to the energizer to make it safe for Stax headphones? I know you've expressed concern about Kingsound and Wee energizers.
-
I bought a pair of Kaldas RR1 cups/drivers/pads from the previous owner about 2 months ago. They squealed, Aumkar had generously replaced the headphones for him - and didn't require shipping back the original bespoke hardware. These were among the first RR1 produced. I've been totally stir crazy due to the lockdown. Though the most I'd played with electrostats was removing rotted foam from a set of lambdas, I figured this might be a fun project to tear down, and if I'm lucky restore. I modded an old Hifiman headband, and bought a cable from Mjolnir audio. I immediately heard the electric squeal, but it would periodically go away. I had a full 2 hour stretch of silence where I realized these were awesome headphones. Though I was biased towards my Koss ESP95X - after a head to head listening session, I had to admit I liked the Kaldas more for everything but treble. Unfortunately, the squeal and/or buzzing from the left earcup grew to become practically continuous. So I used Joamat's instructions to investigate and completely disassemble the left earcup. They were fairly easy to disassemble, except for one bolt that sits right behind the mini XLR connection. The mini XLR pins being so small, and me being TERRIBLE at soldering - I tried to avoid undoing the solder joint, but broke one of the wires. If you do this, be careful to undo the wired connections last, there are tiny M2 nuts that will fall out if you're not careful. After that, I found basically the same issue that Joamat found, the Bias wire was broken, and there were strands inside the female thread of the housing. It's possible that one strand got into the driver and caused the whine and buzzing. I liked the bolted assembly, and wanted to keep the headphones easy to disassemble, so I soldered in M2 terminal connections as shown. I had to use longer heat shrink tubing because I had wiring exposed at the mini XLR connection. I used a grinder on a dremel tool to make a larger hole in the cover - I found when I assembled initially, that I caused a short and lost volume out of the left earcup. To fix it - I ended up resoldering two of the wires at the mini XLR connection. Then I blew compressed air across the driver and stators, being careful to expose the driver for the most minimal time possible. Then I reassembled as shown including the two dust covers. Eager to test my work, I reassembled the headphones and connected to my Stax SRM 717. The left earcup was completely silent - success! Funny thing - the right earcup started squealing even louder! So I repeated the process of soldering terminal connections. When I reassembled, the right earcup still squealed. I was super frustrated, but went back and did the step I skipped, I blew compressed air across driver and stators. And that seems to have solved the final issue. I've now listened for about 10 hours with almost complete silence. To be honest there's been a handful of times, totaling maybe 30 seconds where I heard a slight buzzing, and thought "Oh no! Not again!" But shifting the earcup slightly cleared it immediately. My ears touch the dust covers, so I suspect it's a different issue entirely. Perhaps with a shift, my ear presses against the stator. The final picture is of my Frankenstein Kaldas RR1 conquests. I contacted Aumkar, not for help - but to suggest a few manufacturing improvements based on my findings. Aumkar was very kind, suggested that I solder directly to the bolts - and then informed me that he'd already incorporated all of the manufacturing improvements I suggested. So if you order a Kaldas RR1 conquest now - it will be more robust than the initial versions. Overall - I think this is a great product, and Aumkar has been a pleasure to chat with. If you're willing to buy an energizer separately, these sound better than the Koss, and far better than the L300/L500 I used to own. I hope Kaldas will produce a sequel. I like these headphones so much I'm having Vesper Audio quote out slightly thicker pads so my ears don't touch - and I ordered touch up paint to fix a couple spots I scratched or gouged during my project.

-
Thanks for clarifying Spritzer. I didn't realize you were referring to the ESP95X vs the original ESP950. I thought you'd performed your own mods when you said they weren't stock.
-
Spritzer, in the Kaldas thread you mentioned removing damping from your ESP95X. I've removed the foam on the pad side - did you remove any damping on the grill side? If so, did you notice any improvement?
-
JoaMat, Can you provide more detail about how you disassembled the Conquest to get to that terminal block? And how difficult it was to remove the pads? I'm tempted to pad roll based on your response.