bui501
Returning Member
-
Joined
-
Last visited
Everything posted by bui501
-
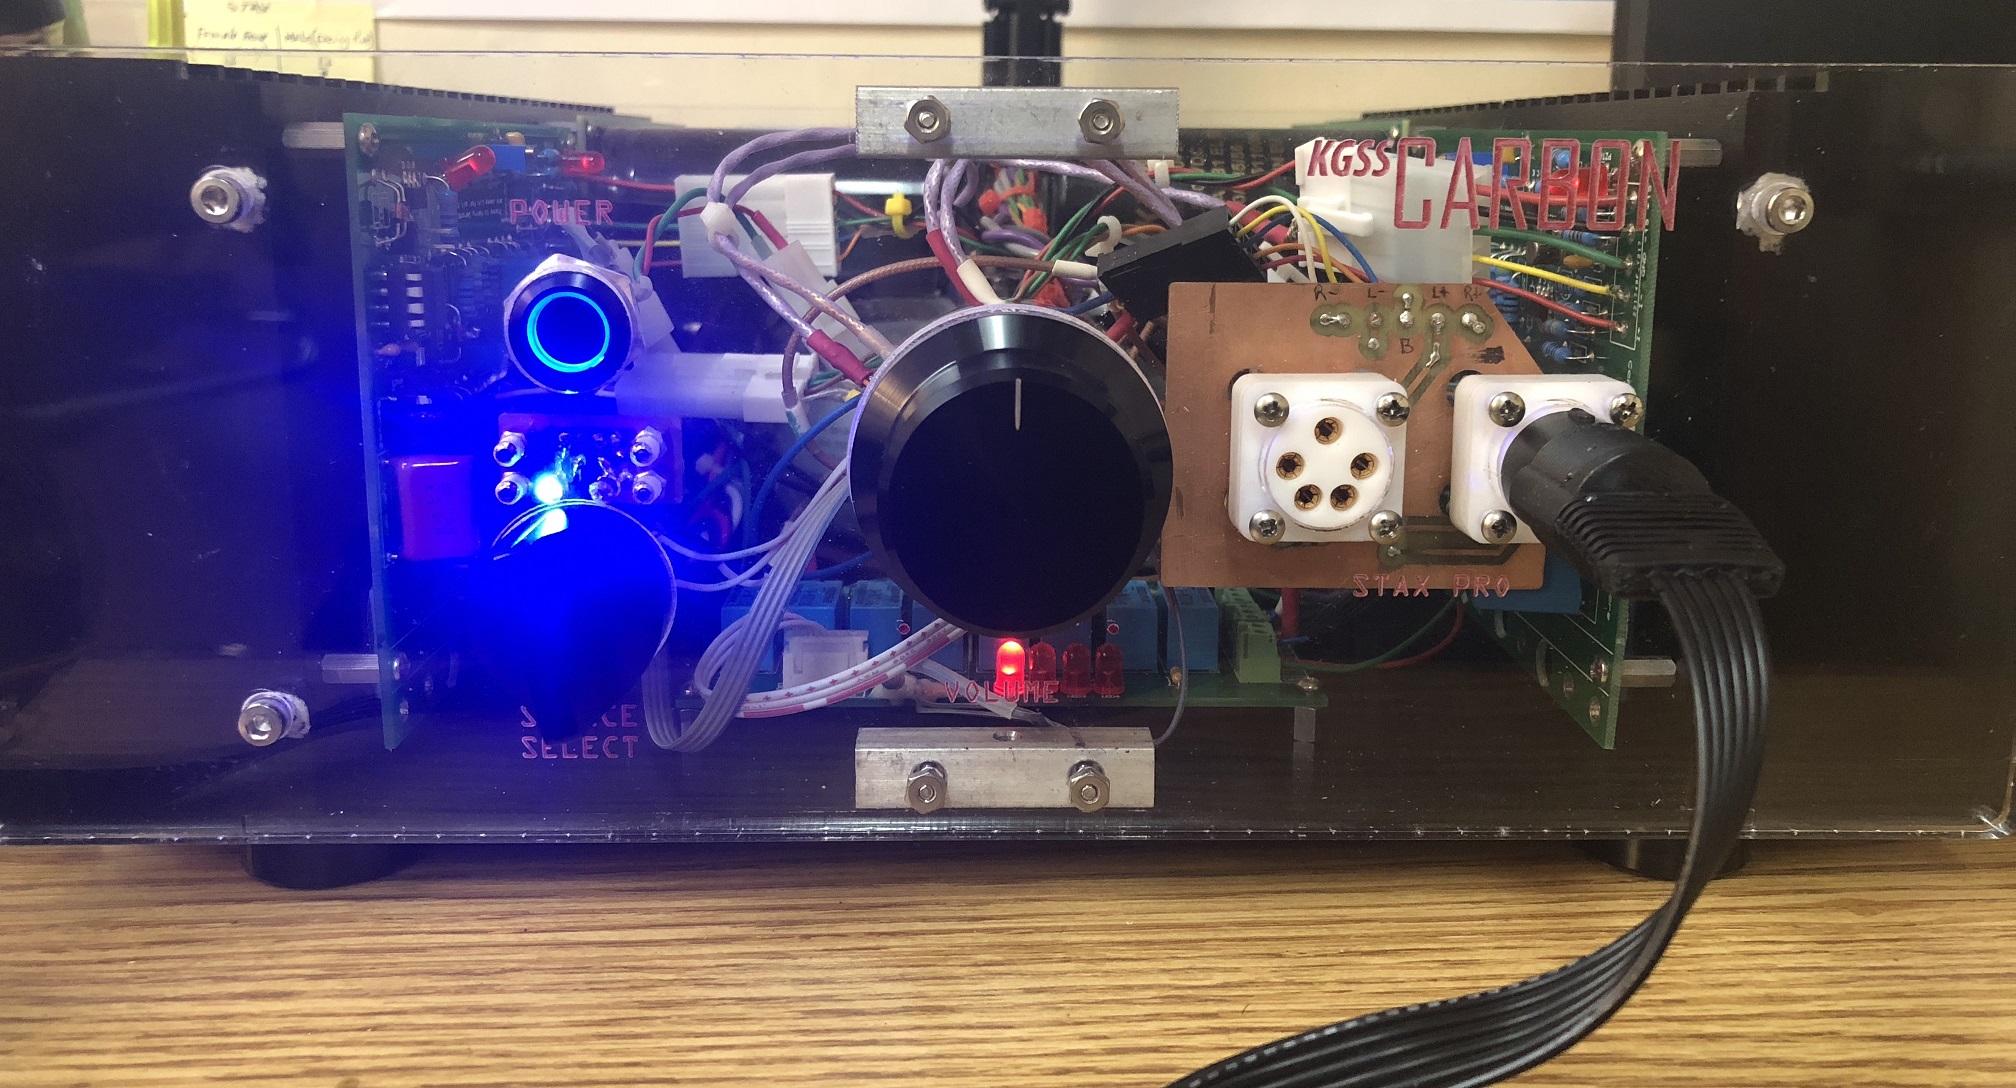
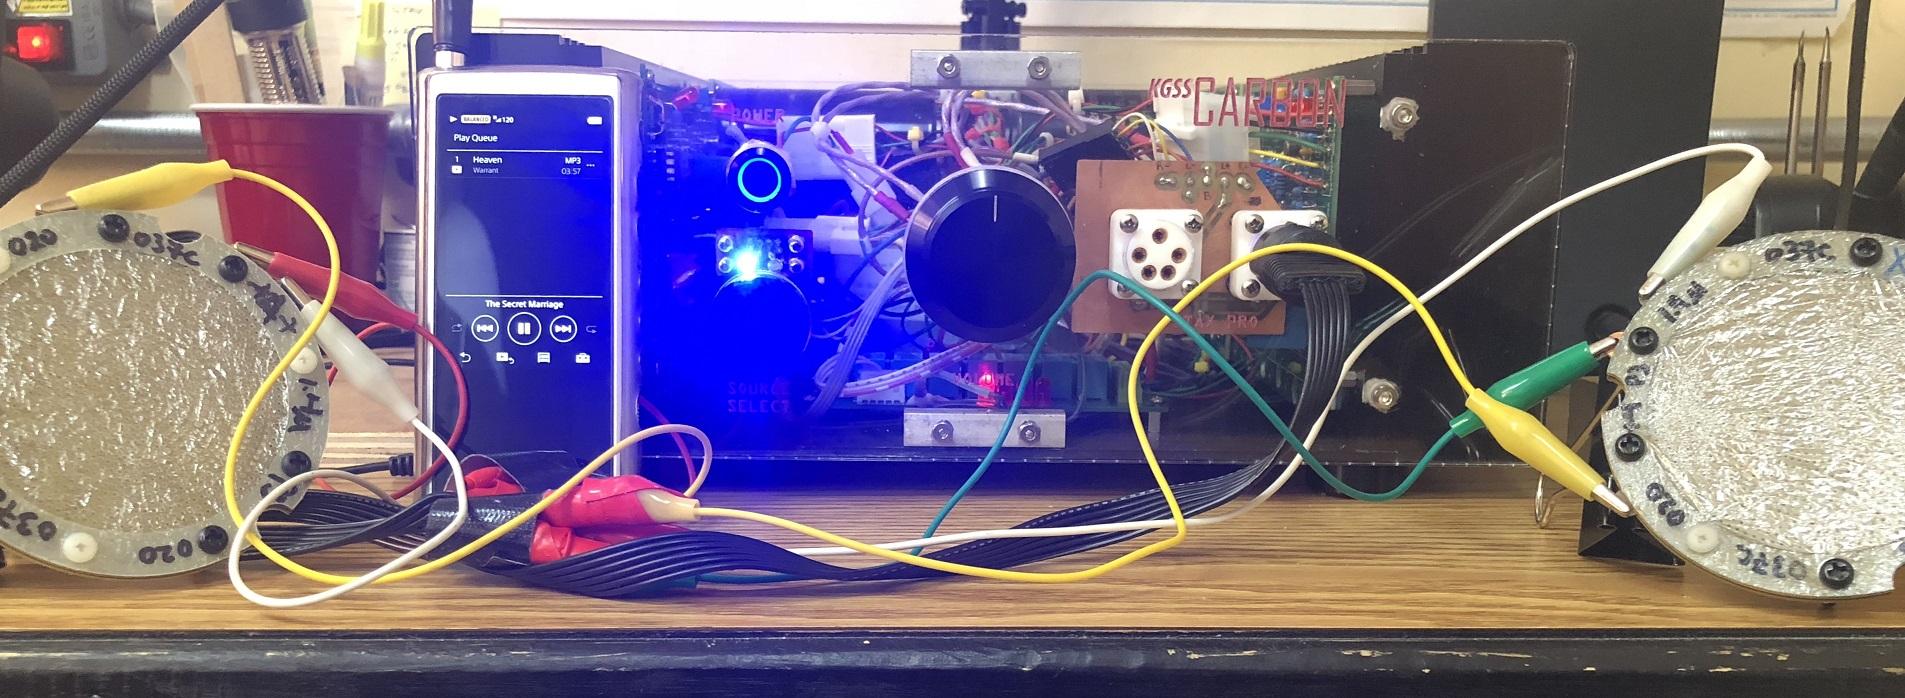
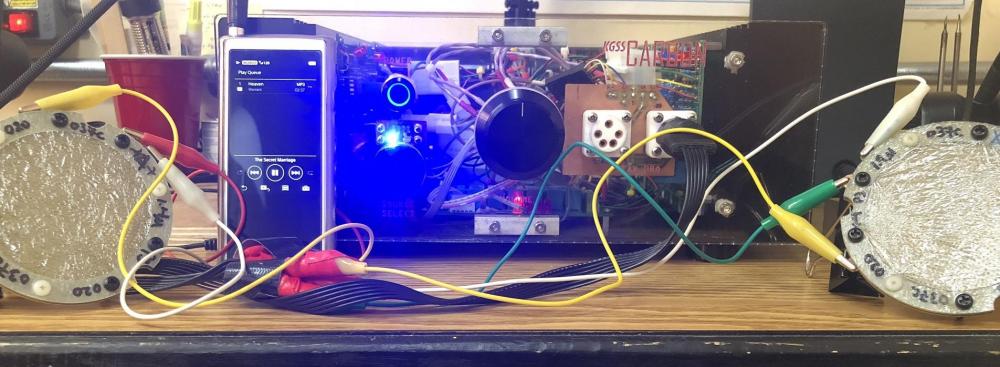
I know this is a cross-post, but it's related to my carbon build... I made acrylic speaker housing(s) for the drivers... (I still haven't decided how to make headbands to mount the ear cups I'm making for headphones yet.) These speakers are now connected to my Carbon and filling up my tiny little room with music. I have tiny-xlr connectors on the back so I can use the same removable cables for speakers and the headphones I'm still building. I love this hobby...

-
Thanks, guys. Blueman2, the custom electrostatic drivers are indeed my creation -- they were inspired by Chinsettawong in his DIY Electrostatic Headphones forum on Head-fi.org (https://www.head-fi.org/threads/my-diy-electrostatic-headphones.498292/), and they were the reason why I started building electrostatic amps in the first place. When I saw that thread several years ago, I bought an old stax SRM-1/Mk2 from eBay to start my DIY headphone attempt, wasn't happy with the old stax amp, so built the KGSSHV... It's been an ongoing fall down the rabbit hole since then. The drivers were made from pcb boards and mylar film with a coating of staticide 6500 antistatic spray on the film. I'm waiting to get access to a machine shop or at least a cnc router again so I can build the cups for them -- or at least get some time again to finish up the wood cups that chinsettawong gave me so I can finally case some of my drivers. In the meantime, though, I have some acrylic headphone cups I've just finished cutting that will finally serve as my version 1.0 of the DIY headphones. (will post pics soon) I know most of you guys have the top-of-the-line Stax headphones and look down on the SR-404 and 300 series, but that's all I have, and these DIY drivers blow those old Stax headphones away in both transparency and soundstage. JoaMat, the relay board is just a stock selector board to let me switch between the balanced (tiny XLR) and unbalanced (phono) input. That and the SumR transformer are the only major components that's stock -- I made everything else from scratch including the stax connectors, pot board, etc. The stax connectors were made from stocks of teflon and have gold-plated brass vacuum tube sockets for connectors. I even molded the stax connector on the cable from scratch: the flat cable itself was a Koss extension cable; the connector on the end was made from pieces of brass rods, a teflon core I milled on a table-top cnc, and covered in a cast hard urethane casing. I DIY cast the mold out of silicon from the end of the cable on my SR-404.
-
I finally broke down and put my "temporary" acrylic front plate on my carbon build... I finished the boards almost 9 months ago and have been waiting for access to a cnc or mill to make the front and back plates. After waiting for so long, I finally bolted the acrylic plates that I had originally made just to size and verify the positions of the components... The amp sounds pretty darn awesome, even with the uncased DIY drivers I had made... Loud enough at 12 O'Clock position to fill a small room with very transparent, noise-free music... Definitely enough to blow out what's left of my eardrums. It'll probably be a while before I can get the permanent, aluminum front and back panels made.

-
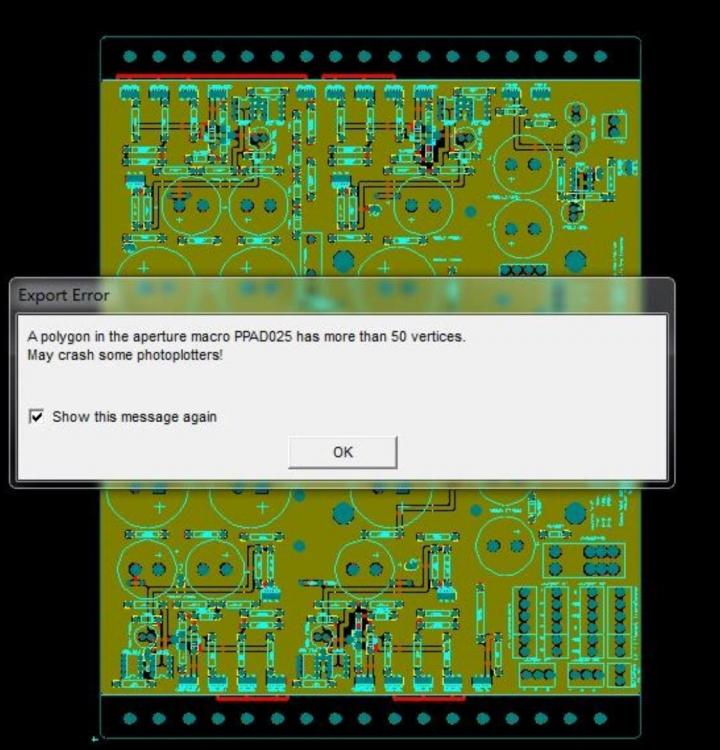
I sent the staxt2powershrunk gerbers to a board house for a run, and they ran into the following error. Should I be using the netlisted version that Kevin posted?
-
Thank you, Kevin and JoaMat.
-
Kevin, I have the original t2hvandlvpsukgsshv2 board you posted a few years back... do I just need one of those boards for the T2 or 2 of them? I noticed the new power supply board you posted yesterday is significantly different from the t2hvandlvpsukgsshv2 combination power supply.
-
Now I know who the hoarders are -- and why they're so expensive from reputable vendors -- GRRRR
-
Thanks. I'm planning to after my experience with the counterfeit CREE parts from alibaba during my Carbon build. I've purchased the DY294 transistor tester that was recommended a few years back in this thread. Is there are better/more accurate equivalent that you're using? My DY294 sometimes gives me a bad reading for a known good part from mouser. I would purchase a curve tracer for this project, but they all seem to be prohibitively expensive compared to all other lab equipment. -Vinh
-
Awe, Nuts! :-D Thank you, JoaMat & Spritzer. I’ll look them up on mouser. This is the very last sand I need to source from the T2 BOM... assuming none of the older items are not fake (knock on wood).
-
JoaMat, would either of these two part be suitable as a substitute for stn9360 on your shrunken board? (Stn9360 is currently out of stock at all the major components vendors until 2019.) PBHV9560ZX can handle up to 500mA but has higher capacitance; PBHV3160ZX has input/output capacitance closer to that of STN9360 but can only handle up to 100mA. Both are 600V devices like the STN9360. Datasheets attached. Even the more recent sands are starting to be difficult to source. PBHV9560Z-465958.pdf PBHV3160Z-466472.pdf
-
Thanks, Kevin. Was hoping I had stumbled on a cheap drop-in replacement. :-(
-
Would Sanyo 2SK2160 be a suitable substitute for the 2SK216? It looks more readily available. (Data sheet is attached.) 2SK2160.pdf
-
Found it!!—(The missing trace in the original shrunk board). Thank you, George. Looks like Kevin fixed it in shrunkedv2. Problem with reading this thread all the way thru at once is that everything is running together. Either that or I’m just getting old.
-
Thanks for the warning. I'll stay away from those boards. I've been looking at the gerber files for the shrunkv2 board and the shrinkedv10 board with the thought of either making my own from the gerbers or sending it off for a small batch run. Thanks, George -- 1/2" doesn't seem like much, but it's a big savings in case work that I'd rather just put toward the electronics, which is why I was looking at the shrunk version and JoaMat's shrinked10 version of the boards. Do you happen to know if the board errors were just in the particular run of boards that Lil Knight did back then or if they were inherent in the gerber files? I was planning to either etch my own board (ala JoaMat style) or do a small batch run with some pcb prototyping service.
-
Awesome! Thanks so much for the clarification on the smd transistor and the advice re. the ksa1229a/ksc2690c. (I had kind of guessed it was your name along with Kevin's on the shrunkedv10 board, but wasn't sure -- sorry, I'm a bit dense on these things. )
-
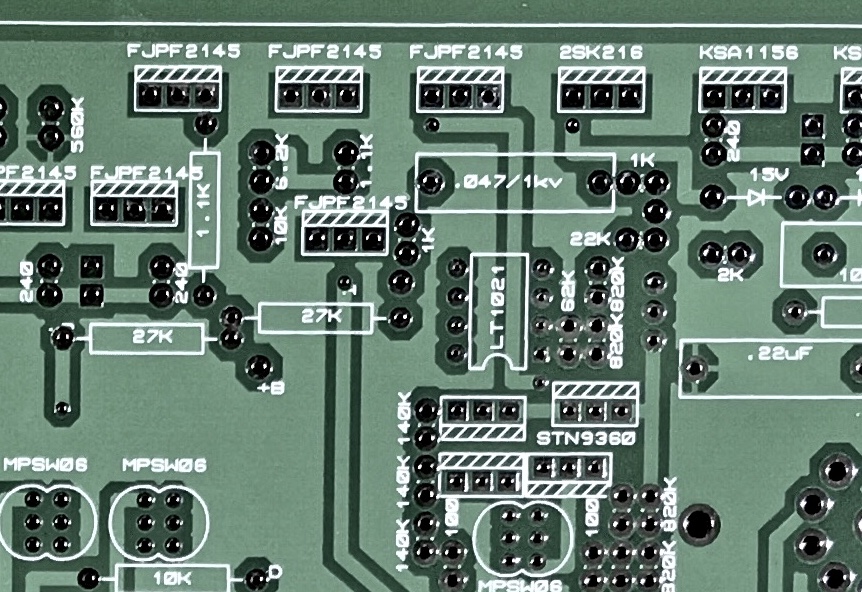
Thanks, JoaMat. The stn9360’s are what still puzzles me—when i searched for STN9360, this part (data sheet below) is the only one that shows up... Is this the same transistor that you used just in a vertical form factor back then?
-
George, do you know if t2shrunkv2 is also in the same state (of incompleteness)? From the early days of the thread, I thought Kevin had laid out that particular board for Lil’knight back then.
-
Kerry, I know it’s been a while ago since you posted this, but would you mind posting the Ferber files and BOM for the compact T2 boards you made and referenced back in 2015? Or pm me a link to them? I’n Determined to build a DIY T2, and am trying to go compact if possible-preferably with parts that are still in production.
-
(1) One of Kevin’s later boards (t2shrinkedv10) has stn9360’s shown in the layout as TO220 parts, but when I did a search for stn9360 on mouser (and digikey), the part shows up as an smd component... does the stn9360 still come in non-SMD format? If so where is a reliable source? If not, what is a suitable replacement? Can I mount the smd version on a smd-to-TO220 adapter board and use the smd parts, or are they not equivalent components? I can’t find any data sheet for a non-smd version of the stn9360, so I do not know what the specs are. (2) the board has a number of parts with leads rather close together with no outlines and with just a simple number by each pair of pads. Are those resistors to be mounted vertically? thanks for any helpful guidance.
-
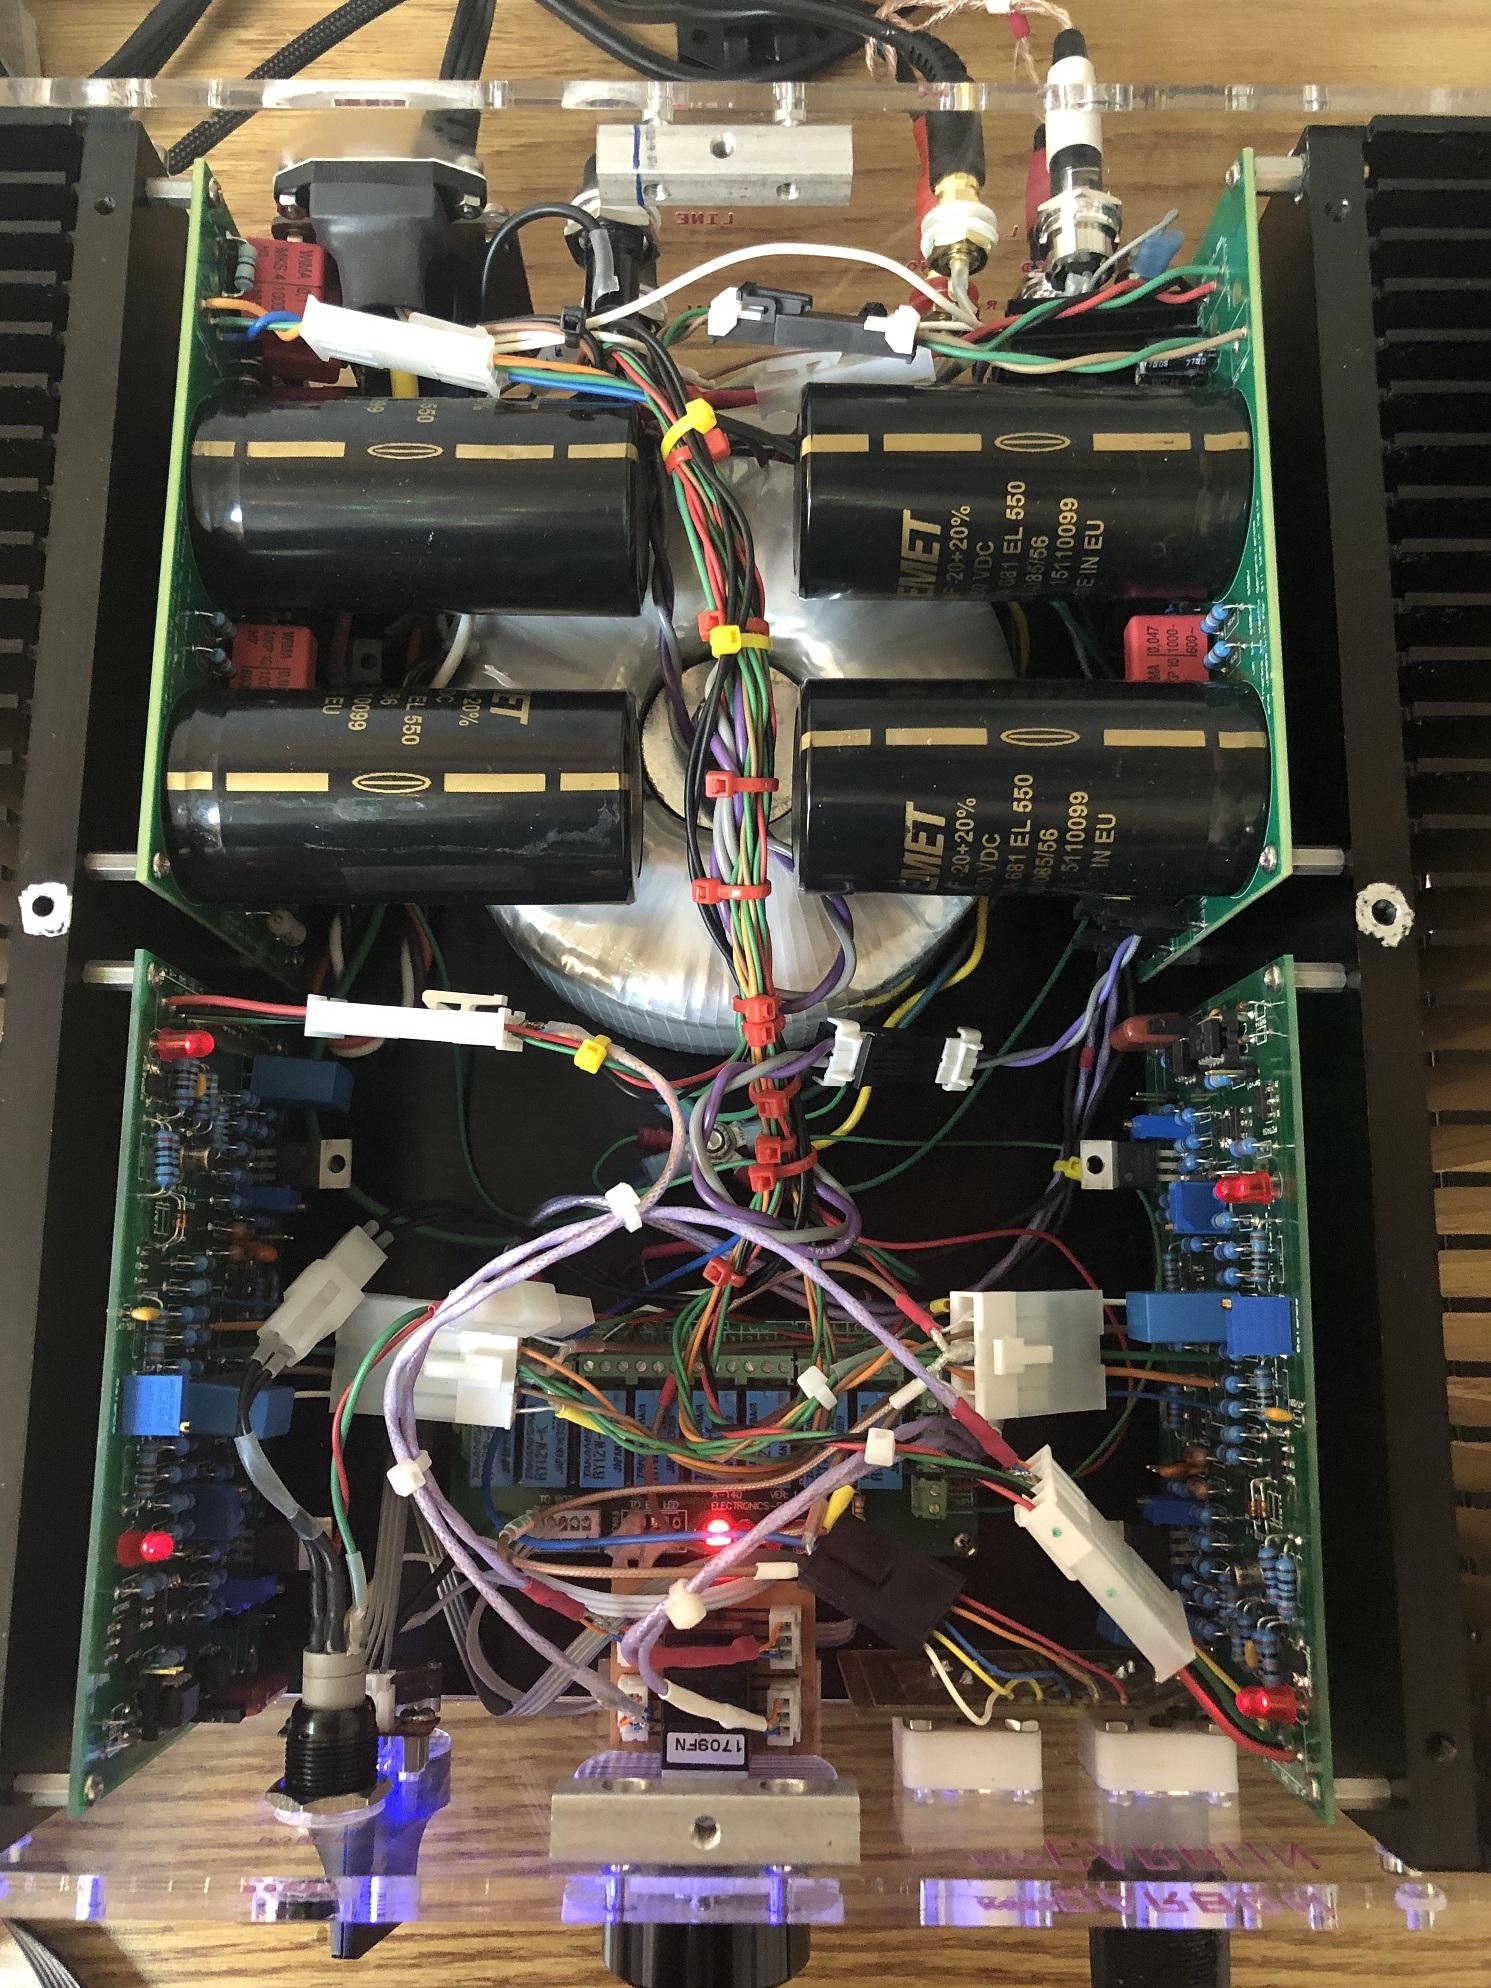
And we have music! After a 5-month saga of locating discontinued parts, melted SiCs, and counterfeit parts from questionable vendors, my Carbon boards with GRHV power supply is up and running!!! Big THANKS and shout-out to the other members here, especially Sorenb and Blueman2 for identifying the cause of my original disaster (not properly heatsinking the SiCs and 10M90s) and the cause of the follow-up failures (counterfeit SiCs and 10M90s from China). I wouldn't have known where to begin to troubleshoot let alone recognize the counterfeit parts. Special thanks to Chinsettawong for lending me authentic replacement parts to complete my boards. ? In summary, two lessons I learned and am passing on for future builders: 1. Proper heatsinking is absolutely necessary for the Carbon and GRHV -- not just for long-term use, but even just for powering up to adjust the current. 2. Buy electronics parts only from reputable vendors -- and Yes, they do sell counterfeit MOSFETs in China that will blow up when powered up. I'm so happy!!! Now I just have to complete the front case and wiring.
-
-
-
That sounds like what happened to me on the positive rail board a couple of days ago: I thought it was just the thermal paste shorting the 10m90s to the heat sink. I didn’t even make the connection til you referenced your earlier experience. Ive got the 10m90s replacements on order from mouser now. Ah... but you mistakened me for someone more patient and wiser... I was the idiot that fired up his brand newly stuffed Carbon build (amp boards and all) without proper heat sinking. It was what started my headaches in the first place. You’d think I’d learn a little patience from that, but I went with the Chinese vendor because it would save me several weeks of waiting for parts from mouser... so of course, I didn’t test the parts from China before excitedly soldering them in before the delivery guy even left my building.
-
The original 10m90s’es were from mouser... that was on the psu boards that were (mostly) working before I melted the components by running them without proper thermal pads... all of the replacement 10m90’s now on both power supply boards and both Carbon amp boards are from the same batch from the same Chinese vendor...
-