headinclouds
-
Posts
159 -
Joined
-
Last visited
-
Days Won
2
Content Type
Profiles
Forums
Events
Everything posted by headinclouds
-
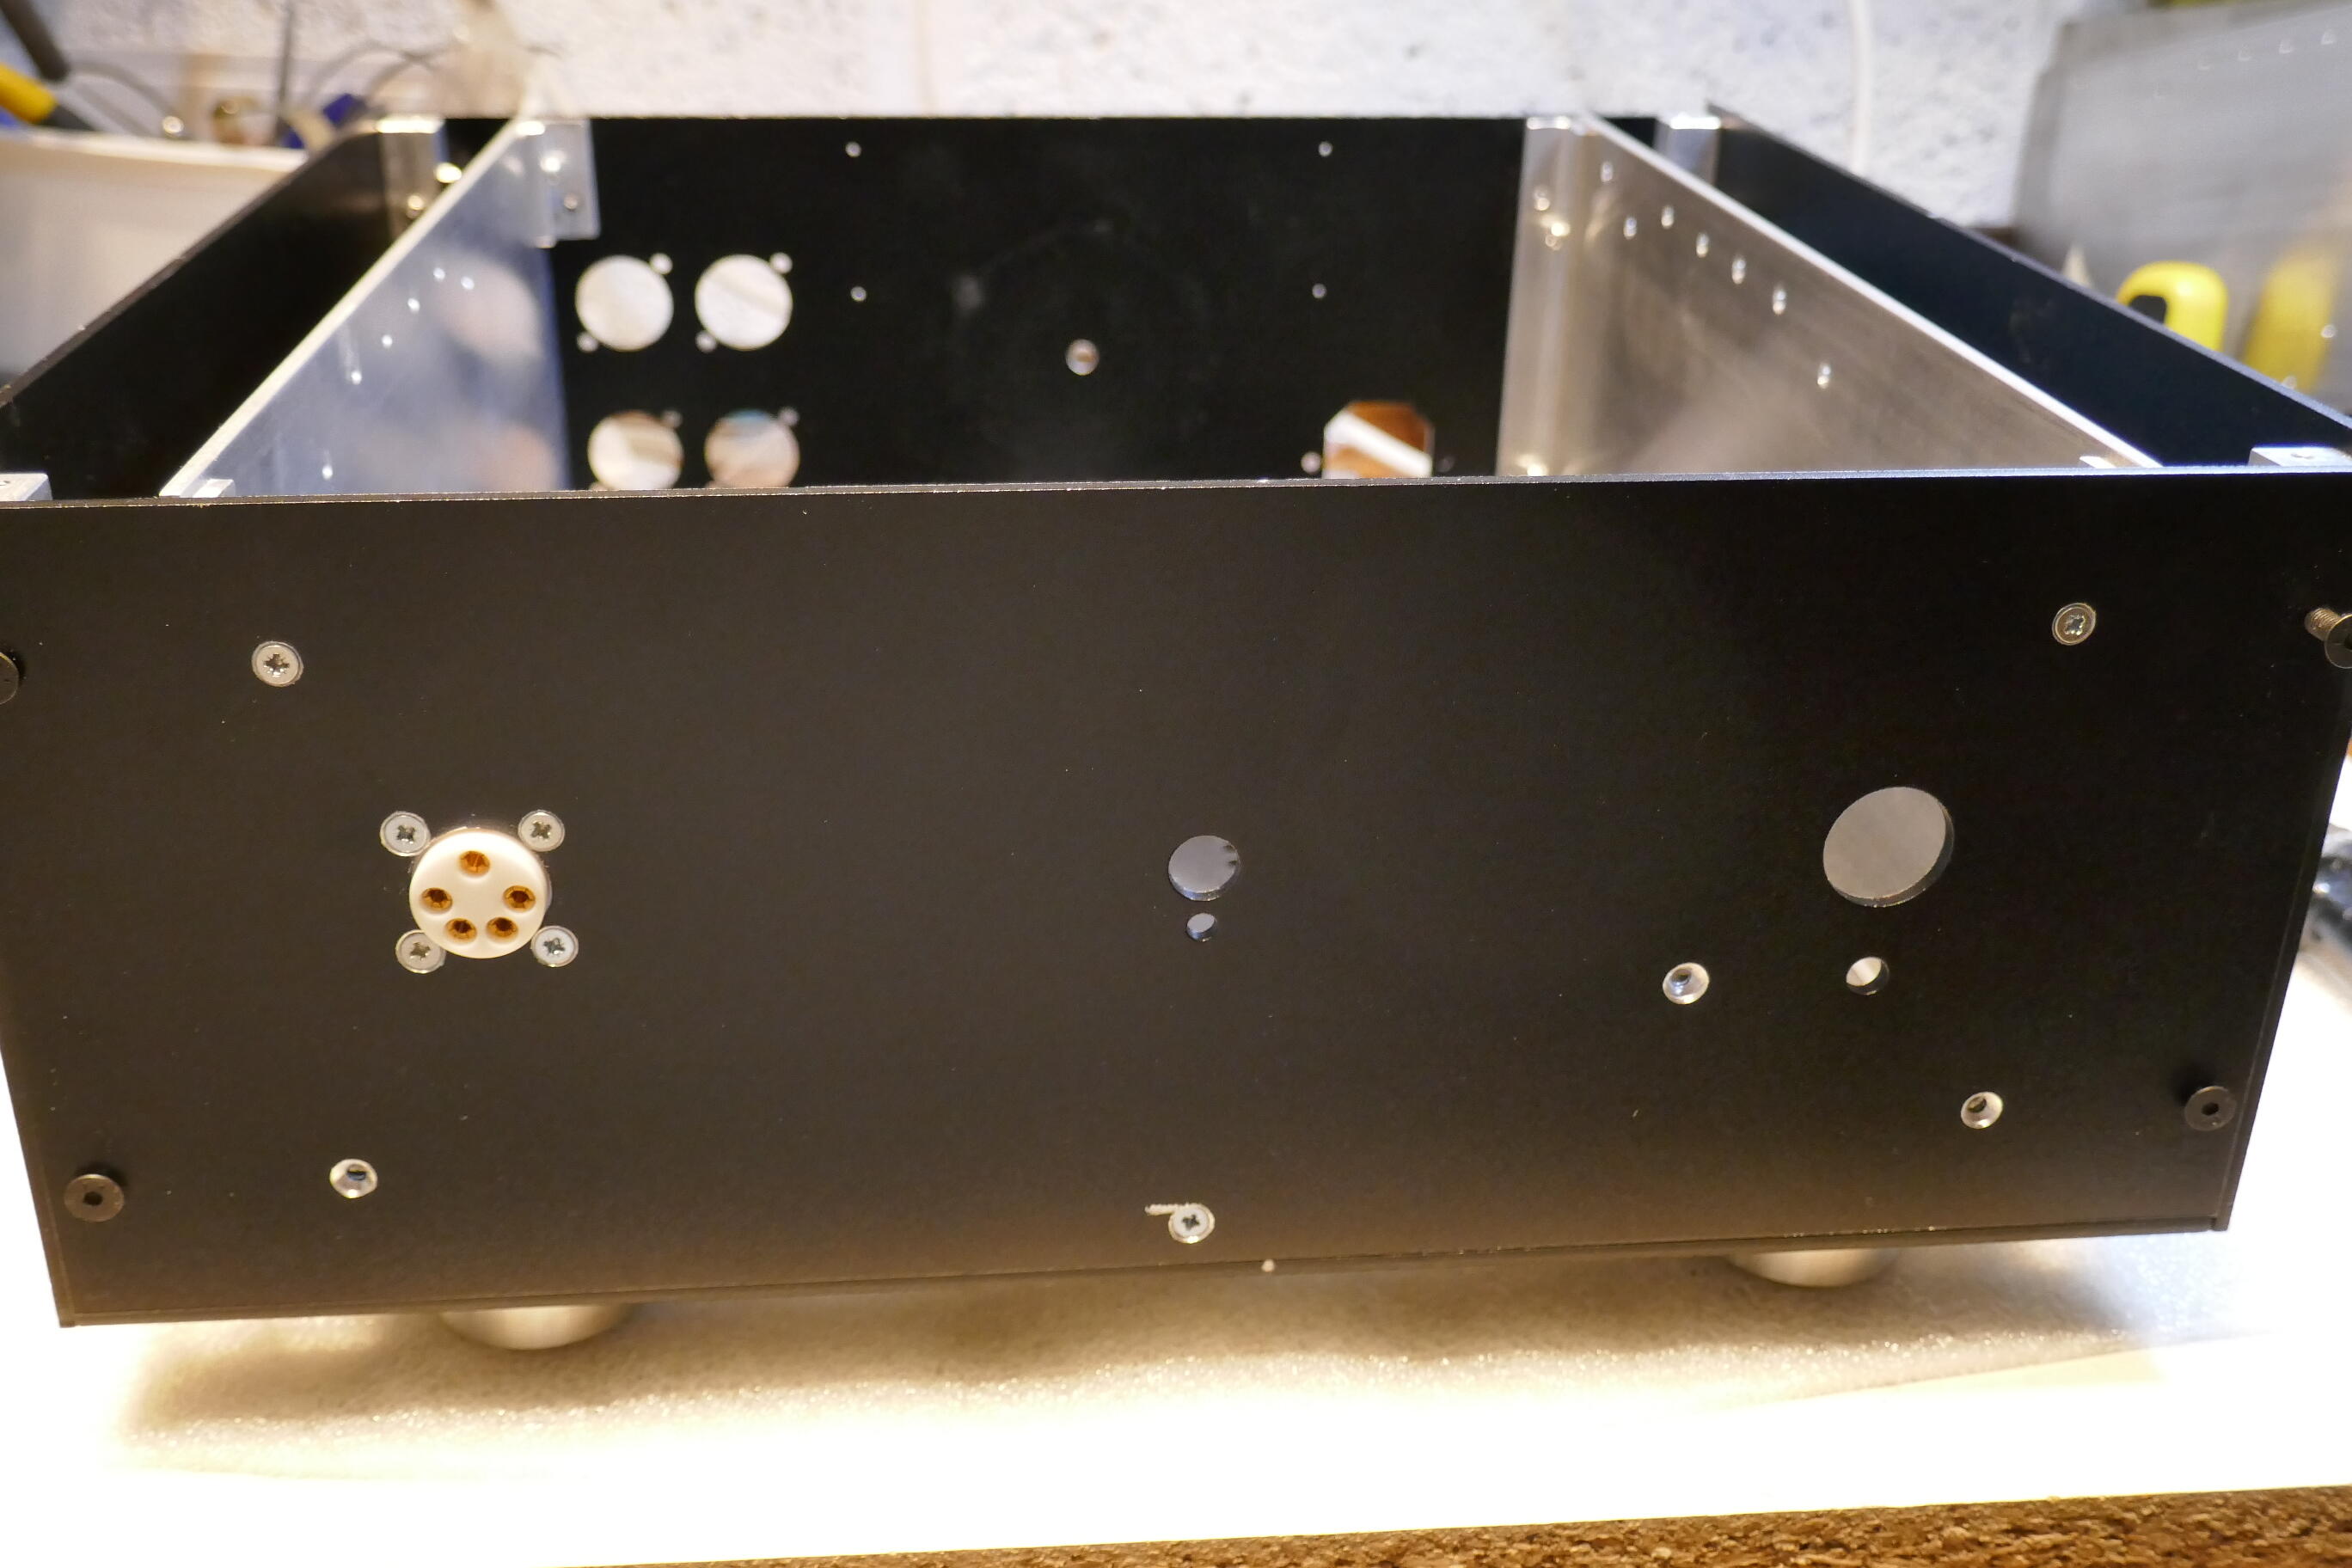
Thanks, it's so much easier than drilling and tapping panels and heatsinks and I think it achieves an acceptable look. My first build was an on-board heatsink KGSShv and used Modushop case. Since then I designed my own cases for the freedom it gives. I use a simple 2D CAD to do sheet metal drawings and export as dxf. I live in Shropshire, England on the edge of the West Midlands industrial area where I can get laser cutting, machining and metal finishing from industrial OEM companies. Unfortunately they don’t do retail or export. They supply the metal (Alum 5251 as it lasers and anodises well). A case like this would currently cost about £280 ($370) for the total of laser, finishing, screen printing. You have to add in the ceramic heatsinks which cost me about £50. Aluminum section, brackets and nuts and bolts are needed for assembly. I don’t know how this compares with any other suppliers.
-
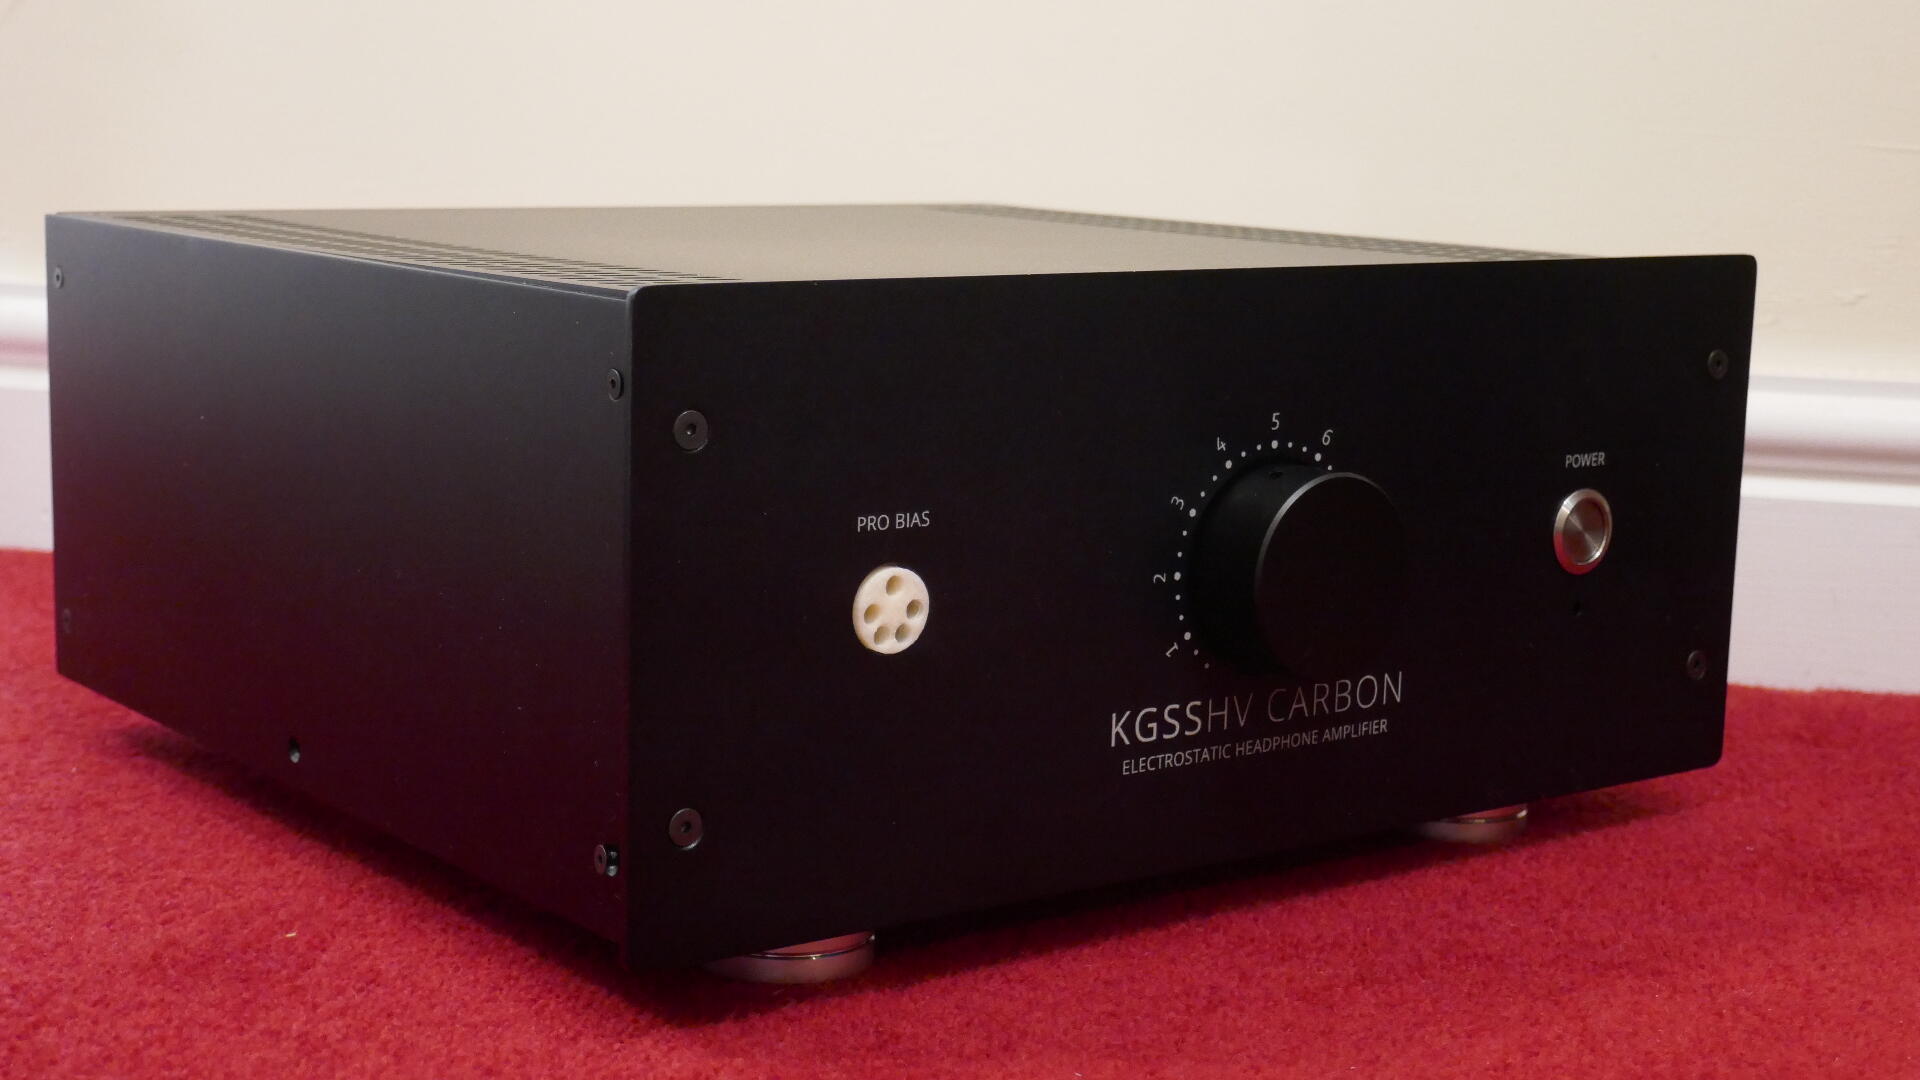
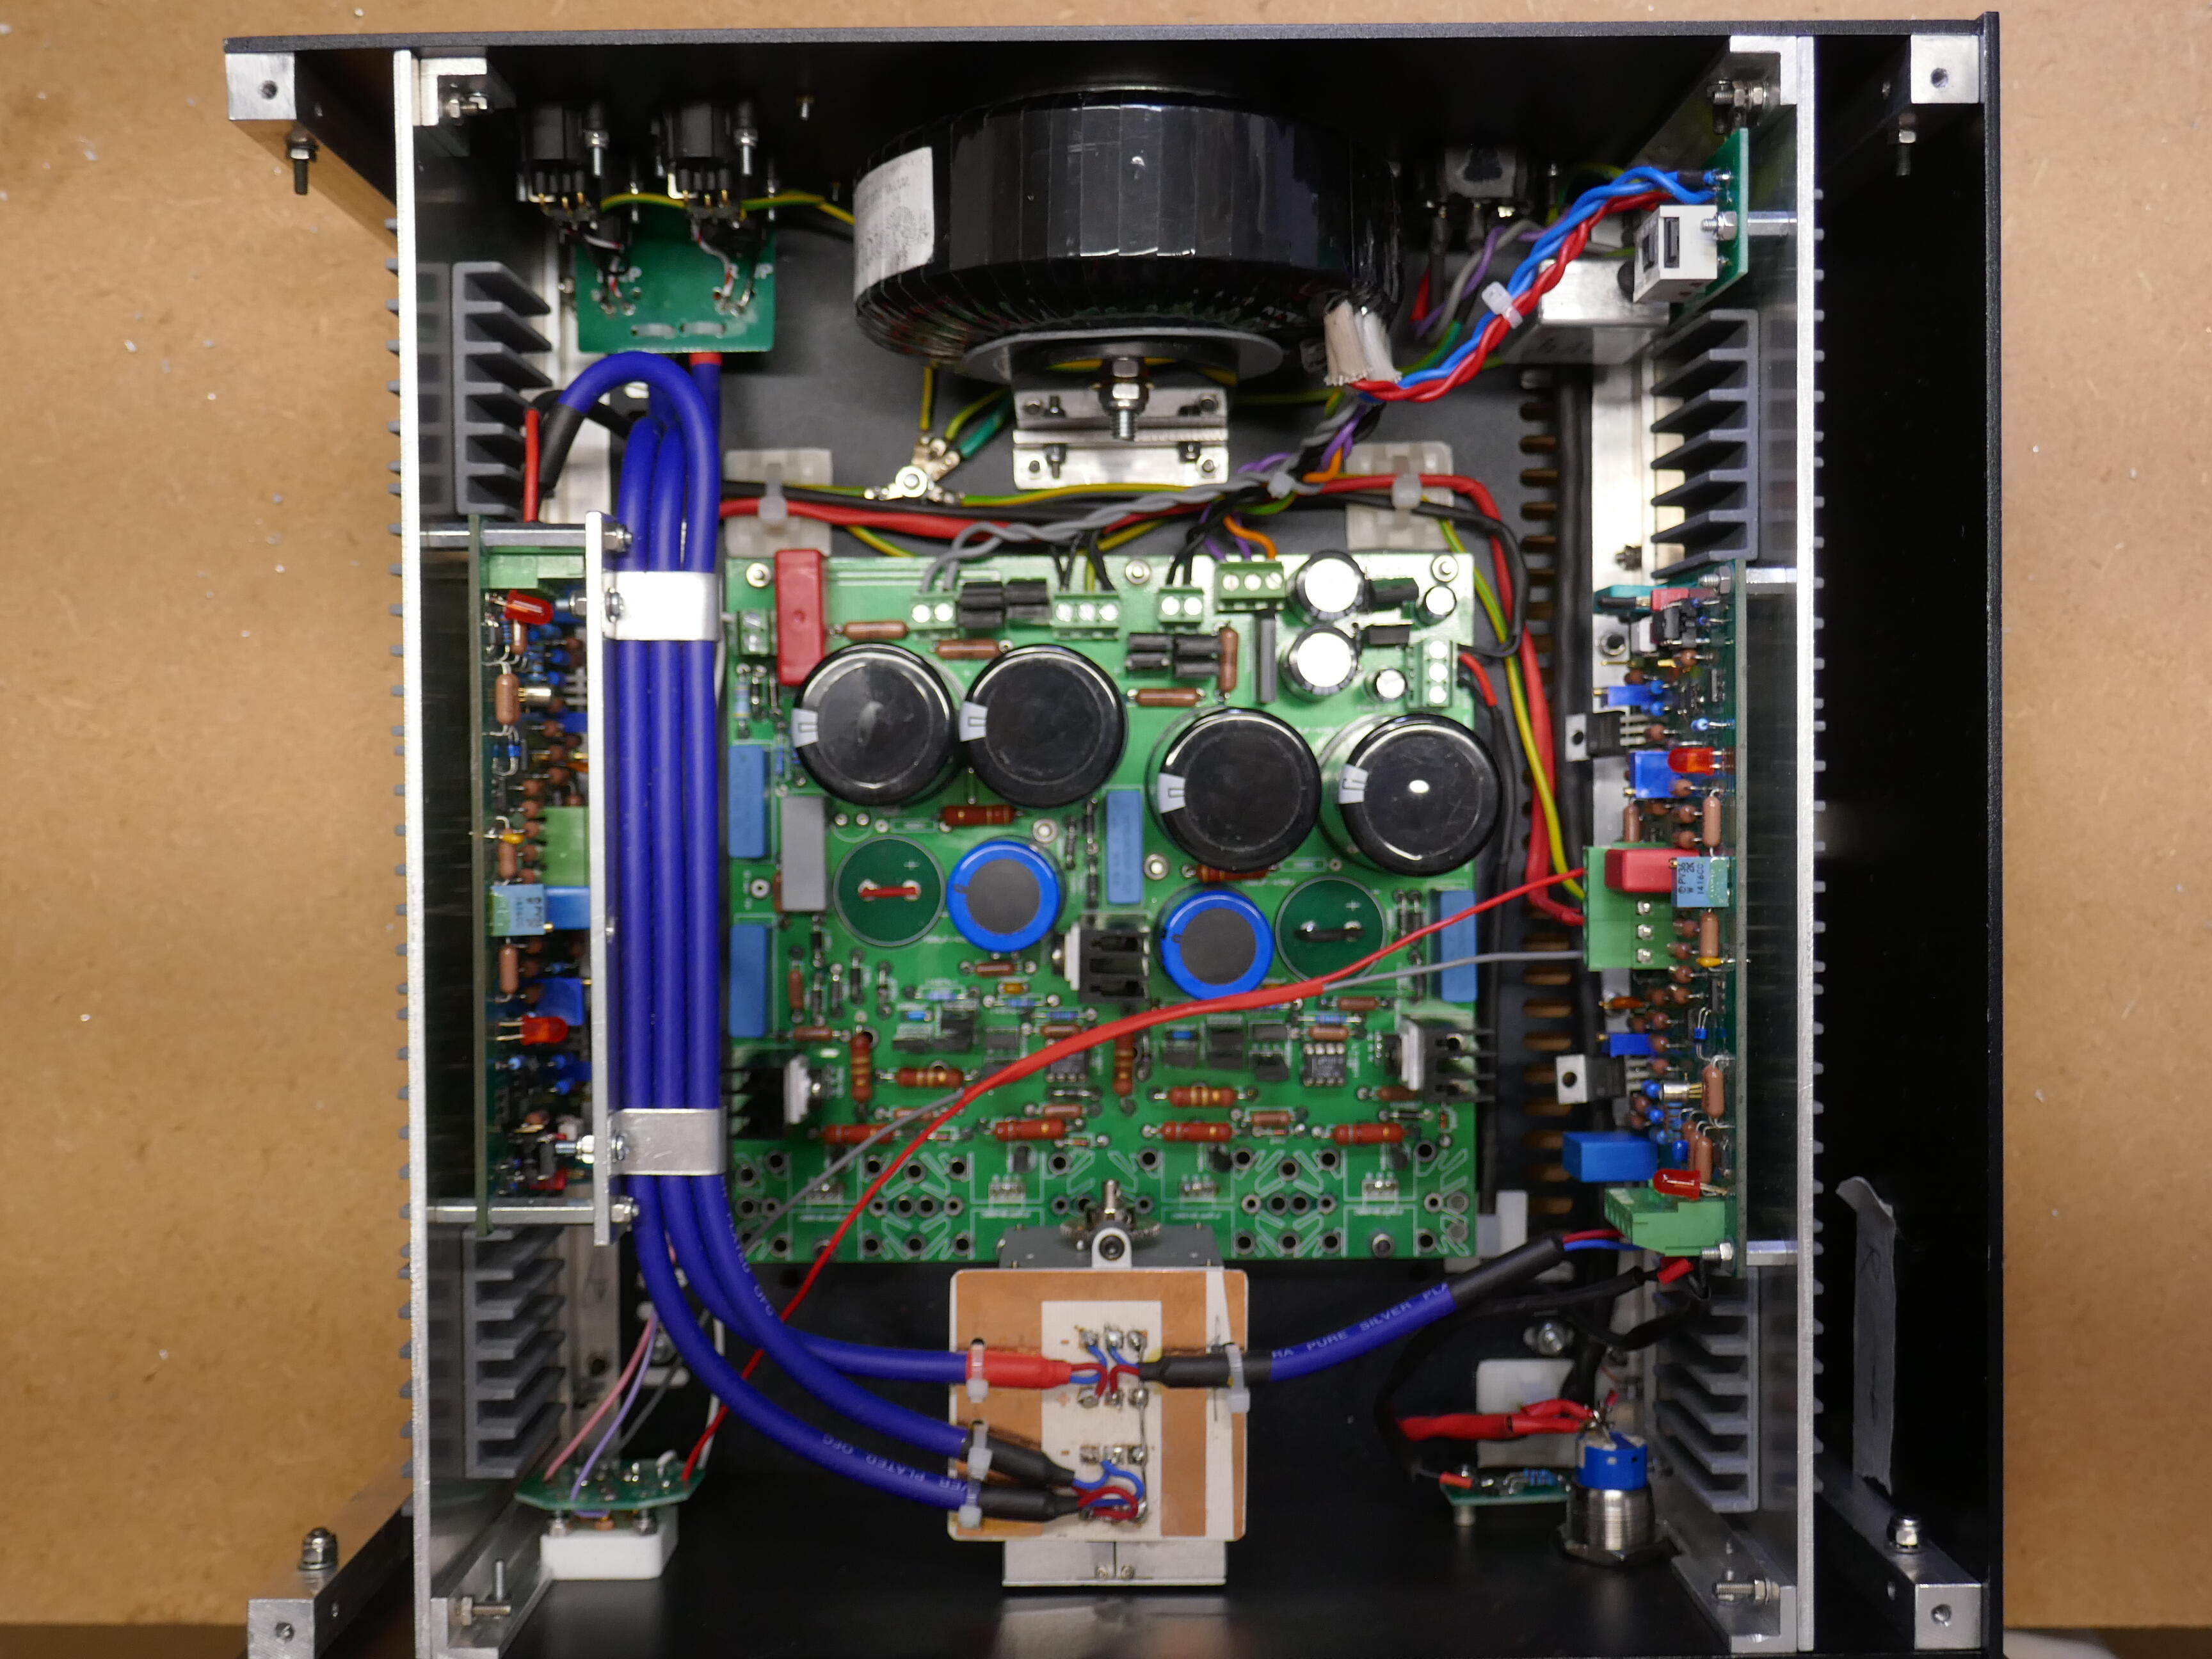
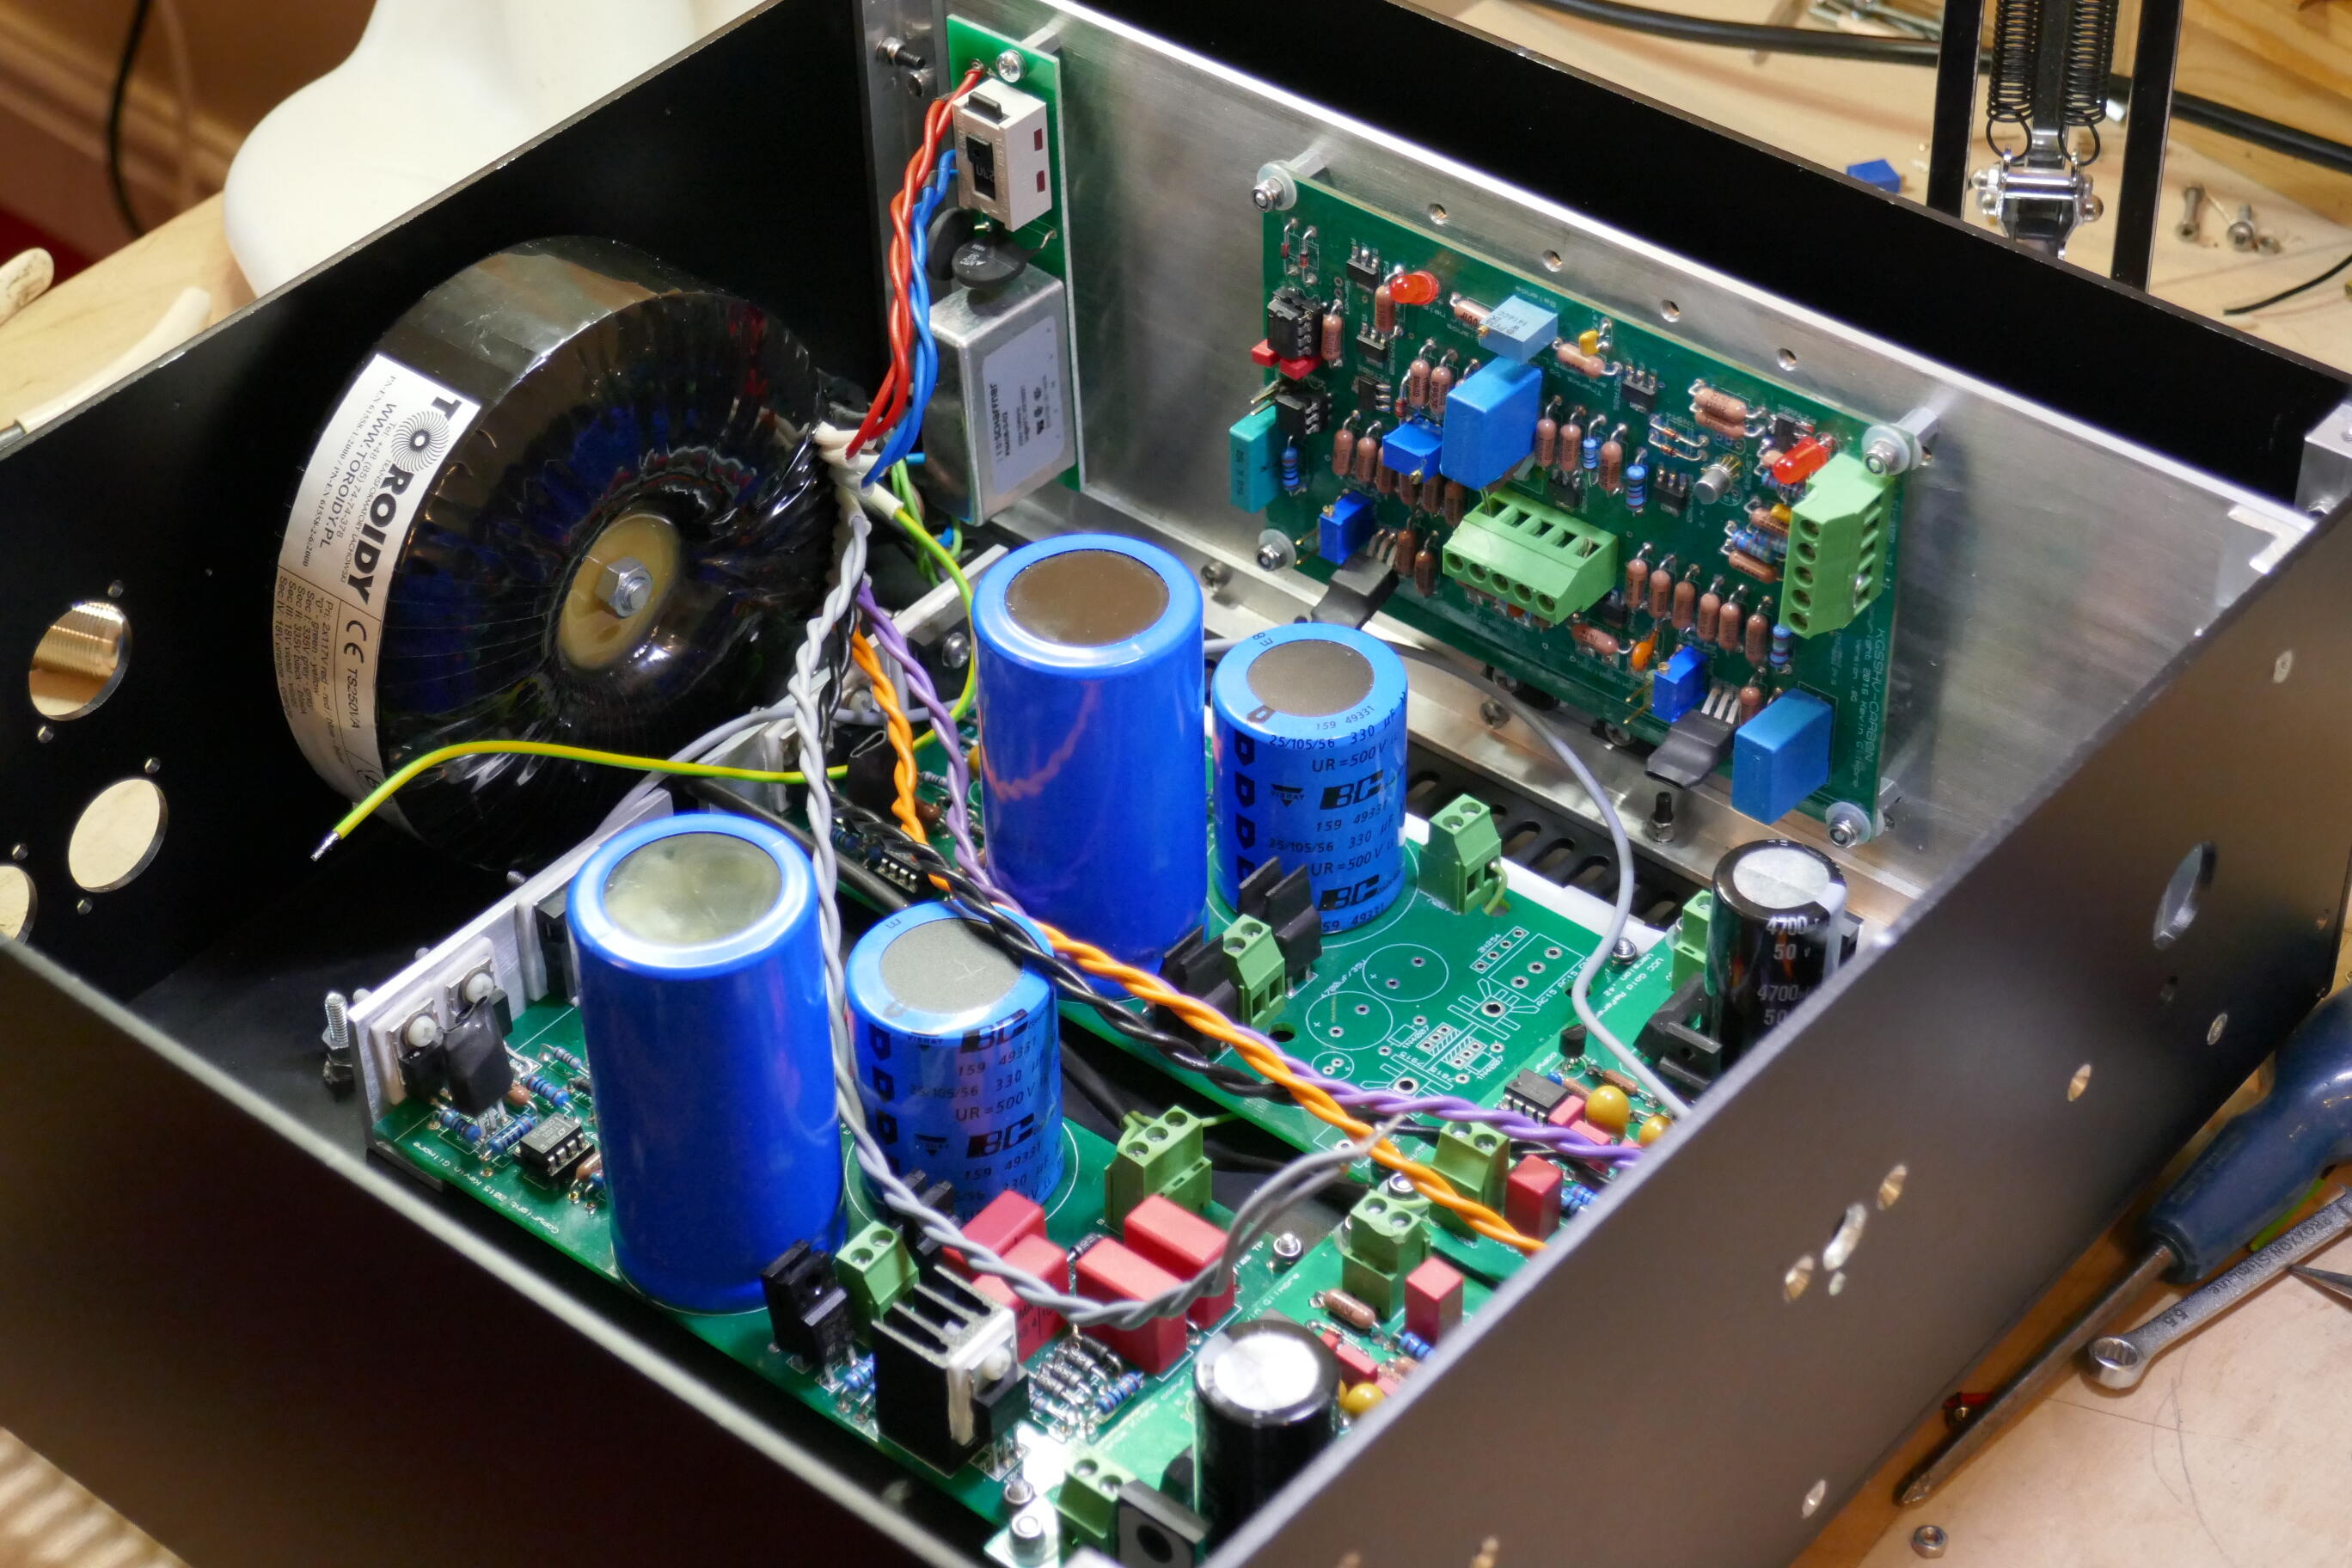
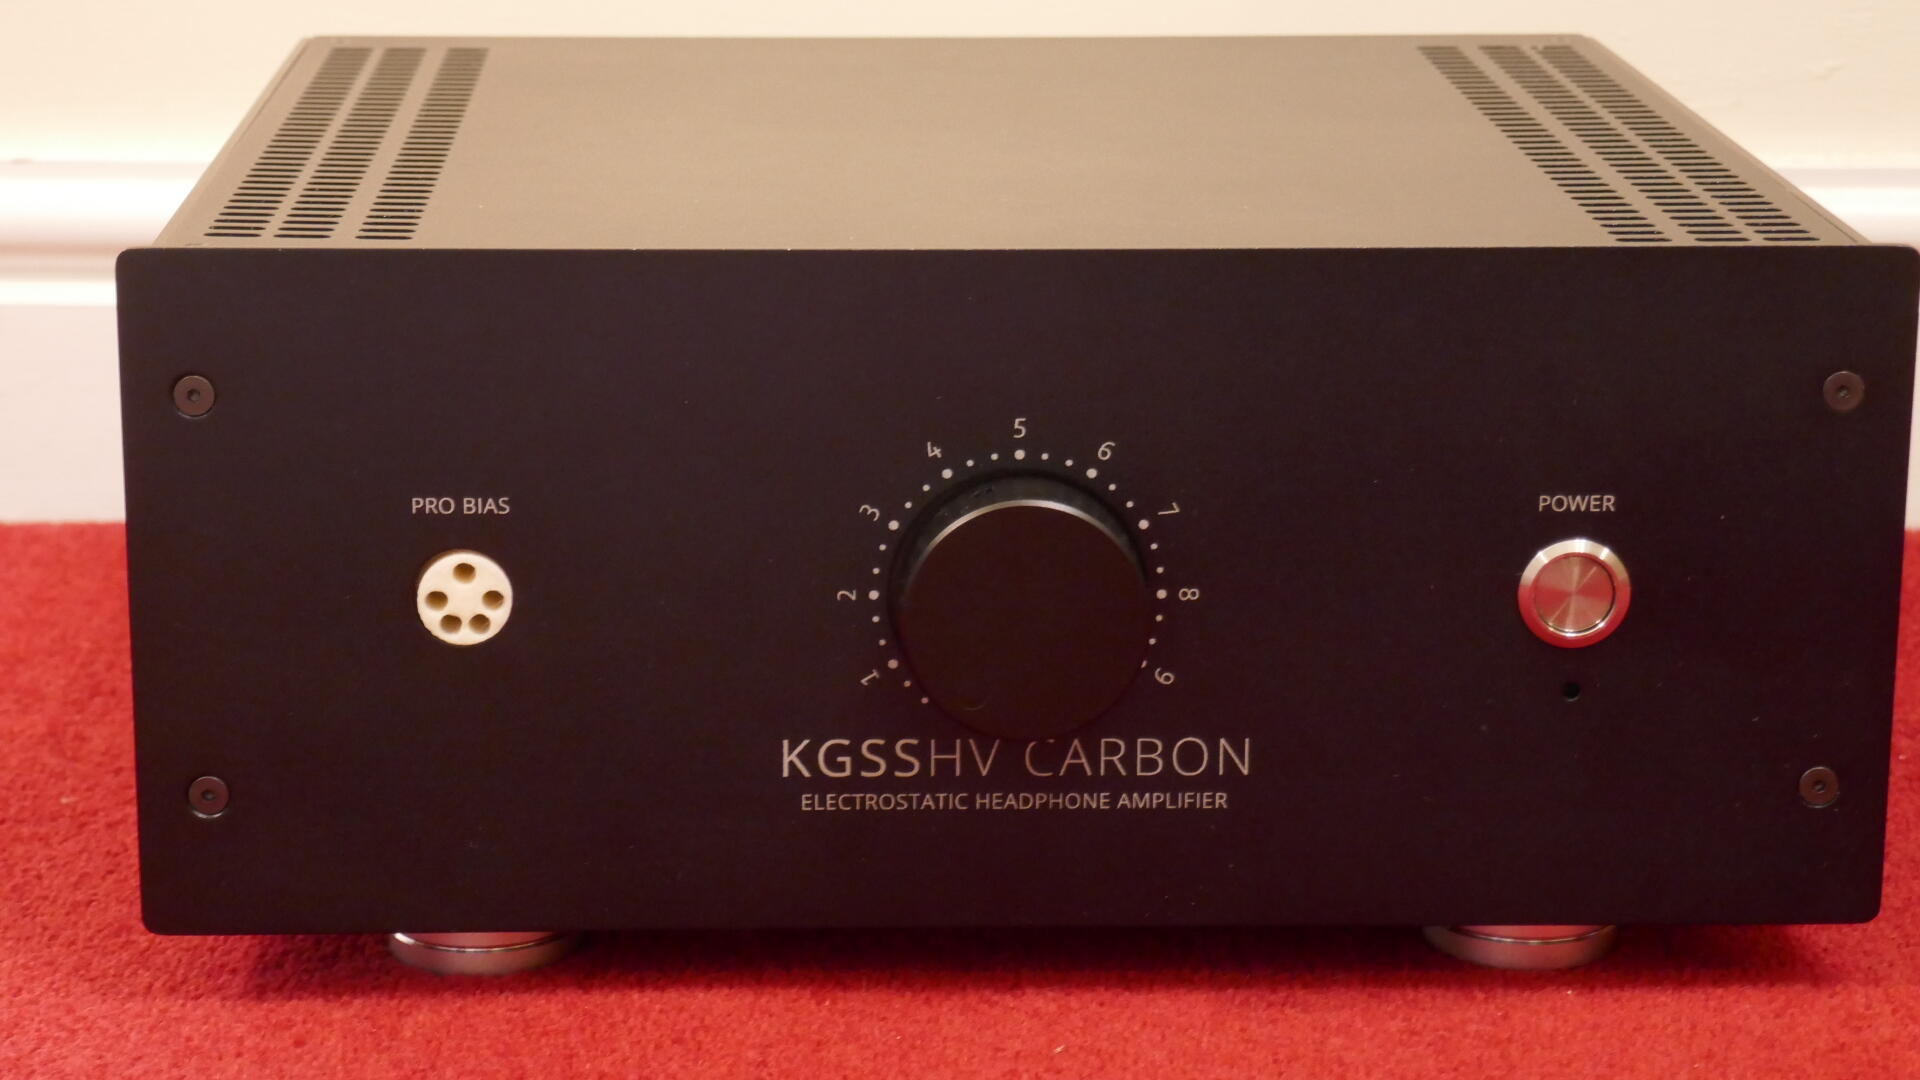
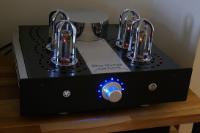
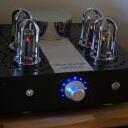
After several years layoff I have built a KGSShv Carbon which uses boards I had in and 4 Cree sicfets from several years back (luckily). The power supply is KGSShv v8 and the amps Carbon v6. It has been one of the easiest builds because of a different way of making the cases which I have described in Making diy cases, https://www.head-case.org/forums/topic/18892-making-diy-cases/ It is set for 400v supplies and 17mA output stage currents. It does not get particularly hot in a 20o C room, the heatsinks run a max of 40o at the centre. The power supply pass transistors are bolted to the bottom of the case and the case runs pleasantly warm to the touch. The size is 335 W x 314 D x 155 H inc feet. Weight 8.5Kg. (13in x 12.4in x 6.1in, 18.8lb.)

-
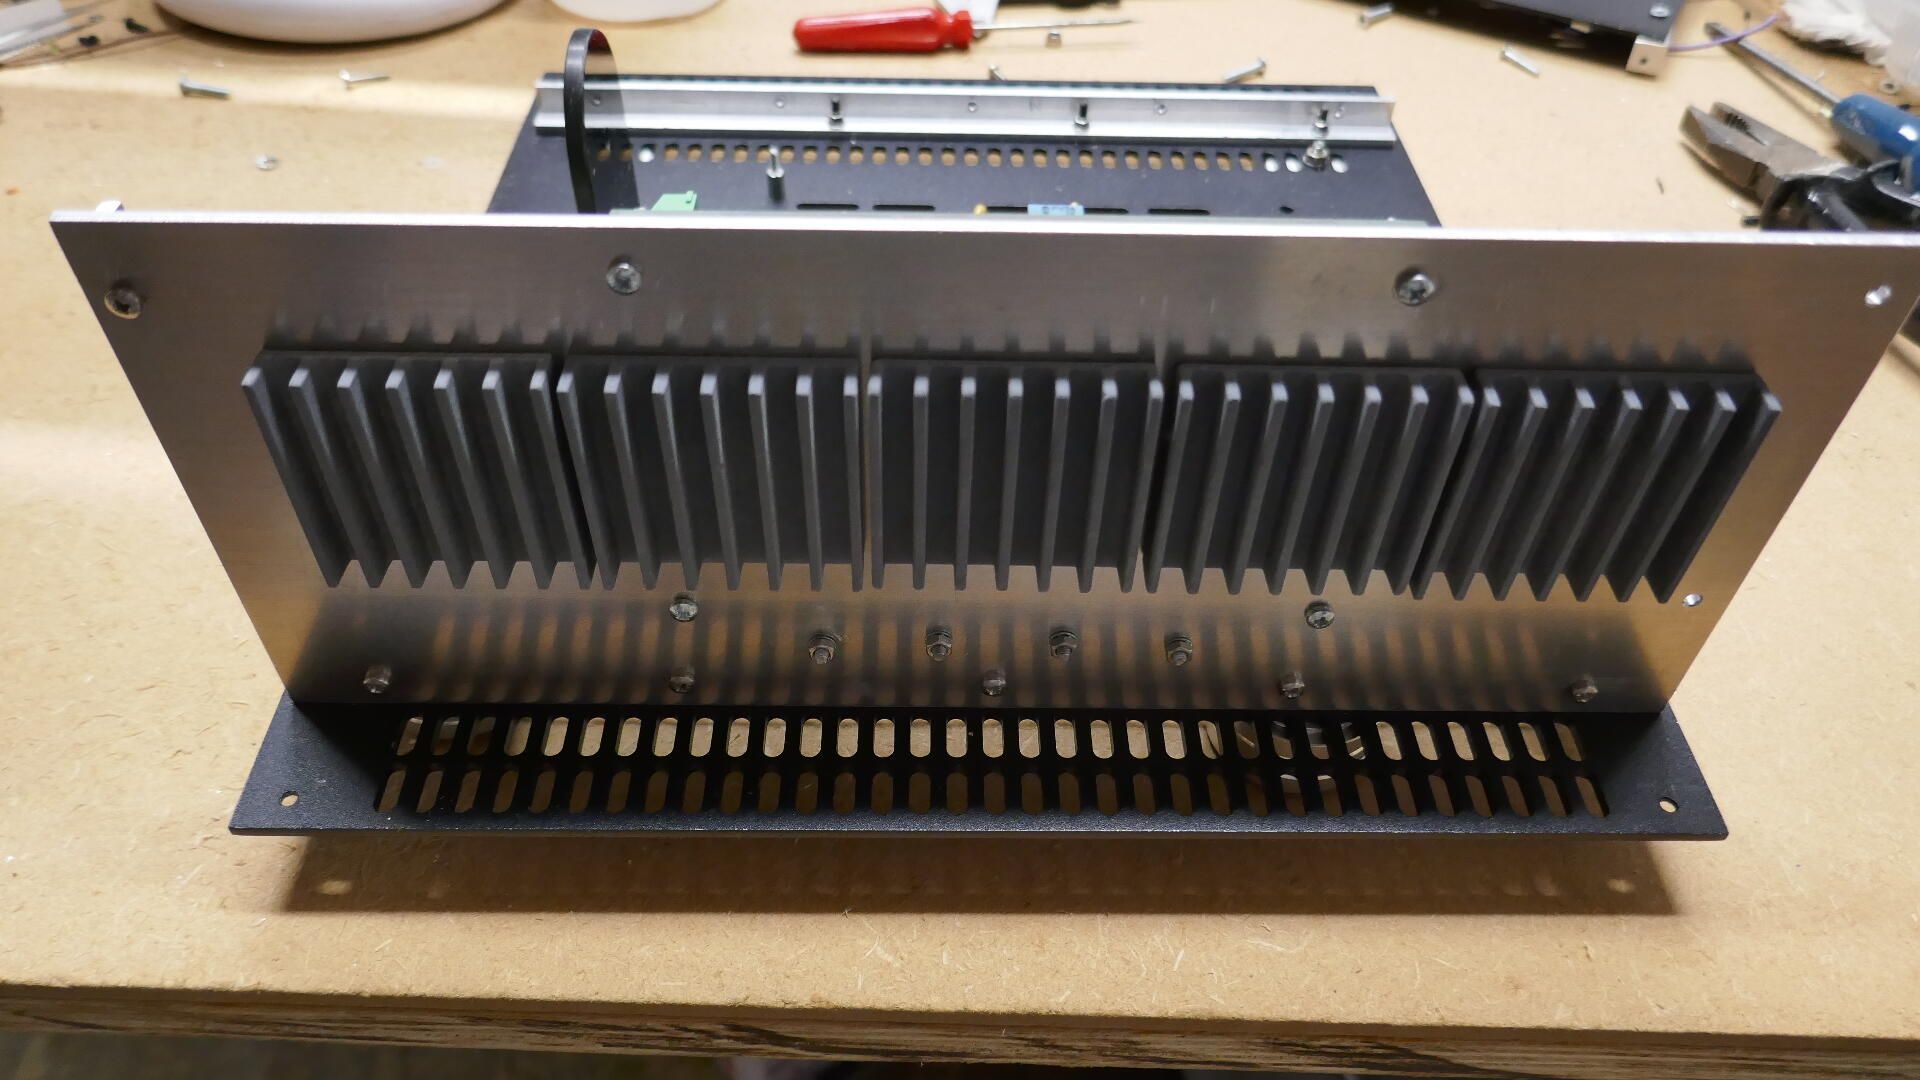
Cases and heatsinks are a problem for DIY builds. Front panels of thick alloy need machining and tapping as do heatsinks. These items are hard to get machined or the sizes the builder wants are not available. I devised a way of making cases, which eliminated these problems and made for easier case design, lower costs and quicker builds. Cases Made from sheet aluminium alloy of preferably 3mm so only single sheet of material needed. I get the parts laser cut by a company which will also supply the material. The case parts need holes to be countersunk where necessary and are then taken for surface finishing, (bead blasting and anodising in my case). I then take the front panels to be screen printed with the graphics I provide. The assembly is with corner posts and angle brackets cut and drilled, and bolted together. I only drill and tap corner posts to attach base and top panels. The case is basically a box with a front panel on to cover the front of the box. Heatsinks https://uk.farnell.com/amec-thermasol/fch505010t/heat-sink-50mmx50mmx10-25mm-ceramic/dp/2499023 Edit; a link to these was omitted, http://www.amecuk.co.uk/ Element14 has them in many countries. https://www.newark.com/c/cooling-thermal-management/heat-sinks?brand=amec-thermasol I discovered porous ceramic heatsinks and realised that these small, light, self-adhesive items would solve problems. I bought a few and tested to see if they did what was claimed. A single 50mm square of 10mm thick could dissipate 5-10W stuck on sheet aluminium. To make heatsinks you only have to bolt the semiconductors directly to the 3mm plates and place the ceramic heatsinks as needed. They are not expensive, and with a range of sizes you can arrange heatsinks of different shapes. I was concerned that they might unstick but the opposite has been true, they are hard to remove. They are not pretty so I contain them inside the case and organise slots above and below to act as a chimney to allow convection. This works well and they do not run hot. The porous ceramic devices are very effective. I have found that this method is much easier to procure and build. The amplifiers built this way can be smaller and lighter.
-
I'd like to chip in here. On different tracks I sometimes had a slight preference for the sound of the GG or the BH, but overall I had a slight preference for the sound of the BH. This impression was pretty fairly arrived at as each amplifier had the same power supplies (all golden ref), wiring, volume attenuator and casework. The GG did have 450v supplies and the BH 400v. The volume was equalised as accurately as possible. It was a wrench but I had to part with one of my babies as couldn't justify keeping both, so the GG has gone. I did hear the new 009S with it and the combination was, on a short hearing, near perfect. I have noticed after many builds of Kevin's designs my preference has been for the versions with tube OP stages.
-
Ha! I don't have a photo of it right now but there is a piece of acrylic in the back of the knob.
-
Well done Pars - although a hole in the skirt is not very bright on its own. (I'm a bit paranoid about a Chinese clone coming out next week, ref. earlier discussion.)
-
Yes I pondered on various ways of doing this. And if you want any electronics in the knob you have to get the supply in to it. I could do it but it’s not good. This uses a fixed light source. How would you do it?
-
Haha, How did you get my photo? It’s not a led. I am thinking of other ways to do it.
-
Yes they had to be blue, didn't they. Thank you for your comments. Kevin came up with a brilliant name for the Blue Hawaii -it has a certain glamorous connotation - well especially for those of us living in dull rainy places!
-
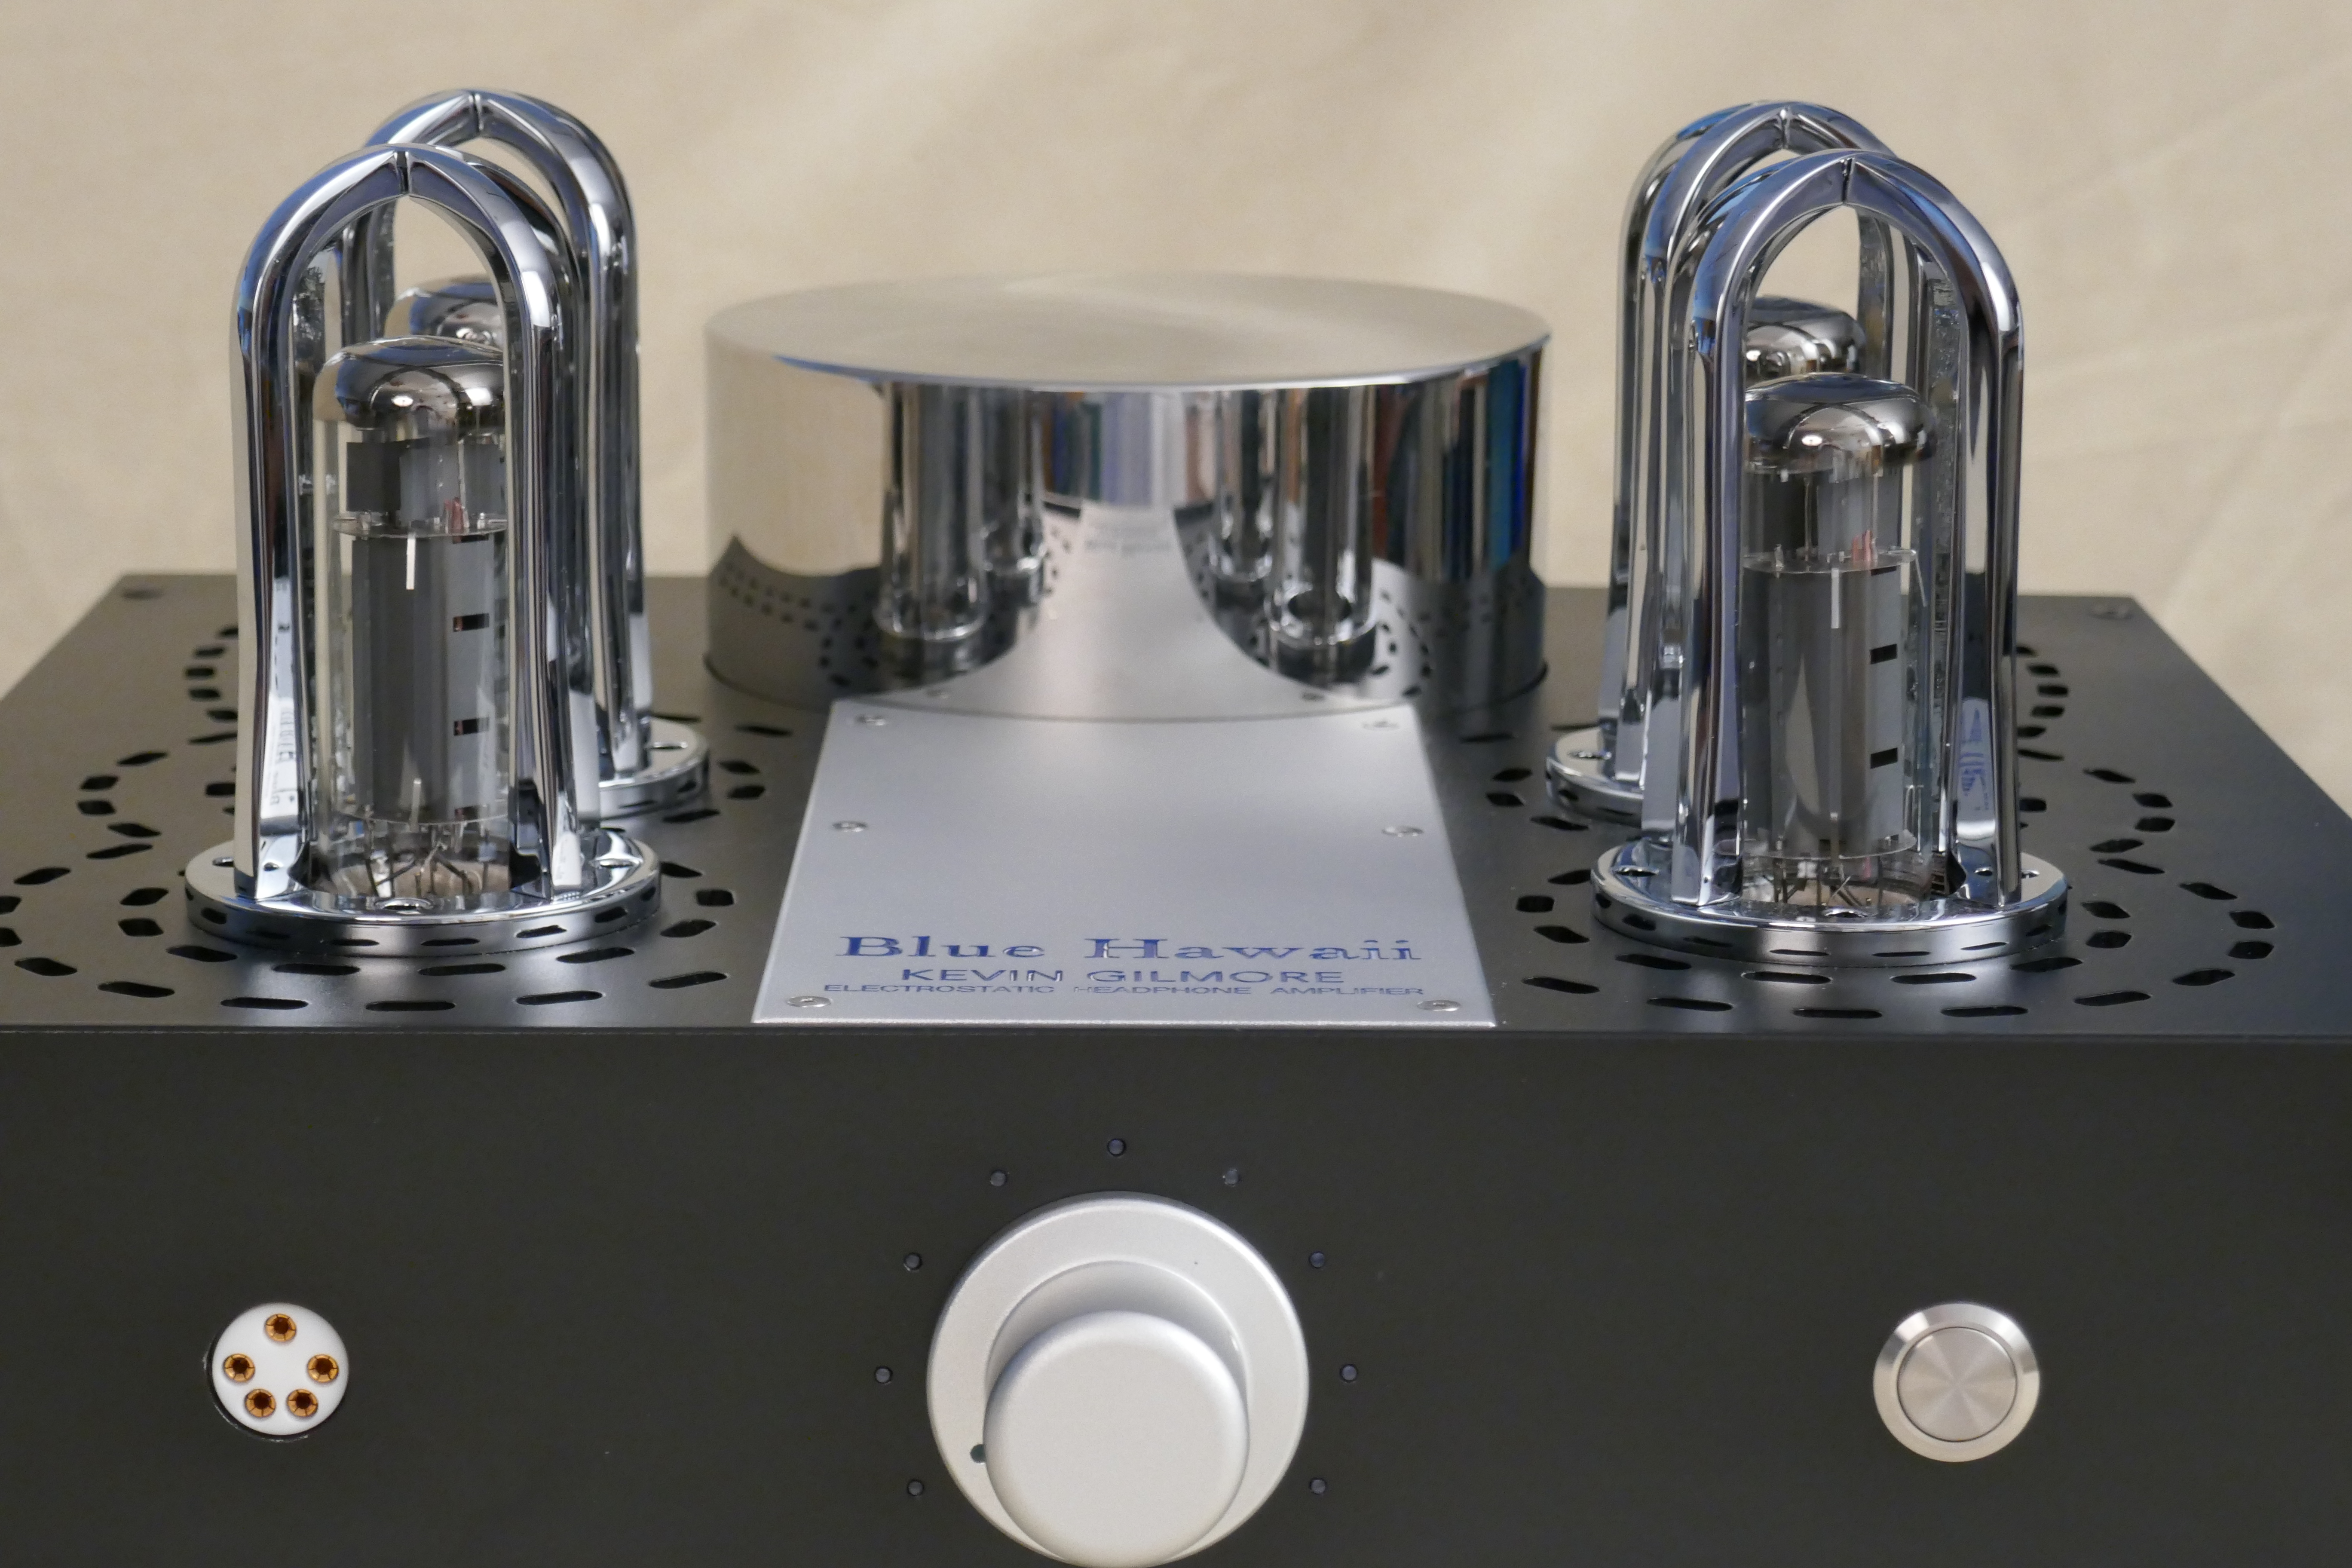
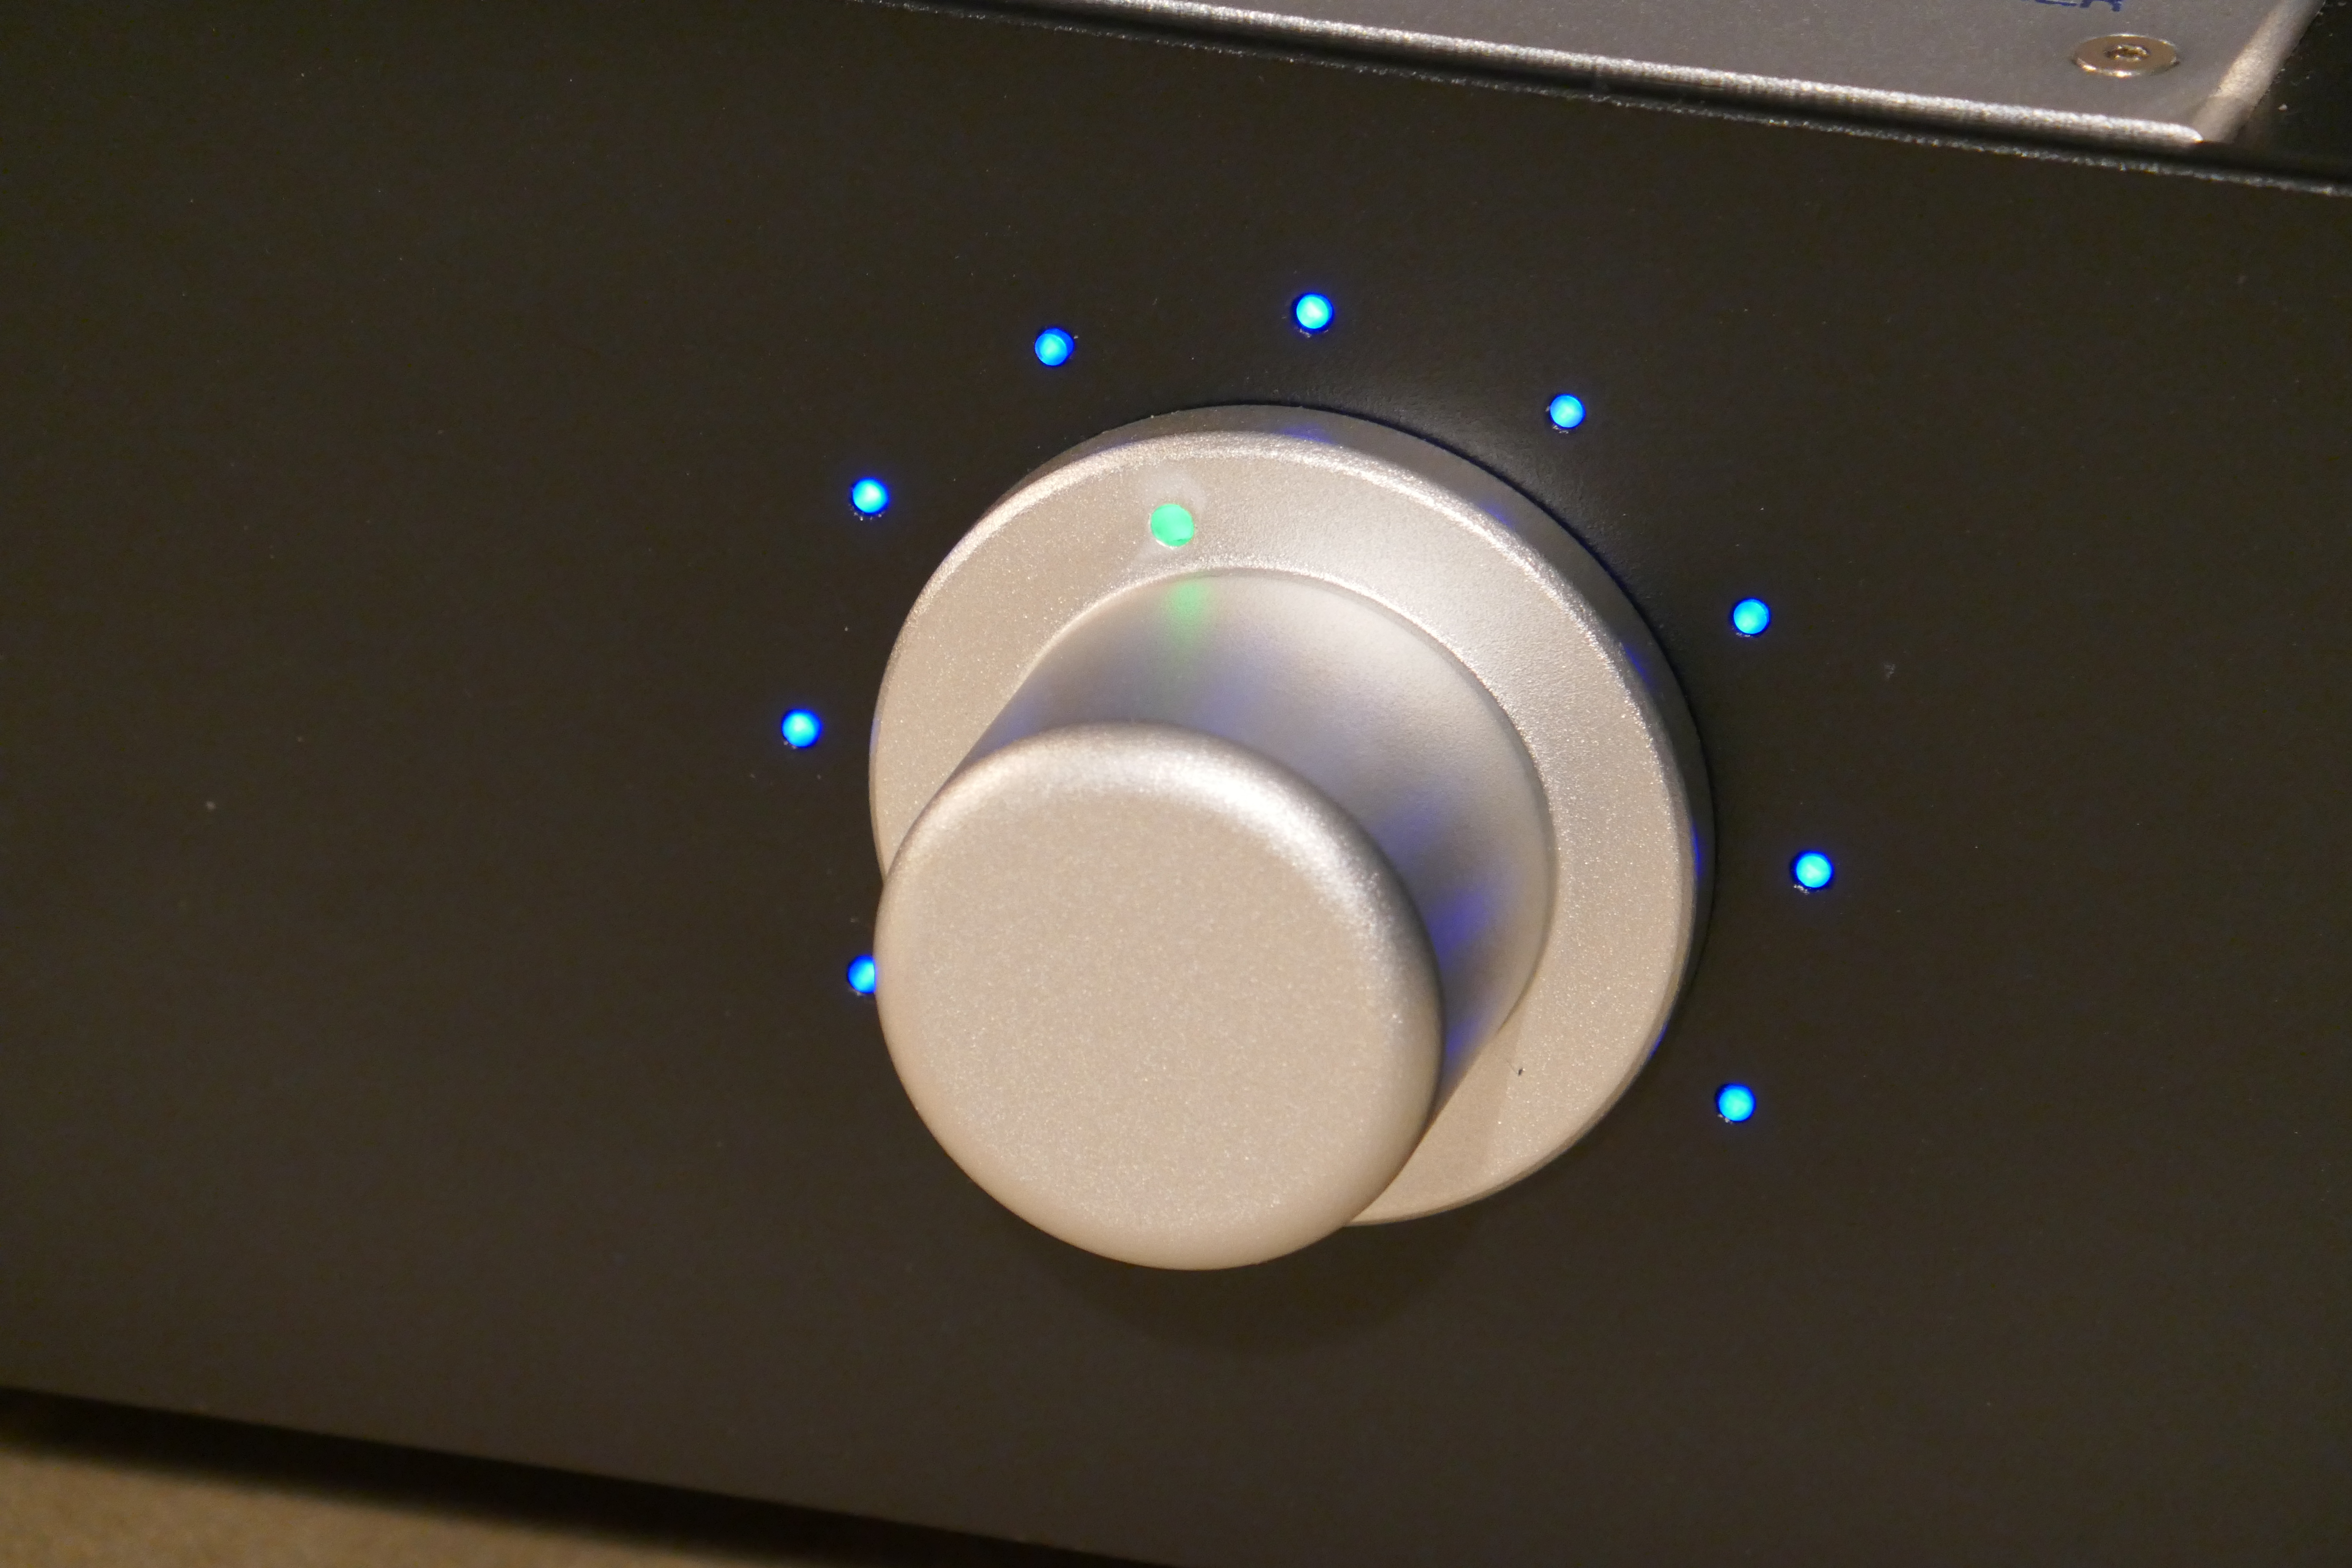
I finally built my Blue Hawaii - a single box KG 2015 which uses the mosfets, (but I will build the BJT boards too). All GR supplies. I was inspired by a Triumph Rocket motorcycle for the chrome trim and I wanted volume indication in the dark so it has a circle of leds and a delayed pointer off the heater warm up. While I was working all this out Kevin published the Grounded Grid so I am building one of those in a similar case. Looking forward to some extended listening now. Thanks Kevin for a great design
- 242 replies
-
- 15
-

-

-
Just returning to catch up with this thread. A terrific project Kerry - a milestone. Many congratulations.
-
Coming back to insanity's problem with the terminals/tracks. It might be worth masking the area and spraying with conformal coating to further increase the insulation strength locally. http://uk.farnell.com/electrolube/hpa200h/coating-conformal-aerosol-200ml/dp/298281 It can be found cheaper elsewhere but if Farnell are delivering to you maybe not. PS alternatively you can spray a little into a jar and paint it on with an artist's brush
-
Yes you have to try it. I would like to raise the terminals more but they rely on the surface to steady them.
-
It does look like the solder is spreading and causing the problem. We are normally soldering with the board inverted -joint on top. If too much solder is applied excess runs through and spreads underneath, but should tend only run on hot metal unless capillary action The kapton tape was used to protect against shorts to traces /components above the surface, for example, in the case of big caps mounted on the PS with ground planes. If we were to put kapton tape on the surface I suspect it would not necessarily stop solder running under it (capillary action too) and causing the same problem. I think the solution is care with the soldering but better, moving the trace as Kevin has done.
-
Remember the craze for kapton tape back in the early KGSShv days? I did buy a reel like this , http://www.ebay.co.uk/sch/i.html?_from=R40&_trksid=p2050601.m570.l2632.R2.TR11.TRC1.A0.H0.Xkap.TRS0&_nkw=kapton+tape&_sacat=92074 Haven't used much to be honest.
-
Hi insanity, I have been staring at my computer all day compiling an order for a new project so I am pretty frazzled too.. However those resistance values you've measured don't look so unusual. The dc values are not the same as the ac impedances. It won't draw those currents when on 50/60Hz. We await your testing of the transformer Good luck PS have you checked the switch? but it must be working if you have trouble in the downstream supplies.
-
Well done Fred, I am so glad you stuck with it.That looks very nice.
-
Wink, I love your use of emoticons. You got me thinking about driving two Stax. I briefly thought of putting two sockets in but quickly decided not to. · I don’t want it · No-one asked for it · It spoils the symmetry · Why would you drive two Stax at same time unless for “comparisons”, assuming your partner does not want to sit listening to the same stuff as you. I know the Carbon has plenty of current but won’t the sound be compromised by more than doubling the 120pF with two in parallel?
-
Thanks but I do have all the components for the KGBH. I have suspended building for what passes for summer over here.
-
Yes one is in his new shopping trolley eh Wink. If you ask for a picture of the bottom I'll worry. The transformer is on a M6 bolt but in case you are wondering is supported at the front by a 6mm thick acrylic piece bolted to a bracket on the base. You should be able to see it in the internal shot.
-
Thank you Steve and Kevin, the cardboard models paid off! It is also a gorgeous sounding amp. I am smiling and tapping my feet again. I should also point out that the styling; rounded edges, milled detail and switch insert were suggested by Julian, whose talents are very much in the visual field.
-
Here is my Carbon build. The layout is a lot like the KGSShv Cube I made in 2014 although this is bigger and easier to assemble. I have dubbed it the “Chunky”. I have two versions, a black/silver and an all silver and am building two of each. The Chunky measures 340 wide X 310 deep x 138 high, plus feet and weighs about 10 kg. As I wish to concentrate on other projects I do not intend to make more amplifiers for other people. I am intending to do a KGBH for myself. I have enjoyed the challenge over the last few years and have also met some great fellow head-cases. The KGSShv/KGST/Carbon KG designs I have built have all worked as intended and been easy to set up and all have given great musical pleasure. This is a sign of a great designer and I would like to note again my gratitude for the great gift given to this hobby by Kevin and Birgir, Kerry, Joamat, Jim L and all the others for their contributions and inspiration.
-
Yes we're a bit punch-drunk at the moment. Well played Iceland a tremendous run so far -- keep it up!
-
Yes that's very good. Trouble is there are portents for big things in Iceland just now,apparently the Hekla volcano is getting a bit tetchy.
-
goldenreference low voltage power supply
headinclouds replied to kevin gilmore's topic in Do It Yourself
I need a few more GR LV single boards, so will buy some. If you would like to be included, please see my post in the Carbon build thread.