

Leaderboard

Popular Content
Showing content with the highest reputation on 11/13/25 in all areas
-
2 points
-
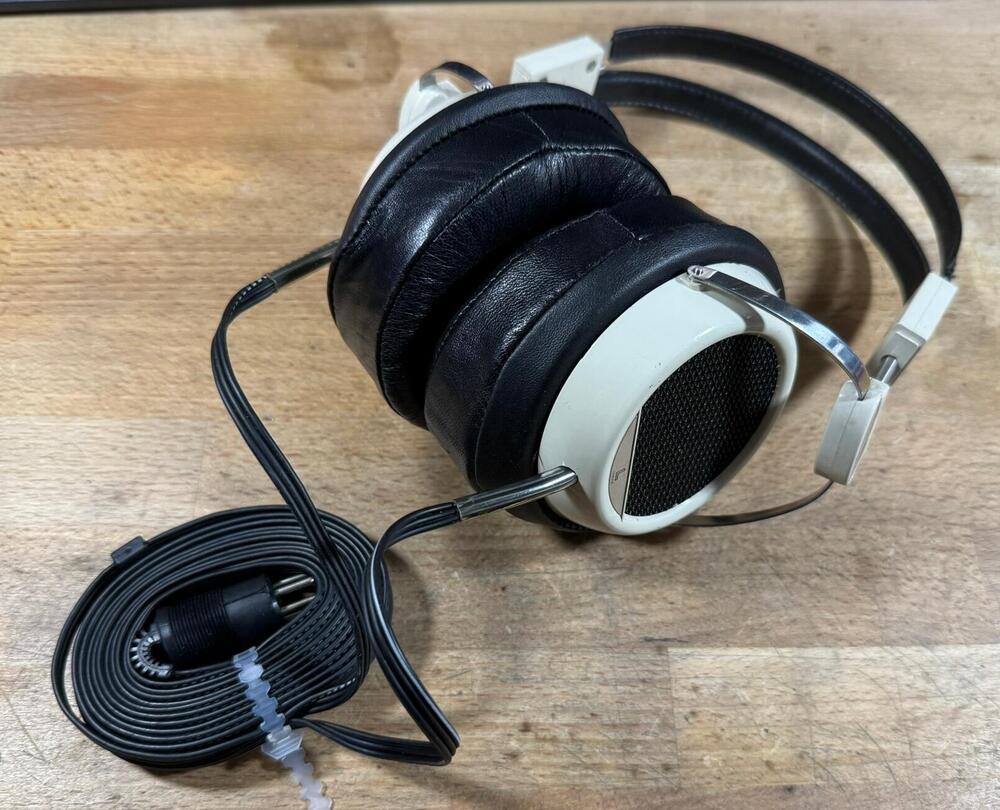
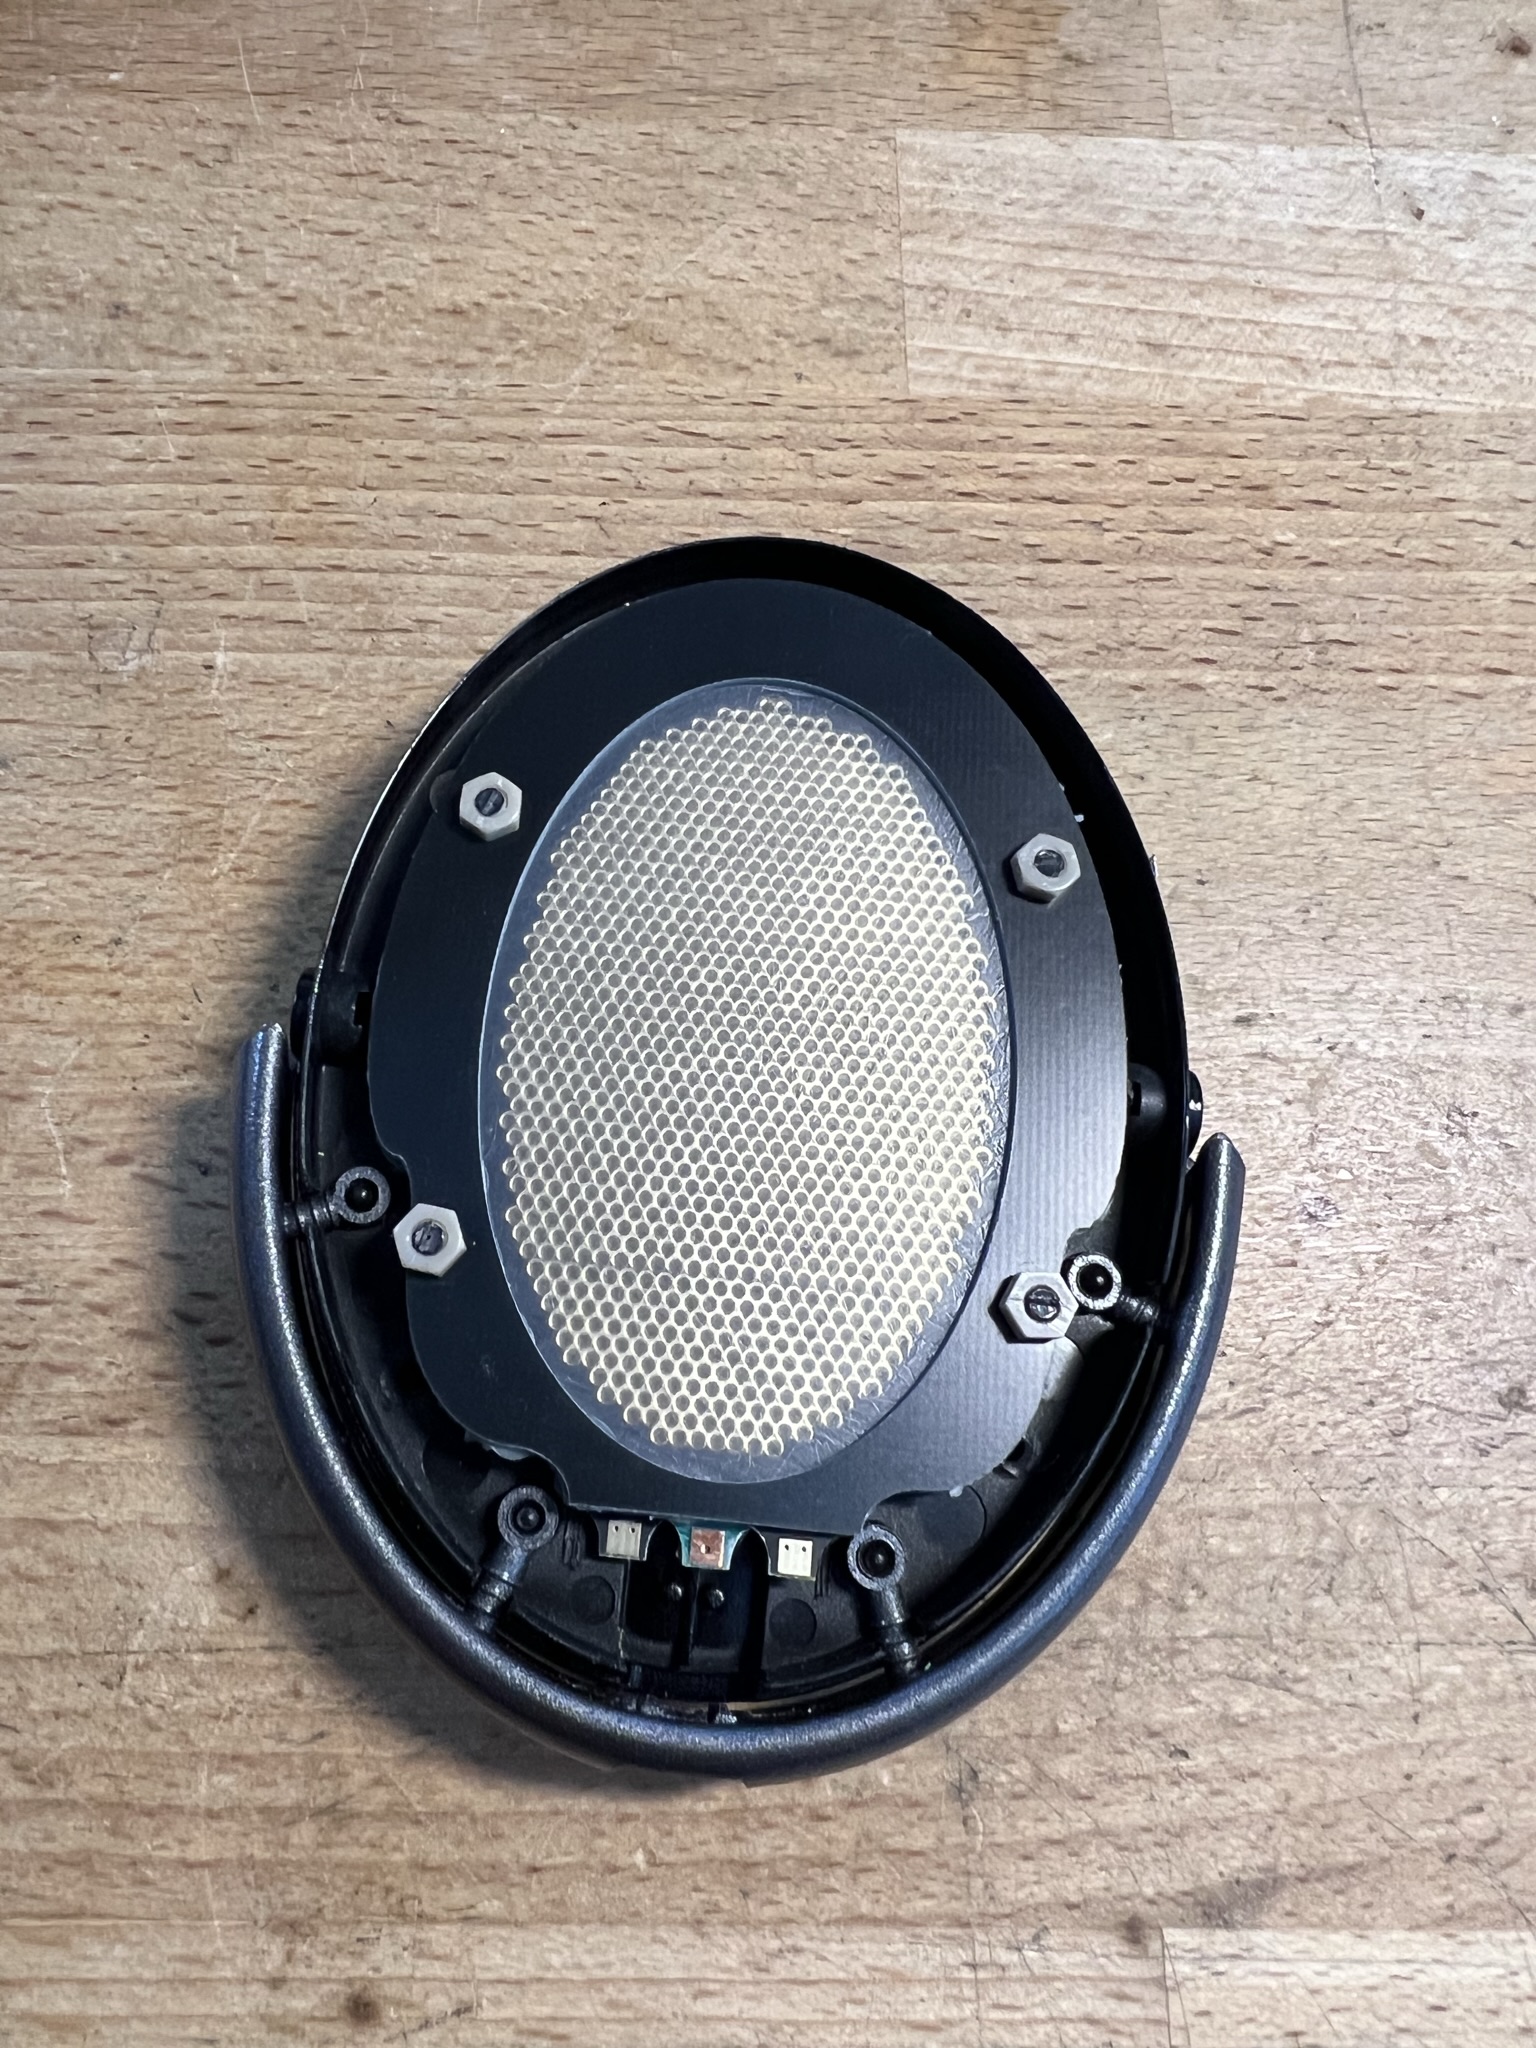
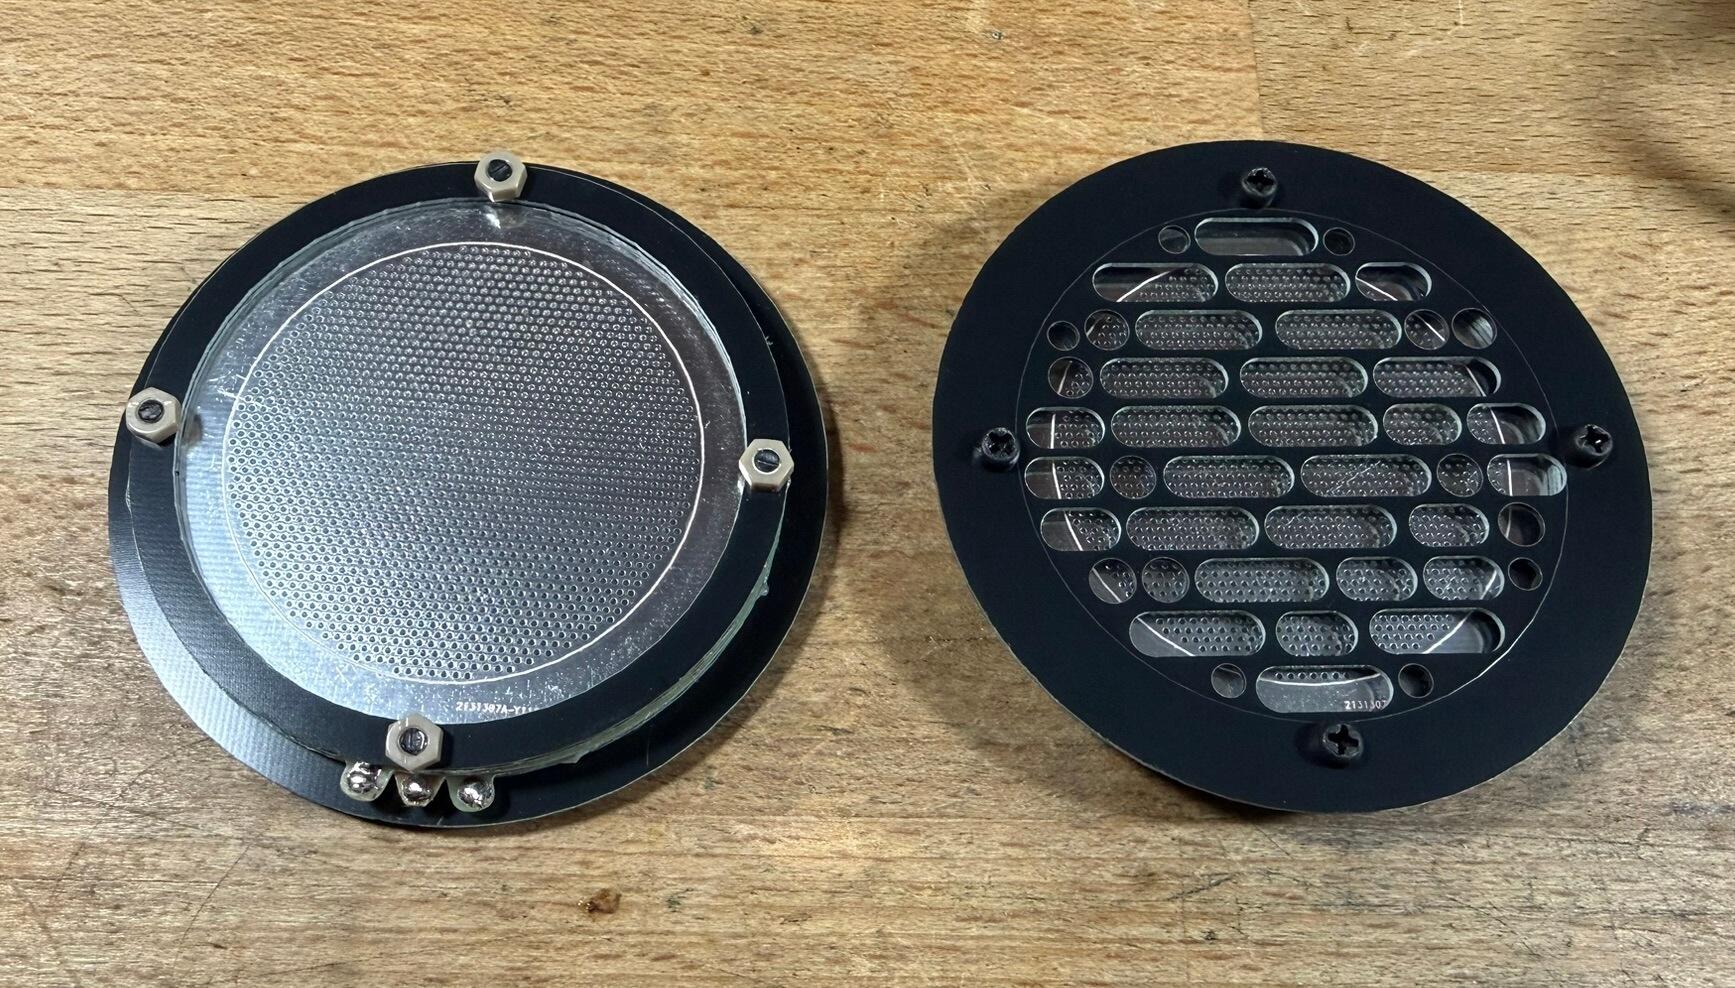
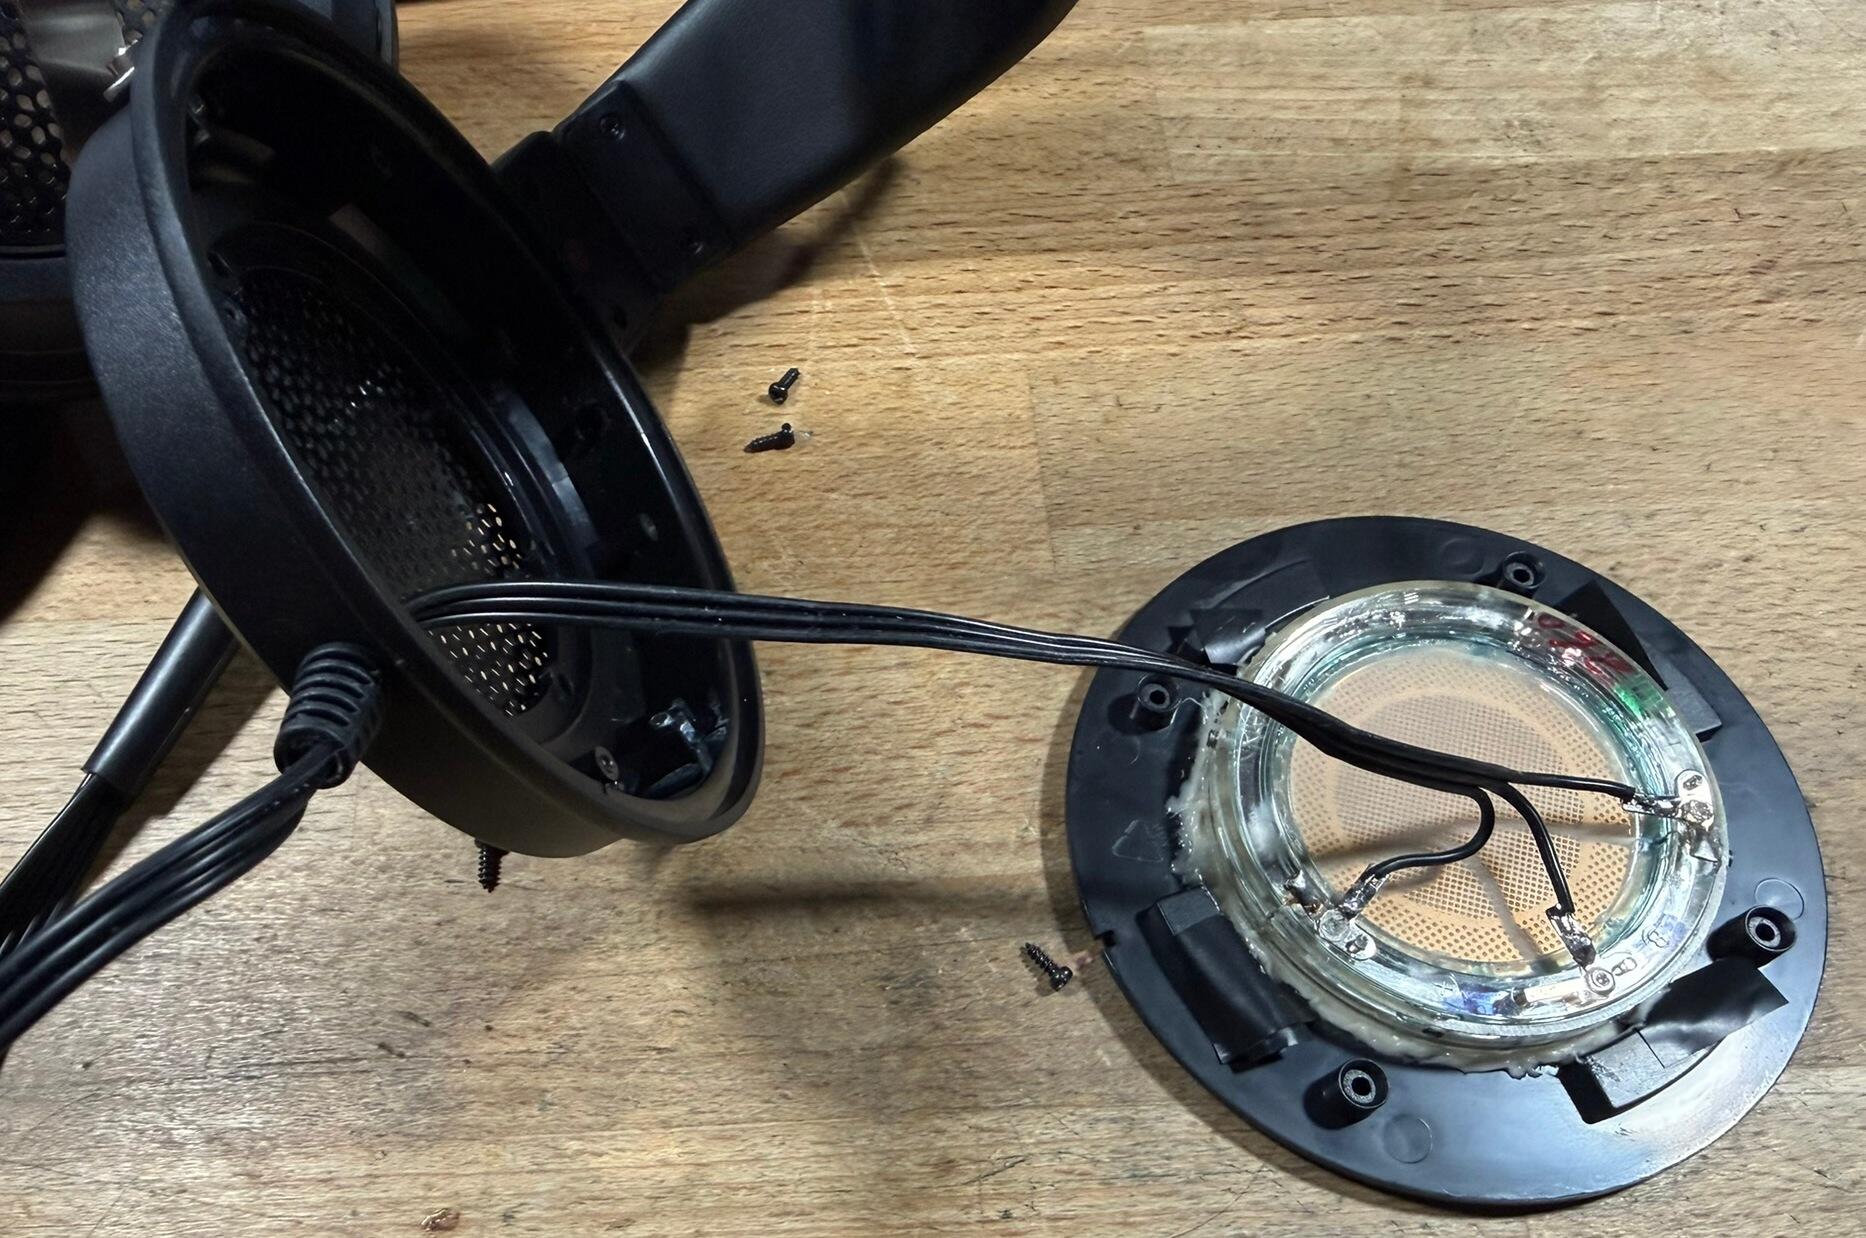
2 points2 pointsThe drivers are genuine, there is just no way to reuse the stock rings so I had to have my own made. The 009 diaphragm rings make zero sense too as there is no way to solder to them so PCB's here make a lot more sense. Plus more insulation as the stock setup is not ideal. The stators and the case will be stock and I went for slightly thicker rings for the dust covers to add more compression to the drivers. I'm also going to replace all the o-rings with better units. One thing I want to do as well is plug that hole in the center of the stators. I don't understand the reasoning behind it and it might be one of the reason why the 009's sound so bad.2 points2 points£220 ‘for a cut-up sock' - Apple's new iPhone Pocket ridiculed online https://www.bbc.com/news/articles/cn97ndgpnq7o2 points1 pointI did search but I couldn't find a dedicated thread about DIY electrostatics so in the spirit of getting the discussion started, here is something I've been working on. Well over a decade ago I bought up all the spare Sennheiser HE60 parts to assemble new headphones. The first thing to go out of stock was the main housing so to assemble the last pair, I had to adept a HD650 housing to take the HE60 drivers. Ever since then it has stuck in my head to make my own drivers for those housings and well... here is version 2.0: I bought a ratty old HD650 and completely stripped it apart. Headpad, earpads and cable went into the trash while the rest went for a long bath. First step is to make the baffle flat so a lot of cutting with nice, sharp, flush cutters. I naturally forgot to take a picture of that step... Next step was to fully measure what area I had to work with and design PCB's to match that, while maximizing the open area. The end result is three different PCB's, as they are all setup to be dual sided. One for the stators, one which holds the diaphragm and finally the simple outline which holds the dust covers and can act as a spacer. Some pics of them assembled in the housing: Four nylon screws hold the sandwich together, fixed with PEEK nuts to get extra gripping power as the assembly had to be as flat as is possible. Dust covers placed away from the stators so they don't cause any issues. Earpad side: Due to the screws, some earpad mountings have to be cut up to get the pads to fit but yeah, they are just cheap crap from China so who cares. I could cut a slot in them to try and make it fit but maintaining as much pressure on the drivers as I can is far more important. Final assembly with a King Sound cable as I have a couple of those sitting around. For the diaphragm I used my usual stock of 1.4um film and the earpads are just the cheapest leather pads I found on ebay. I have a couple of nicer ones but these are the thickest and that helps make them more balanced sounding. The diaphragms were stretched by hand on a mirror (which is my preferred way) and glued with wood glue (thanks for the tip Aumkar!) which is just perfect for this. Coating is anti-static spray which means they energize in five seconds or so which I can live with. Now for the sound... pretty damn good for something so simple and literally being the second set I assemble. Well that and zero effort has been put into sealing the baffle or just any sealing at all. I just stuck the PCB's onto the baffle and built up the stack. Overall sound signature is similar to the HE60 but not as diffused and with far more bass output. Maybe a tad too much at times as there are some oscillations that I can pickup at very high volume levels and under high excursion. I tend to go with slightly less tension on the diaphragm so that might be it. Treble is very pronounced with the thinner pads but with the ones pictured, it is just perfect. These are not forward at all and the soundstage is excellent for this size of a driver and non-angled earpads. Sensitivity is slightly lower than the regular Stax sets but still only marginally so. All in I'm very happy with the roughly 150$ outlay for these. Now this is version 2.0 but the first version used a HD58X from Drop, brand new in the box that I cut up. Same driver profile but thicker stators so the efficiency was really bad plus the stators had full solder mask on them. Now I'm out of the spacer PCB's for the dust covers so next time I order PCB's, I'll make another set. I also have some diaphragm spacers which would work well for normal bias as I've always wanted to mess more with that.
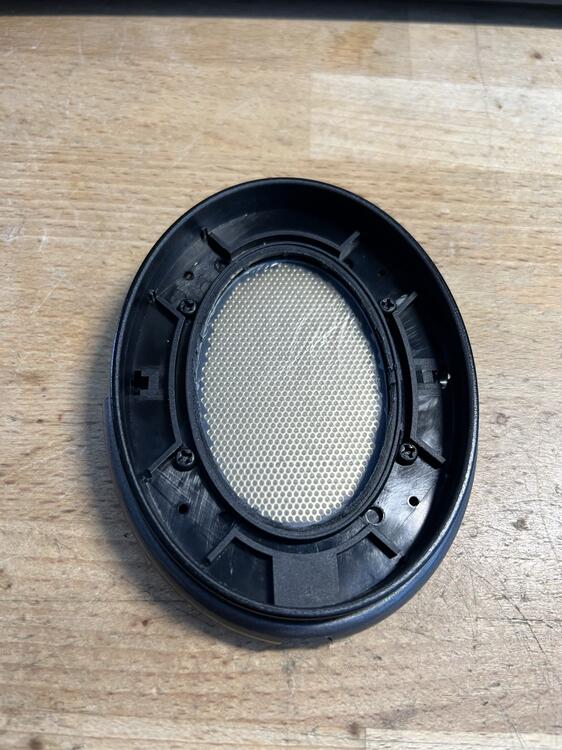
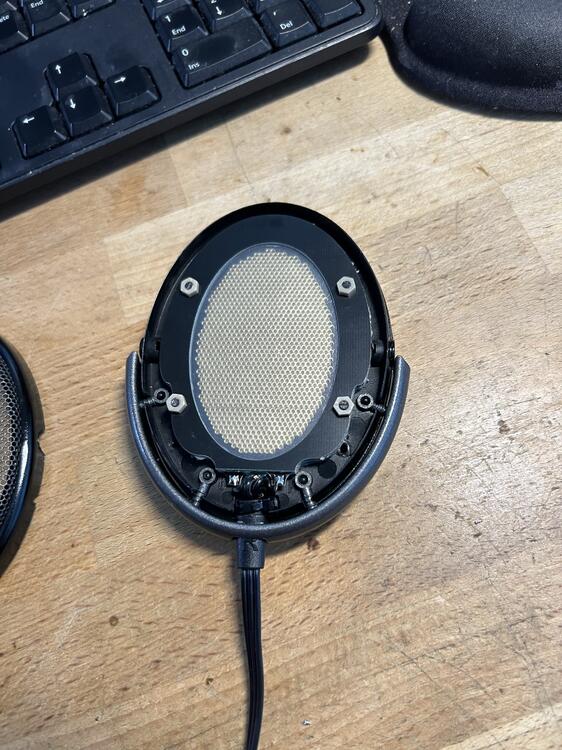

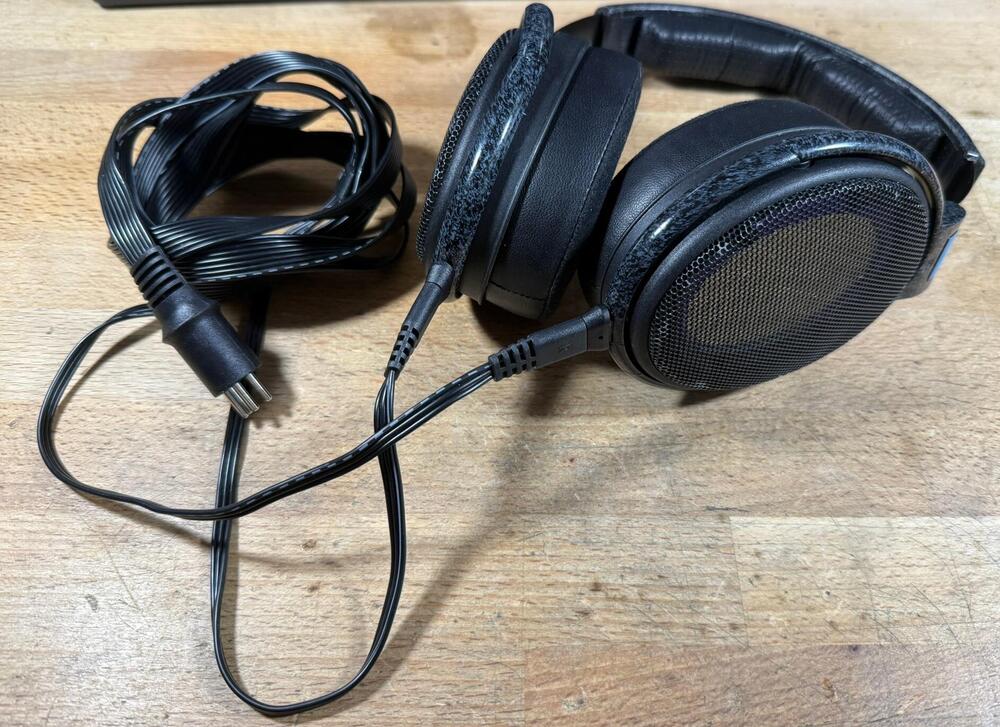
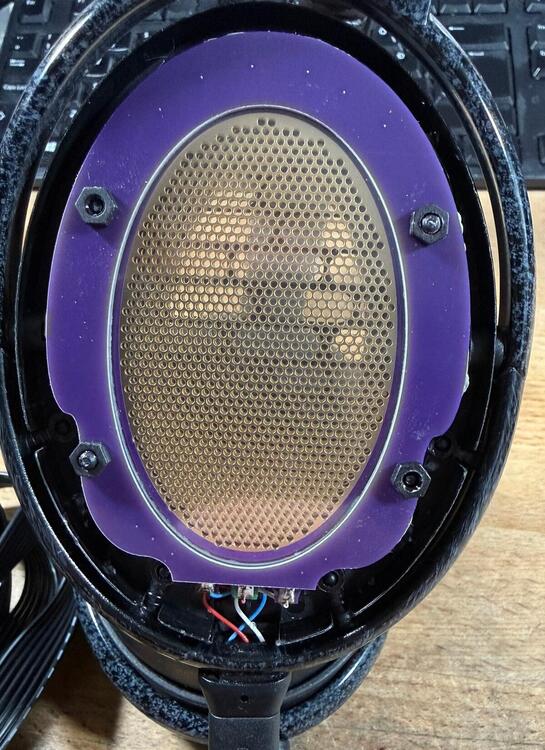
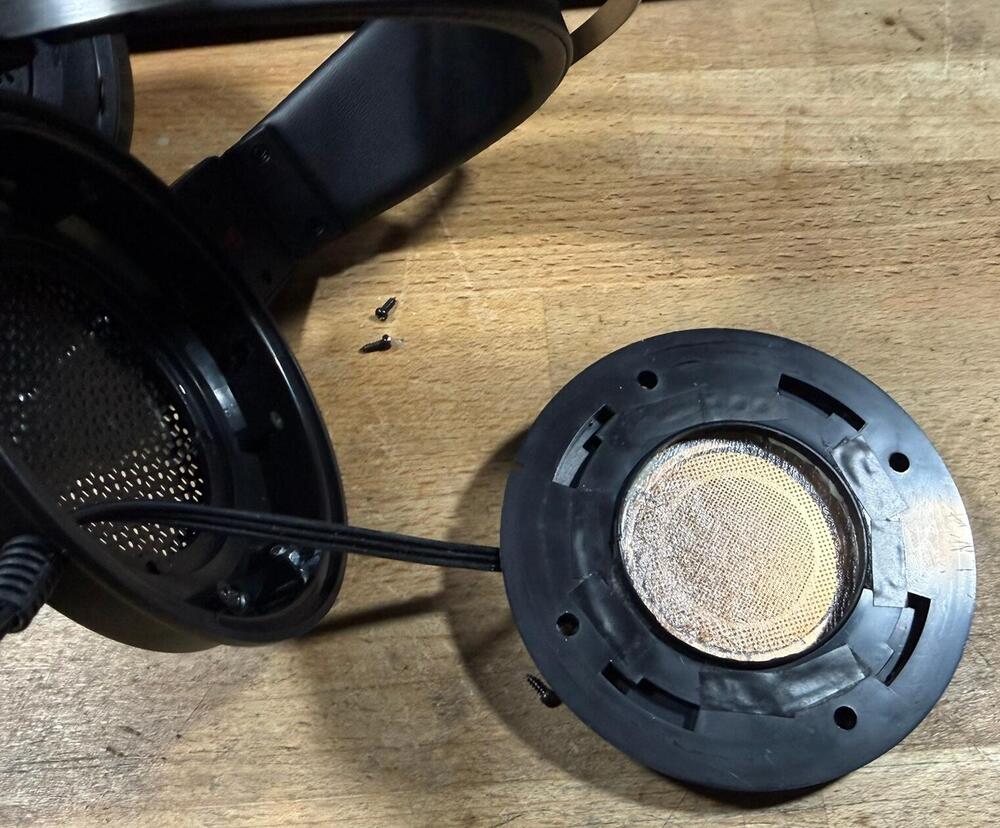
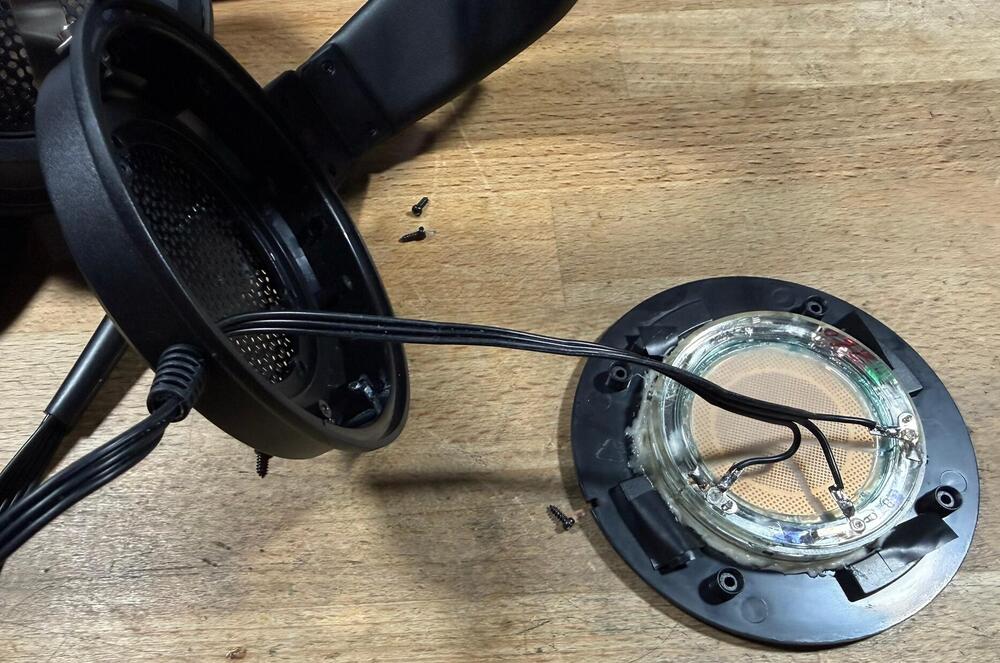
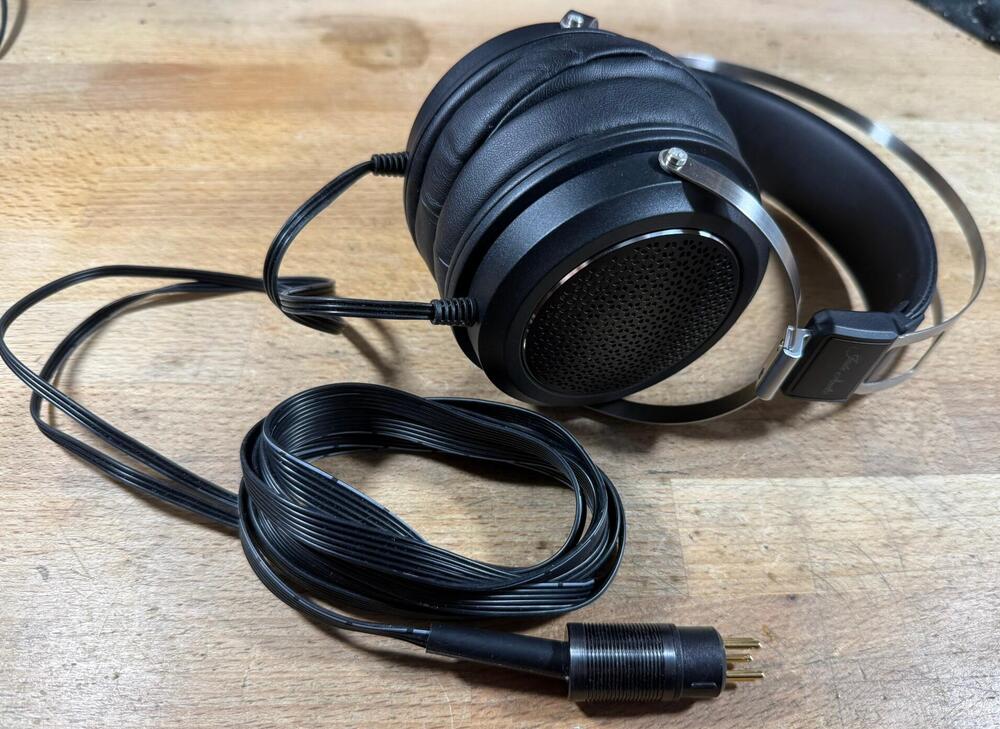
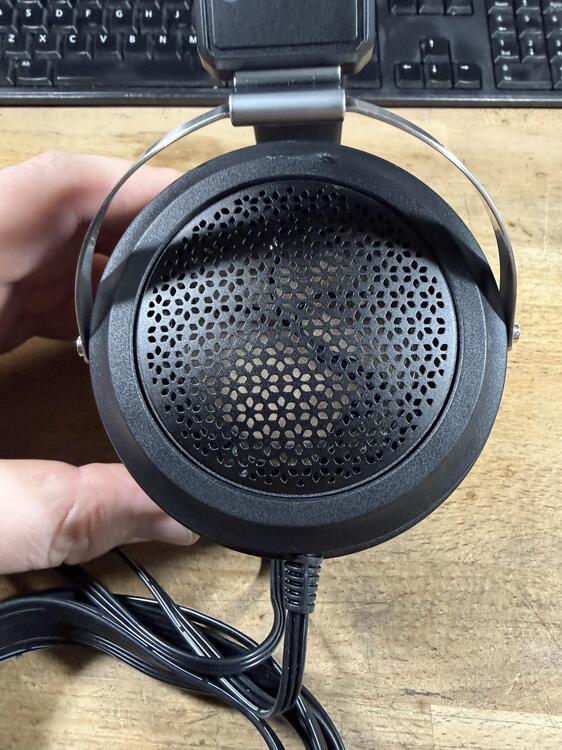
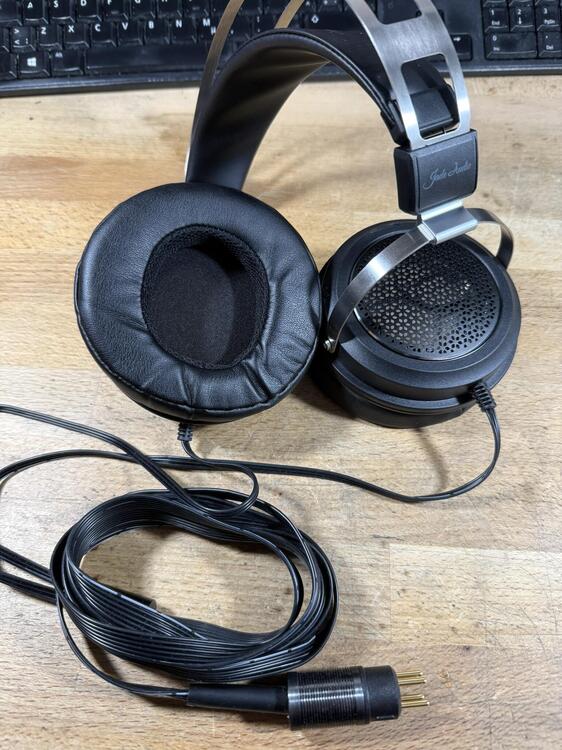
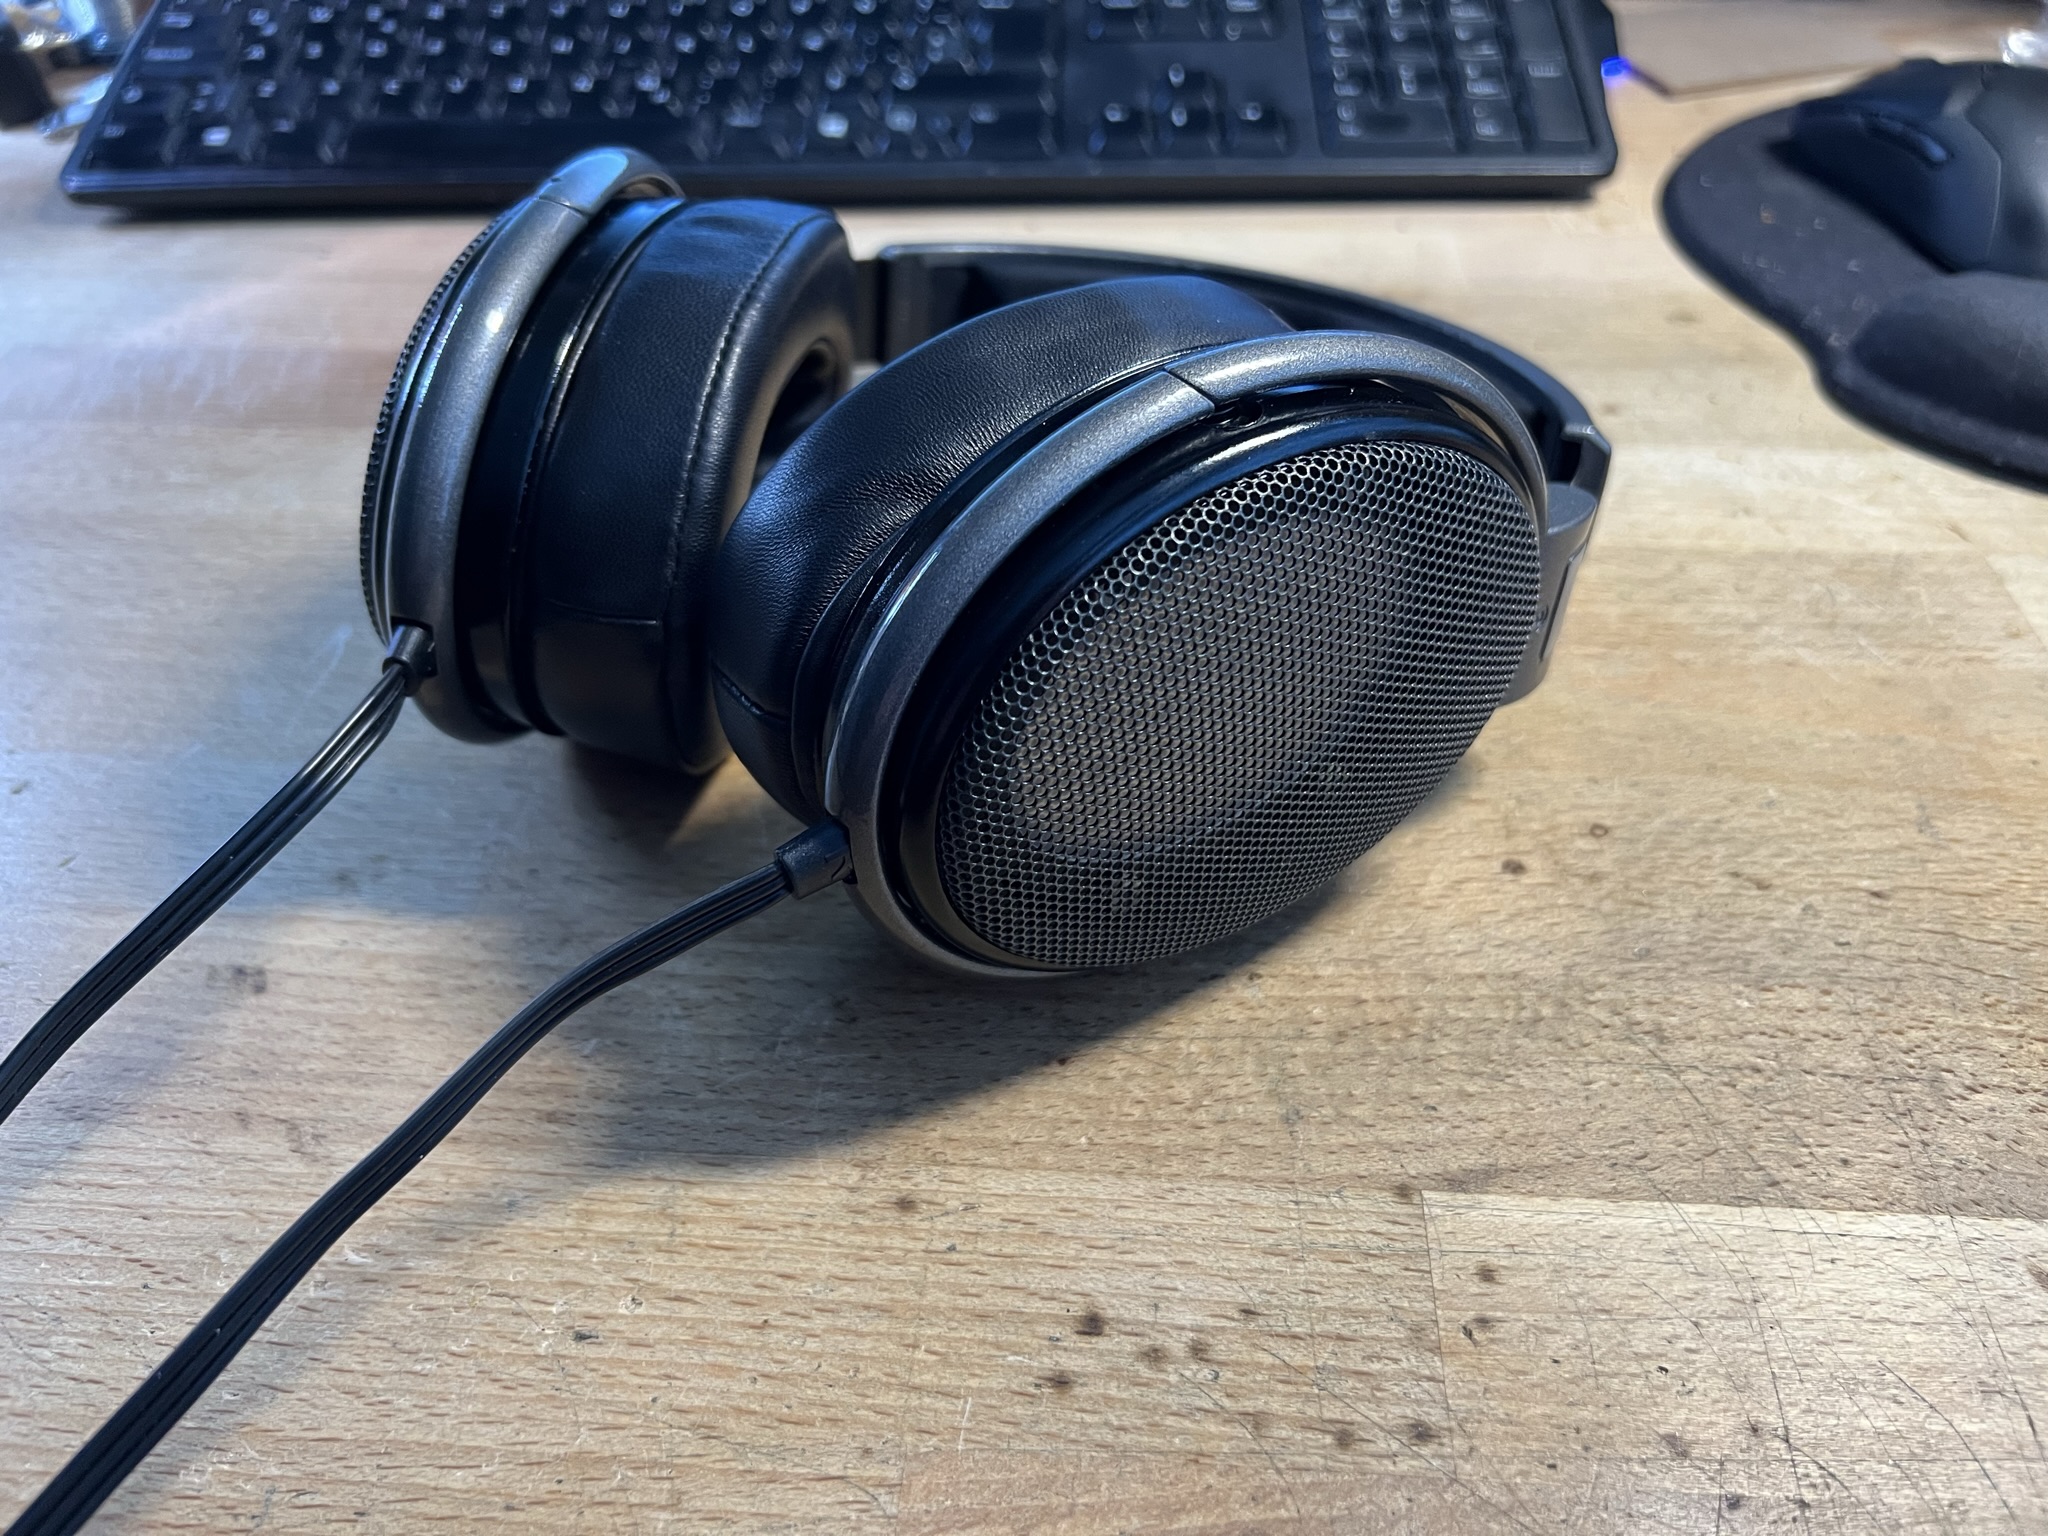
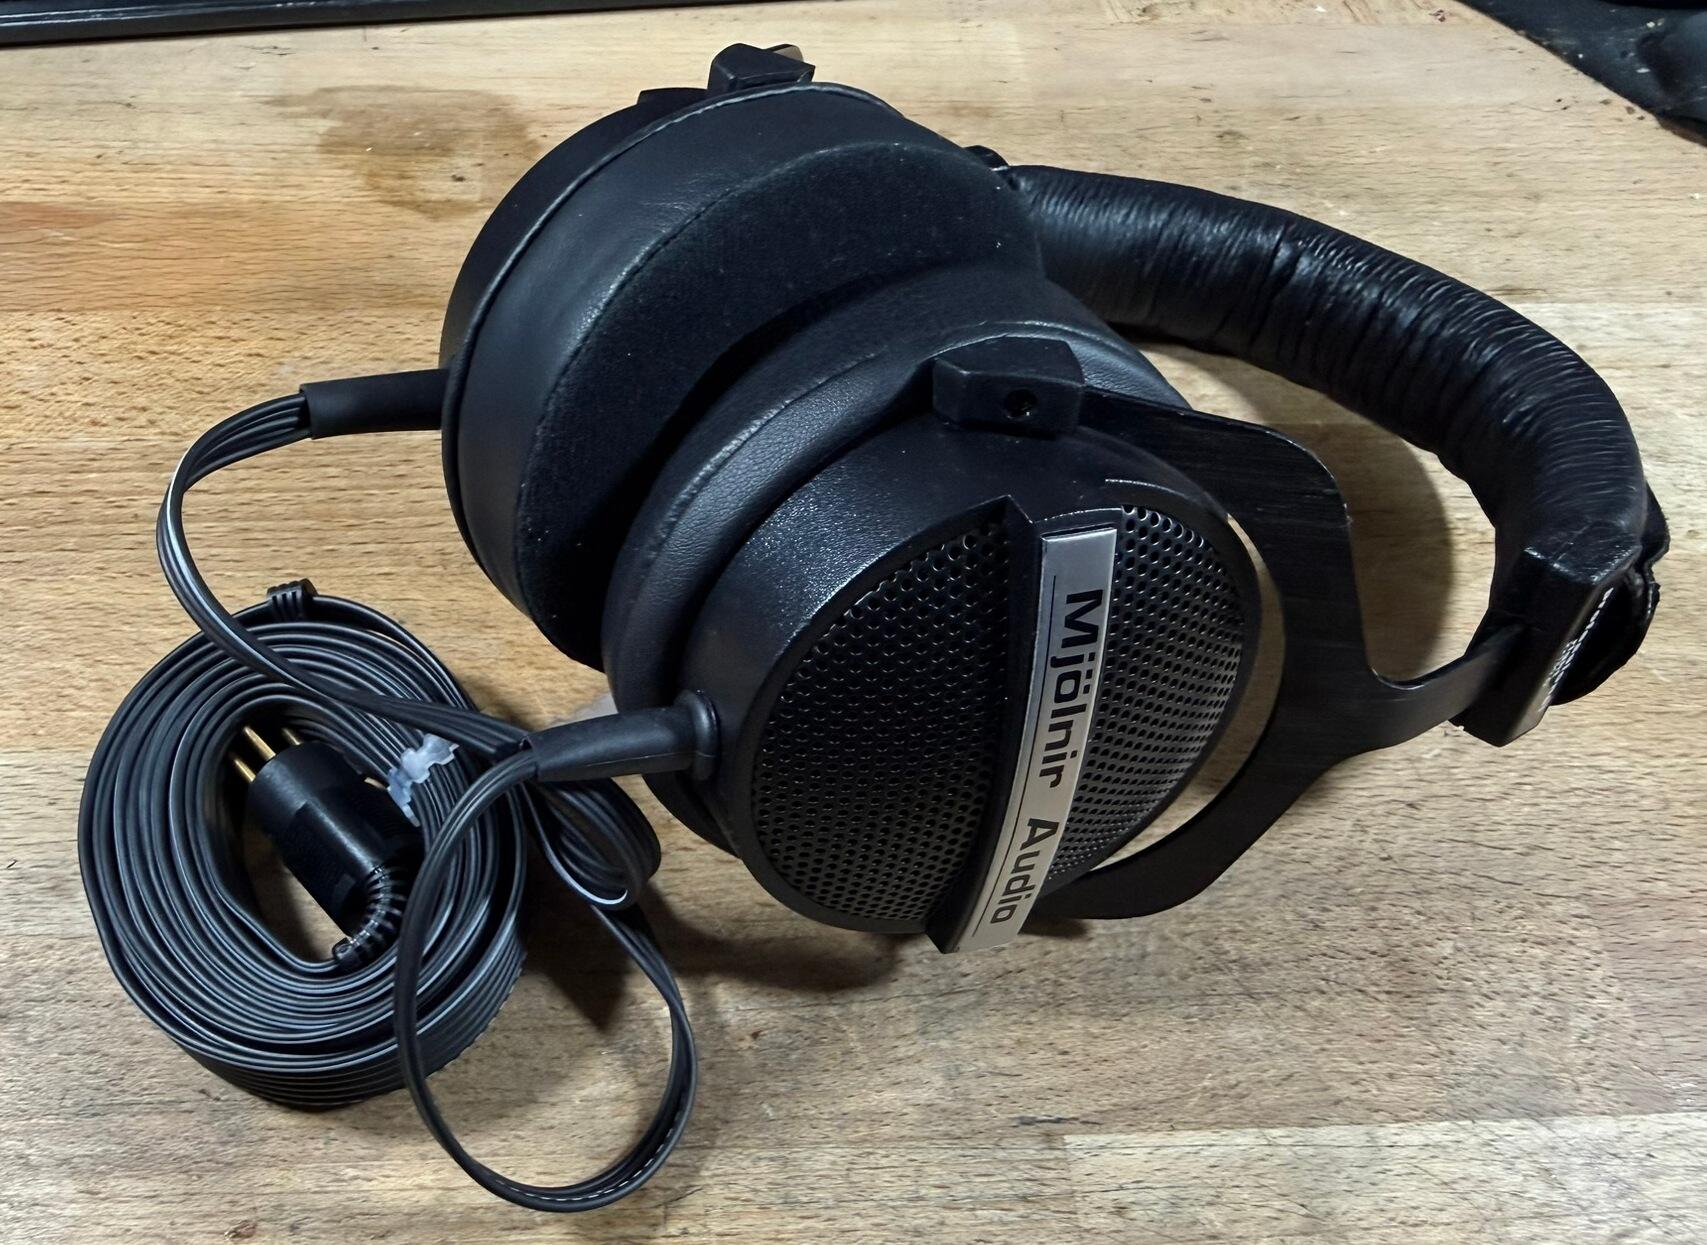
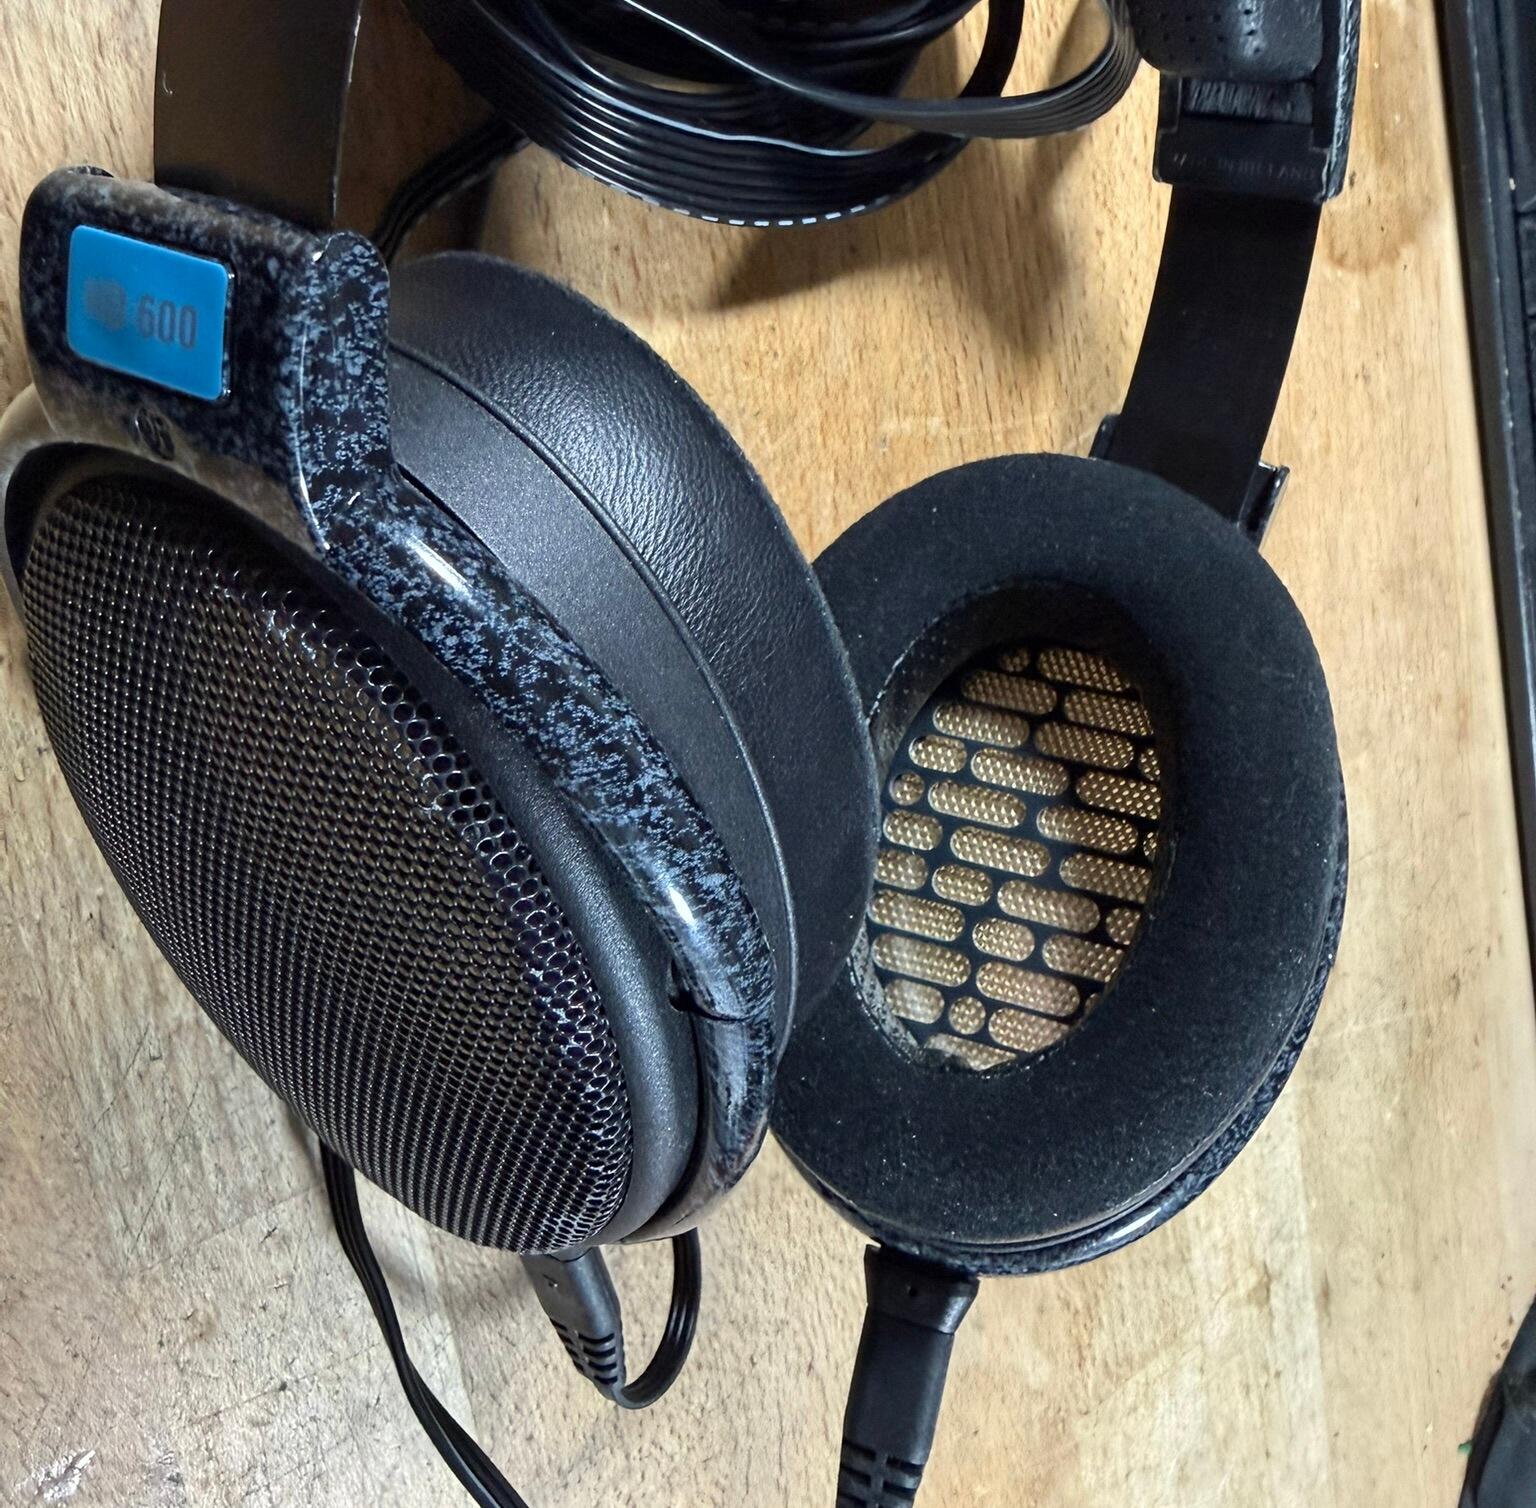
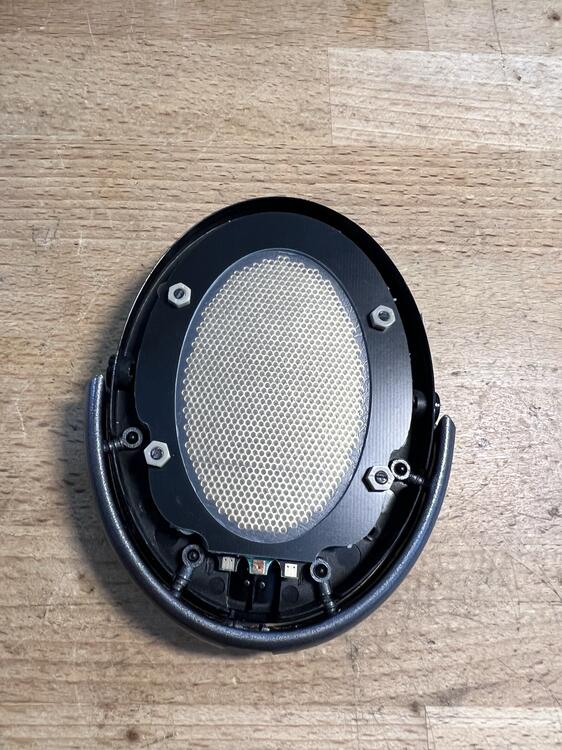 1 pointWe've been using Canon inkjet printers for quite awhile (had two). Our current one is a TR8500 something or other IIRC. I buy the ink off of Amazon (EZ Ink store there) and it has worked fine. I had used Epson prior to that but got tired of their print heads clogging and bricking the printer. Ink is $25 for a full load for our model (currently on sale for $16). EDIT: Our is a TR8520. Best Buy has a similar TR8620 now, here.1 pointOur printer is on its last legs. Subscribed...1 point1 point1 pointI'm using Comfort fabric softener and it works well. Whether it will hold up long term... that's a whole other matter1 point1 pointForgot to mention, my oldest son is turning 10 this month and we are throwing him a One Piece themed B-Day party... I'm going to run a One Piece themed game for him and 4-5 of his friends. SUPER NERVOUS! Ten year olds are harsh critics, lol. Also a little rusty, but I used to be quite good, so we'll see what I can come up with. EDIT: HA! You can double post here, excellent. Suck it Head-Fi!1 point1 pointThat's awesome. I've played in a few of the 'Role with Pride' games through TorontoDnD and they are usually better than the 'regular' games tbh. I usually play female characters, always have, and nobody says boo or expects my character to be a half naked pornstar in a chainmail bikini... its refreshing. Also, hey Steve!!! Missed you buddy. I still show off your woodwork with pride, though since covid, I have less people to show it to. I miss showing off my wood. 😕 EDIT: Oops, didn't realise I was resurrecting a 4 year old thread.1 pointI know they are canceled, but every now and again I still like to revisit the sheer lunacy of Die Antwoord. This was the anti- ritual circumcision PSA.1 point1 pointApropos: "Why does Grindr always crash when there is a Republican convention or big event in town? Anyone meet someone (edit: that is openly anti-lgbt in words and action) famous or well known on there? Or just someone who is a raging Maga or Republican but secretly loves to have gay sex?" https://www.reddit.com/r/lgbt/s/jkk5cutnzV1 point1 point1 pointI don't know that I find much honor in his memory, however I find honor in his daughter. I don't agree with many of her policy ideas, but she stood up to Trump when he trampled the constitution. One of the very few that did. I find that very honorable!1 point1 pointWhile being stuck home, recovering for the past two weeks, I finally got round to doing some more DIY electrostatic headphones. I wanted to try out some different materials, 2um mylar and Comfort fabric softener to do the resistive coating. I must say both worked well and if the Comfort stuff holds up long term, it is a damn good coating that costs pretty much nothing. First off my long standing test drivers in a Superlux HD330 housing... as I had some donor headphones in stock. I made a few of these but this set has the Stax wide PC-OCC cable and Dekoni Fostex hybrid pads. I've made so many of these drivers over the years that they are a good benchmark and they perform flawlessly. Charge up instantly, no charge migration or issue with humidity that I can detect. The drivers are also modular so easy to assemble and test: I didn't even spring for ENIG on these but yeah, super simple design that just slots into the Supelux housing. They are just a bit on the small side for my head and the partially closed housing has issues but it's a fun set to play with. Next up is a set of SR-5's that had severe imbalance. Time for a new set of diaphragms with the thicker spacers I made 10 years ago or. I simply replace the stock diaphragm and this converts them to Pro bias too. Throw on there an old Lambda cable which had a break at the cable entry and it's a great little set of headphones. I love the SR-X Mk3 drivers and they are fun to play with. It is a bit challenging to fit the thicker spacers into the normal bias housings as it can warp the drivers but not a big deal really. Then I put on some leather earpads from my stash and yeah, a great SR-5 Pro... something Stax really should have sold back in the day. While I was making the diapgragms for those SR-5's, I made a couple of more for a spare set of drivers which resulted in this: I'm always on the lookout for cheap open back headphones which can be "easily" turned into electrostatics. This is a Fiio JT1 which was less than 60$ shipped but is not ideal for the conversion as the baffle is not flat due to how the earpads are mounted. Still nothing a circular saw can't fix: I covered the stock holes with tape to seal the baffle and keep the glue out when I fitted the driver: The PU two part adhesive covers all the baffle vents and I put some tape on the earpad attachment points to just keep the glue out of them. Worked just fine and the seal is great No damping at the back and they are open enough. I fitted strain reliefs at the cable entry and plugs to seal off the top vents in the housing as well. This one has the stock earpads and the cable is the standard silicone 6 core stuff floating around with an aluminum cable splitter for the Y split and a prototype plug I was sent a while back. Pretty nice sounding set of headphones that don't cost a lot to make. Granted you need a SR-X Mk3 to donate the drivers and some custom spacers to make it work but I'd want to make something like this with custom drivers. It would be a great DIY project to release, buy this set of headphones, rip out its guts and make your own drivers from these PCB's. The cable is easy to source, so are the cable entry glands and a Stax plug can be 3D printed with basic XLR housings. Finally, a bit of a closure for me with what is probably the final version of the HD580/600/650 electrostatic conversion above. I was always battling baffle leaks on those as it is impossible to shave the stock baffle completely flat. I might try to laser cut a neoprene gasket or something like that but on this one I simply designed a new protection grill and glued that to the baffle. Not ideal but it works nicely. Then new stators and new spacers for the diaphragms and dust covers. The cable is the King Sound KS-H4 unit so it is removable. I just shaved down the socket a bit and glued it into the stock holes. The protection grill which is glued to the baffle. Earpads are the hybrid units Drop used to sell and then sheepskin headpad. New stators with full ENIG plating and purple solder mask because reasons. :) These do sound great if I dare say so myself, very much on par with the HE60 but with a fuller sound. Same spacing at 0.5mm so sensitivity is very close too to stock Senn units. Funny for me as the HD600 was my first ever high end set of headphones, so when I found this set with broken drivers it was an ideal candidate for conversion. Full circle and all that shit...


 1 point1 point0 points0 points


Important Information
By using this site, you agree to our Terms of Use.
Account
Navigation
Search
Configure browser push notifications
Chrome (Android)
- Tap the lock icon next to the address bar.
- Tap Permissions → Notifications.
- Adjust your preference.
Chrome (Desktop)
- Click the padlock icon in the address bar.
- Select Site settings.
- Find Notifications and adjust your preference.
Safari (iOS 16.4+)
- Ensure the site is installed via Add to Home Screen.
- Open Settings App → Notifications.
- Find your app name and adjust your preference.
Safari (macOS)
- Go to Safari → Preferences.
- Click the Websites tab.
- Select Notifications in the sidebar.
- Find this website and adjust your preference.
Edge (Android)
- Tap the lock icon next to the address bar.
- Tap Permissions.
- Find Notifications and adjust your preference.
Edge (Desktop)
- Click the padlock icon in the address bar.
- Click Permissions for this site.
- Find Notifications and adjust your preference.
Firefox (Android)
- Go to Settings → Site permissions.
- Tap Notifications.
- Find this site in the list and adjust your preference.
Firefox (Desktop)
- Open Firefox Settings.
- Search for Notifications.
- Find this site in the list and adjust your preference.