

Leaderboard


Popular Content
Showing content with the highest reputation on 06/05/15 in all areas
-
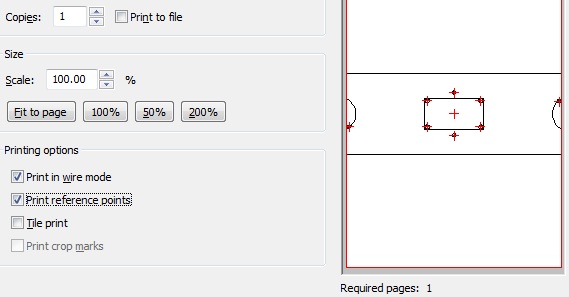
3 points2 points1 point1 pointdon't be too hard on you'reself I think you fit into society bull shit just fine1 point1 pointI regret not setting an over/under on number of posts Nutter would make before he self-immolated. It has been entertaining.1 point1 pointreally think that HIfi Nutter really needs to go and buy a liquid lightning and go over to changstar1 point1 pointThat's the thing, for $300 something, getting the resolve of an ortho, no glaring flaws, nice looking, easy to drive, neutral, while blocking out external noise (closed) more than meets my expectations for a work headphone. I didn't like the MSR much at all, personally. Now, if I wanted to lug an amp to work and didn't have to block out sound, the HD600 would be my choice as well.1 point1 point1 pointRick Astley will let you borrow any movie from his Pixar collection except one. He's never gonna give you Up!1 point1 pointBased on my experience, going for a HV over a lower end amp like the 717 will have better bass control and soundstage, but won't cause a fundamental change in the sound (probably most important with an SR007 Mk1). If you prefer an older Stax (which can be had for much less), then it is all the better for you.1 point1 pointyep i fixed it. one of the caps was not working because the ground was not hooked up. highly unlikely that anyone would know, but easy to fix. everyone with those boards should add the jumper. how I found it was I was working on adding more area to the heatsink on the surface mount board and saw that the pin was not connected. what I could do now is add some ground plane on the back of that board like I have done for the others. lower impedance ground means even less noise1 pointI've experimented a lot on drilling precisely located holes. This is a technique I've developed for myself and it's working for me. Drilled >20 cases already. 1. First make drawing in FPE software to the size of your panel/case. In the drawing use as narrow lines as possible for increased accuracy. 2. Print it with scale set to 100% (A4, A3, A2 or whatever your panel size is). This is very important to ensure that printer/plotter prints precise size according to drawing. Sometimes the printer outcome is different by fraction of mm/inch to what you expect. It will ruin accuracy. Measure the paper drawing with ruler ot caliper. If not perfect, either calibrate the printer or search for another one. It may take time to find a printer/plotter which prints precisely. Also, make sure you use the following settings as on screnshot attached (this is all about FPE software, other software setting may be different). Print in B/W mode, not color so that only one printer cartridge will be engaged for maximum accuracy). 3. Cut the outer shape (=panel shape) of the drawing with Xacto knife guided by metal ruler. 4. Stick it precisely to the panel by using glue (you will remove it later with solvent). Don't apply too thick layer of glue. As thin as possible. Wait for the glue to harden. 5. Now you proceed to drilling itself. Slightly punch reference points to be drilled on paper with carbide scriber. The scriber must protrude the pater and reach the metal to leave mark on it. This is very important to put the scriber exactly in the center of reference point (funny enough, it's harder than you can imagine). That's why I recommend to apply thin layer of glue and use thin paper for printing. Use good lighting and magnifying glass if necessary. I use this carbide scriber: http://www.amazon.com/gp/product/B00004T7S1?psc=1&redirect=true&ref_=od_aui_detailpages00 6. Punch paper (and panel underneath it) with automatic center punch. After you mark the center of the hole with carbide scriber (step #5), it's easy to punch it with center punch, it doesn't wander. I use this center punch: http://www.amazon.com/gp/product/B000HTAH70?psc=1&redirect=true&ref_=oh_aui_detailpage_o02_s00 Try to punch once only. Only if you see that it is offset, make second ot third strike to remedy. 7. Take good screw-driver drill, preferably cordless. Chuck must be good (tricky to find drill with chuck that doesn't stagger on the shaft). 8. Make starting cavity with drill bit for ceramic tile. It has totally different shape from usual drill, but it doesn't wander. I use this one: http://my-shop.ru/shop/products/1885540.html?partner=6414&gclid=CjwKEAjwkcWrBRDg5u6SuPS11C0SJAChLLAHXLrav1hkXKRHwcnHVHuU2tZX_i9WsiFiGHJPUOUJKxoCu9zw_wcB Mine has 4 cutting blades. 2 cutting blades (more common) will do the trick as well, I guess. Just make small cavity with it. Don't try to drill through, of course. Always apply oil at drilling. I use WD40. The cavity made by ceramic drill bit will ensure that the final drill bit will not wander. As you can notice, the whole process is about minimizing wandering of the bit. 8. Now you are prepared to drill the final hole. Don't try to use generic drill bit. Instead, use spotting drill. I use this one made by Europa Tool (if talking about 3mm hole, there are different sizes): http://www.ebay.co.uk/itm/3mm-HSS-Co8-90-DEGREE-NC-SPOTTING-SPOT-DRILL-EUROPA-OSBORN-8214020300-D25-/271833566150?pt=LH_DefaultDomain_3&hash=item3f4a8b0bc6 What's so special about spotting drill? First, it has very short fluted part. It means that it's sturdy and doesn't bend when you press the drill against the material. Believe me, drill bits under size of 5mm with large fluted part do bend when you press it down. Then, it has no side cutters. It means that it cuts material only with its tip. Side cutters tend to bite the material which make the bit wander sideways. Use oil at drilling and VERY low RPM (~1 revolution per second). For that screw-driver drill must be used, not usual drill. Screw-driver drill will maintain torque at low RPM. Spotting drill is not designed to drill trough thick material, but it's good enough to drill through 3-4mm. And yes, when drill panel up to 1.5mm thick, don't use drill bench. Better by hand (just control it that you hold the drill vertically). 9. You are done. Remove the paper and clean the panel. Deburring may be needed (I use Noga tools). This method is about drilling small holes (e.g. for screws, standoffs etc). For large holes (e.g. for Neutrik connectors), knock-out punch must be used (that is another story, and there are also some trick to share).
 1 point1 point1 pointWhy I did not catch that obvious fact before posting, I will never know. Thanks for reminding me that my vote means less than a politicians' word I give up trying to embed a vimeo link, so here it is below: Edit: Okay, fuck that! I tried all sorts of fancy syntax. All I had to to was post the URL? Son of the beech!1 point1 pointDidn't he pass 7 years ago? RIP, nevertheless. EDIT: Reminded me to re-watch one of my favorite commercials ever.1 point1 point1 pointI wasn't aware of a political party that wasn't cunt1 point


Important Information
By using this site, you agree to our Terms of Use.